OneFS Writable Snapshots Coexistence and Caveats

In the final article in this series, we’ll take a look at how writable snapshots co-exist in OneFS, and their integration and compatibility with the various OneFS data services.

Staring with OneFS itself, support for writable snaps is introduced in OneFS 9.3 and the functionality is enabled after committing an upgrade to OneFS 9.3. Non-disruptive upgrade to OneFS 9.3 and to later releases is fully supported. However, as we’ve seen over this series of articles, writable snaps in 9.3 do have several proclivities, caveats, and recommended practices. These include observing the default OneFS limit of 30 active writable snapshots per cluster (or at least not attempting to delete more than 30 writable snapshots at any one time if the max_active_wsnaps limit is increased for some reason).

There are also certain restrictions governing where a writable snapshot’s mount point can reside in the file system. These include not at an existing directory, below a source snapshot path, or under a SmartLock or SyncIQ domain. Also, while the contents of a writable snapshot will retain the permissions they had in the source, ensure the parent directory tree has appropriate access permissions for the users of the writable snapshot.

The OneFS job engine and restriping jobs also support writable snaps and, in general, most jobs can be run from inside a writable snapshot’s path. However, be aware that jobs involving tree-walks will not perform copy-on-read for LINs under writable snapshots.

The PermissionsRepair job is unable to fix the files under a writable snapshot which have yet to be copy-on-read. To prevent this, prior to starting a PermissionsRepair job, instance the `find` CLI command (which searches for files in directory hierarchy) can be run on the writable snapshot’s root directory in order to populate the writable snapshot’s namespace.

The TreeDelete job works for subdirectories under writable snapshot. TreeDelete, run on or above a writable snapshot, will not remove the root, or head, directory of the writable snapshot (unless scheduled through writable snapshot library).

The ChangeList, FileSystemAnalyze, and IndexUpdate jobs are unable to see files in a writable snapshot. As such , the FilePolicy job, which relies on index update, cannot manage files in writable snapshot.

Writable snapshots also work as expected with OneFS access zones. For example, a writable snaps can be created in a different access zone than its source snapshot:

# isi zone zones list

Name     Path

------------------------

System   /ifs

zone1    /ifs/data/zone1

zone2    /ifs/data/zone2

------------------------

Total: 2

# isi snapshot snapshots list

118224 s118224              /ifs/data/zone1

# isi snapshot writable create s118224 /ifs/data/zone2/wsnap1

# isi snapshot writable list

Path                   Src Path          Src Snapshot

------------------------------------------------------

/ifs/data/zone2/wsnap1 /ifs/data/zone1   s118224

------------------------------------------------------

Total: 1

Writable snaps are supported on any cluster architecture that’s running OneFS 9.3, and this includes clusters using data encryption with SED drives, which are also fully compatible with writable snaps. Similarly, InsightIQ and DataIQ both support and accurately report on writable snapshots, as expected.

Writable snaps are also compatible with SmartQuotas, and use directory quotas capacity reporting to track both physical and logical space utilization. This can be viewed using the `isi quota quotas list/view` CLI commands, in addition to ‘isi snapshots writable view’ command.

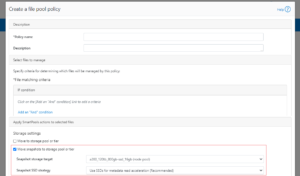
Regarding data tiering, writable snaps co-exist with SmartPools, and configuring SmartPools above writable snapshots is supported. However, in OneFS 9.3, SmartPools filepool tiering policies will not apply to a writable snapshot path. Instead, the writable snapshot data will follow the tiering policies which apply to the source of the writable snapshot. Also, SmartPools is frequently used to house snapshots on a lower performance, capacity optimized tier of storage. In this case, the performance of a writable snap that has its source snapshot housed on a slower pool will likely be negatively impacted. Also, be aware that CloudPools is incompatible with writable snaps in OneFS 9.3 and CloudPools on a writable snapshot destination is currently not supported.

On the data immutability front, a SmartLock WORM domain cannot be created at or above a writable snapshot under OneFS 9.3.  Attempts will fail with following messages:

# isi snapshot writable list

Path                  Src Path          Src Snapshot

-----------------------------------------------------

/ifs/test/rw-head     /ifs/test/head1   s159776

-----------------------------------------------------

Total: 1

# isi worm domain create -d forever /ifs/test/rw-head/worm

Are you sure? (yes/[no]): yes

Failed to enable SmartLock: Operation not supported

# isi worm domain create -d forever /ifs/test/rw-head/worm

Are you sure? (yes/[no]): yes

Failed to enable SmartLock: Operation not supported

Creating a writable snapshot inside a directory with a WORM domain is also not permitted.

# isi worm domains list

ID      Path           Type

---------------------------------

2228992 /ifs/test/worm enterprise

---------------------------------

Total: 1

# isi snapshot writable create s32106 /ifs/test/worm/wsnap

Writable Snapshot cannot be nested under WORM domain 22.0300: Operation not supported

Regarding writable snaps and data reduction and storage efficiency, the story in OneFS 9.3 is as follows.  OneFS in-line compression works with writable snapshots data, but in-line deduplication is not supported, and existing files under writable snapshots will be ignored by in-line dedupe. However, inline dedupe can occur on any new files created fresh on the writable snapshot.

Post-process deduplication of writable snapshot data is not supported and the SmartDedupe job will ignore the files under writable snapshots.

Similarly, at the per-file level, attempts to clone data within a writable snapshot (cp -c) are also not permitted and will fail with the following error:

# isi snapshot writable list

Path                  Src Path          Src Snapshot

-----------------------------------------------------

/ifs/wsnap1           /ifs/test1        s32106

-----------------------------------------------------

Total: 31

# cp -c /ifs/wsnap1/file1 /ifs/wsnap1/file1.clone

cp: file1.clone: cannot clone from 1:83e1:002b::HEAD to 2:705c:0053: Invalid argument

Additionally, in a small file packing archive workload the files under a writable snapshot will be ignored by the OneFS small file storage efficiency (SFSE) process, and there is also currently no support for data inode inlining within a writable snapshot domain.

Turning attention to data availability and protection, there are also some writable snapshot caveats in OneFS 9.3 to bear in mind. Regarding SnapshotIQ:

Writable snaps cannot be created from a source snapshot of the /ifs root directory. They also cannot currently be locked or changed to read-only. However, the read-only source snapshot will be locked for the entire life cycle of a writable snapshot.

Writable snaps cannot be refreshed from a newer read-only source snapshot. However, a new writable snapshot can be created from a more current source snapshot in order to include subsequent updates to the replicated production dataset. Taking a read-only snapshot of a writable snap is also not permitted and will fail with the following error message:

# isi snapshot snapshots create /ifs/wsnap2

snapshot create failed: Operation not supported

Writable snapshots cannot be nested in the namespace under other writable snapshots, and such operations will return ENOTSUP.

Only IFS domains-based snapshots are permitted as the source of a writable snapshot. This means that any snapshots taken on a cluster prior to OneFS 8.2 cannot be used as the source for a writable snapshot.

Snapshot aliases cannot be used as the source of a writable snapshot, even if using the alias target ID instead of the alias target name. The full name of the snapshot must be specified.

# isi snapshot snapshots view snapalias1

               ID: 134340

             Name: snapalias1

             Path: /ifs/test/rwsnap2

        Has Locks: Yes

         Schedule: -

  Alias Target ID: 106976

Alias Target Name: s106976

          Created: 2021-08-16T22:18:40

          Expires: -

             Size: 90.00k

     Shadow Bytes: 0.00

        % Reserve: 0.00%

     % Filesystem: 0.00%

            State: active

# isi snapshot writable create 134340 /ifs/testwsnap1

Source SnapID(134340) is an alias: Operation not supported

The creation of SnapRevert domain is not permitted at or above a writable snapshot. Similarly, the creation of a writable snapshot inside a directory with a SnapRevert domain is not supported. Such operations will return ENOTSUP.

Finally, the SnapshotDelete job has no interaction with writable snapss and the TreeDelete job handles writable snapshot deletion instead.

Regarding NDMP backups, since NDMP uses read-only snapshots for checkpointing it is unable to backup writable snapshot data in OneFS 9.3.

Moving on to replication, SyncIQ is unable to copy or replicate the data within a writable snapshot in OneFS 9.3. More specifically:

Replication Condition Description
Writable snapshot as SyncIQ source Replication fails because snapshot creation on the source writable snapshot is not permitted.
Writable snapshot as SyncIQ target Replication job fails as snapshot creation on the target writable snapshot is not supported.
Writable snapshot one or more levels below in SyncIQ source Data under a writable snapshot will not get replicated to the target cluster. However, the rest of the source will get replicated as expected
Writable snapshot one or more levels below in SyncIQ target If the state of a writable snapshot is ACTIVE, the writable snapshot root directory will not get deleted from the target, so replication will fail.

Attempts to replicate the files within a writable snapshot with fail with the following SyncIQ job error:

“SyncIQ failed to take a snapshot on source cluster. Snapshot initialization error: snapshot create failed. Operation not supported.”

Since SyncIQ does not allow its snapshots to be locked, OneFS cannot create writable snapshots based on SyncIQ-generated snapshots. This includes all read-only snapshots with a ‘SIQ-*’ naming prefix. Any attempts to use snapshots with an SIQ* prefix will fail with the following error:

# isi snapshot writable create SIQ-4b9c0e85e99e4bcfbcf2cf30a3381117-latest /ifs/rwsnap

Source SnapID(62356) is a SyncIQ related snapshot: Invalid argument

A common use case for writable snapshots is in disaster recovery testing. For DR purposes, an enterprise typically has two PowerScale clusters configured in a source/target SyncIQ replication relationship. Many organizations have a requirement to conduct periodic DR tests to verify the functionality of their processes and tools in the event of a business continuity interruption or disaster recovery event.
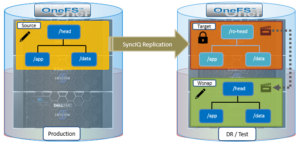
Given the writable snapshots compatibility with SyncIQ caveats described above, a writable snapshot of a production dataset replicated to a target DR cluster can be created as follows:

  1. On the source cluster, create a SyncIQ policy to replicate the source directory (/ifs/test/head) to the target cluster:
# isi sync policies create --name=ro-head sync --source-rootpath=/ifs/prod/head --target-host=10.224.127.5 --targetpath=/ifs/test/ro-head

# isi sync policies list

Name  Path              Action  Enabled  Target

---------------------------------------------------

ro-head /ifs/prod/head  sync    Yes      10.224.127.5

---------------------------------------------------

Total: 1
  1. Run the SyncIQ policy to replicate the source directory to /ifs/test/ro-head on the target cluster:
# isi sync jobs start ro-head --source-snapshot s14


# isi sync jobs list

Policy Name  ID   State   Action  Duration

-------------------------------------------

ro-head        1    running run     22s

-------------------------------------------

Total: 1


# isi sync jobs view ro-head

Policy Name: ro-head

         ID: 1

      State: running

     Action: run

   Duration: 47s

 Start Time: 2021-06-22T20:30:53


Target:
  1. Take a read-only snapshot of the replicated dataset on the target cluster:
# isi snapshot snapshots create /ifs/test/ro-head

# isi snapshot snapshots list

ID   Name                                        Path

-----------------------------------------------------------------

2    SIQ_HAL_ro-head_2021-07-22_20-23-initial /ifs/test/ro-head

3    SIQ_HAL_ro-head                          /ifs/test/ro-head

5    SIQ_HAL_ro-head_2021-07-22_20-25         /ifs/test/ro-head

8    SIQ-Failover-ro-head-2021-07-22_20-26-17 /ifs/test/ro-head

9    s106976                                   /ifs/test/ro-head

-----------------------------------------------------------------
  1. Using the (non SIQ_*) snapshot of the replicated dataset above as the source, create a writable snapshot on the target cluster at /ifs/test/head:
# isi snapshot writable create s106976 /ifs/test/head
  1. Confirm the writable snapshot has been created on the target cluster:
# isi snapshot writable list

Path              Src Path         Src Snapshot

----------------------------------------------------------------------

/ifs/test/head  /ifs/test/ro-head  s106976

----------------------------------------------------------------------

Total: 1


# du -sh /ifs/test/ro-head

 21M    /ifs/test/ro-head
  1. Export and/or share the writable snapshot data under /ifs/test/head on the target cluster using the protocol(s) of choice. Mount the export or share on the client systems and perform DR testing and verification as appropriate.
  2. When DR testing is complete, delete the writable snapshot on the target cluster:
# isi snapshot writable delete /ifs/test/head

Note that writable snapshots cannot be refreshed from a newer read-only source snapshot. A new writable snapshot would need to be created using the newer snapshot source in order to reflect and subsequent updates to the production dataset on the target cluster.

So there you have it: The introduction of writable snaps v1 in OneFS 9.3 delivers the much anticipated ability to create fast, simple, efficient copies of datasets by enabling a writable view of a regular snapshot, presented at a target directory, and accessible by clients across the full range of supported NAS protocols.
OneFS Writable Snapshots Management, Monitoring and Performance

When it comes to the monitoring and management of OneFS writable snaps, the ‘isi writable snapshots’ CLI syntax looks and feels similar to regular, read-only snapshots utilities. The currently available writable snapshots on a cluster can be easily viewed from the CLI with the ‘isi snapshot writable list’ command. For example:

# isi snapshot writable list

Path              Src Path        Src Snapshot

----------------------------------------------

/ifs/test/wsnap1  /ifs/test/prod  prod1

/ifs/test/wsnap2  /ifs/test/snap2 s73736

----------------------------------------------

The properties of a particular writable snap, including both its logical and physical size, can be viewed using the ‘isi snapshot writable view’ CLI command:

# isi snapshot writable view /ifs/test/wsnap1

         Path: /ifs/test/wsnap1

     Src Path: /ifs/test/prod

 Src Snapshot: s73735

      Created: 2021-06-11T19:10:25

 Logical Size: 100.00

Physical Size: 32.00k

        State: active

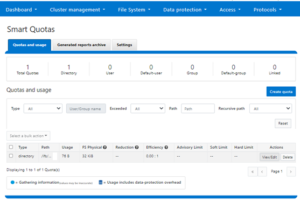
The capacity resource accounting layer for writable snapshots is provided by OneFS SmartQuotas. Physical, logical, and application logical space usage is retrieved from a directory quota on the writable snapshot’s root and displayed via the CLI as follows:

# isi quota quotas list

Type      AppliesTo  Path             Snap  Hard  Soft  Adv  Used  Reduction  Efficiency

-----------------------------------------------------------------------------------------

directory DEFAULT    /ifs/test/wsnap1 No    -     -     -    76.00 -          0.00 : 1

-----------------------------------------------------------------------------------------

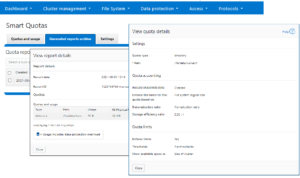
Or from the OneFS WebUI by navigating to File system > SmartQuotas > Quotas and usage:

For more detail, the ‘isi quota quotas view’ CLI command provides a thorough appraisal of a writable snapshot’s directory quota domain, including physical, logical, and storage efficiency metrics plus a file count. For example:

# isi quota quotas view /ifs/test/wsnap1 directory

                        Path: /ifs/test/wsnap1

                        Type: directory

                   Snapshots: No

                    Enforced: Yes

                   Container: No

                      Linked: No

                       Usage

                           Files: 10

         Physical(With Overhead): 32.00k

        FSPhysical(Deduplicated): 32.00k

         FSLogical(W/O Overhead): 76.00

        AppLogical(ApparentSize): 0.00

                   ShadowLogical: -

                    PhysicalData: 0.00

                      Protection: 0.00

     Reduction(Logical/Data): None : 1

Efficiency(Logical/Physical): 0.00 : 1

                        Over: -

               Thresholds On: fslogicalsize

              ReadyToEnforce: Yes

                  Thresholds

                   Hard Threshold: -

                    Hard Exceeded: No

               Hard Last Exceeded: -

                         Advisory: -

    Advisory Threshold Percentage: -

                Advisory Exceeded: No

           Advisory Last Exceeded: -

                   Soft Threshold: -

        Soft Threshold Percentage: -

                    Soft Exceeded: No

               Soft Last Exceeded: -

                       Soft Grace: -

This information is also available from the OneFS WebUI by navigating to File system > SmartQuotas > Generated reports archive > View report details:

Additionally, the ‘isi get’ CLI command can be used to inspect the efficiency of individual writable snapshot files. First, run the following command syntax on the chosen file in the source snapshot path (in this case /ifs/test/source).

In the example below, the source file, /ifs//test/prod/testfile1, is reported as 147 MB in size and occupying 18019 physical blocks:

# isi get -D /ifs/test/prod/testfile1.zip

POLICY   W   LEVEL PERFORMANCE COAL  ENCODING      FILE              IADDRS

default      16+2/2 concurrency on    UTF-8         testfile1.txt        <1,9,92028928:8192>

*************************************************

* IFS inode: [ 1,9,1054720:512 ]

*************************************************

*

*  Inode Version:      8

*  Dir Version:        2

*  Inode Revision:     145

*  Inode Mirror Count: 1

*  Recovered Flag:     0

*  Restripe State:     0

*  Link Count:         1

*  Size:               147451414

*  Mode:               0100700

*  Flags:              0x110000e0

*  SmartLinked:        False

*  Physical Blocks:    18019

However, when running the ‘isi get’ CLI command on the same file within the writable snapshot tree (/ifs/test/wsnap1/testfile1), the writable, space-efficient copy now only consumes 5 physical blocks, as compared with 18019 blocks in the original file:

# isi get -D /ifs/test/wsnap1/testfile1.zip

POLICY   W   LEVEL PERFORMANCE COAL  ENCODING      FILE              IADDRS

default      16+2/2 concurrency on    UTF-8         testfile1.txt        <1,9,92028928:8192>

*************************************************

* IFS inode: [ 1,9,1054720:512 ]

*************************************************

*

*  Inode Version:      8

*  Dir Version:        2

*  Inode Revision:     145

*  Inode Mirror Count: 1

*  Recovered Flag:     0

*  Restripe State:     0

*  Link Count:         1

*  Size:               147451414

*  Mode:               0100700

*  Flags:              0x110000e0

*  SmartLinked:        False

*  Physical Blocks:    5

 Writable snaps use the OneFS policy domain manager, or PDM, for domain membership checking and verification. For each writable snap, a ‘WSnap’ domain is created on the target directory. The ‘isi_pdm’ CLI utility can be used to report on the writable snapshot domain for a particular directory.

# isi_pdm -v domains list --patron Wsnap /ifs/test/wsnap1

Domain          Patron          Path

b.0700          WSnap           /ifs/test/wsnap1

Additional details of the backing domain can also be displayed with the following CLI syntax:

# isi_pdm -v domains read b.0700

('b.0700',):

{ version=1 state=ACTIVE ro store=(type=RO SNAPSHOT, ros_snapid=650, ros_root=5:23ec:0011)ros_lockid=1) }

Domain association does have some ramifications for writable snapshots in OneFS 9.3 and there are a couple of notable caveats. For example, files within the writable snapshot domain cannot be renamed outside of the writable snap to allow the file system to track files in a simple manner.

# mv /ifs/test/wsnap1/file1 /ifs/test

mv: rename file1 to /ifs/test/file1: Operation not permitted

 Also, the nesting of writable snaps is not permitted in OneFS 9.3, and an attempt to create a writable snapshot on a subdirectory under an existing writable snapshot will fail with the following CLI command warning output:

# isi snapshot writable create prod1 /ifs/test/wsnap1/wsnap1-2

Writable snapshot:/ifs/test/wsnap1 nested below another writable snapshot: Operation not supported

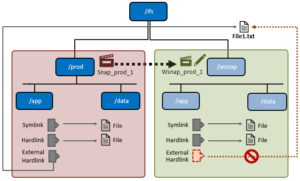
When a writable snap is created, any existing hard links and symbolic links (symlinks) that reference files within the snapshot’s namespace will continue to work as expected. However, existing hard links with a file external to the snapshot’s domain will disappear from the writable snap, including the link count.

Link Type Supported Details
Existing external hard link No Old external hard links will fail.
Existing internal hard link Yes Existing hard links within the snapshot domain will work as expected.
External hard link No New external hard links will fail.
New internal hard link Yes Existing hard links will work as expected.
External symbolic link Yes External symbolic links will work as expected.
Internal symbolic link Yes Internal symbolic links will work as expected.

Be aware that any attempt to create a hard link to another file outside of the writable snapshot boundary will fail.

# ln /ifs/test/file1 /ifs/test/wsnap1/file1

ln: /ifs/test/wsnap1/file1: Operation not permitted

However, symbolic links will work as expected. OneFS hard link and symlink actions and expectations with writable snaps are as follows:

Writable snaps do not have a specific license, and their use is governed by the OneFS SnapshotIQ data service. As such, in addition to a general OneFS license, SnapshotIQ must be licensed across all the nodes in order to use writable snaps on a OneFS 9.3 PowerScale cluster. Additionally, the ‘ISI_PRIV_SNAPSHOT’ role-based administration privilege is required on any cluster administration account that will create and manage writable snapshots. For example:

# isi auth roles view SystemAdmin | grep -i snap

             ID: ISI_PRIV_SNAPSHOT

In general, writable snapshot file access is marginally less performant compared to the source, or head, files, since an additional level of indirection is required to access the data blocks. This is particularly true for older source snapshots, where a lengthy read-chain can require considerable ‘ditto’ block resolution. This occurs when parts a file no longer resides in the source snapshot, and the block tree of the inode on the snapshot does not point to a real data block. Instead it has a flag marking it as a ‘ditto block’. A Ditto-block indicates that the data is the same as the next newer version of the file, so OneFS automatically looks ahead to find the more recent version of the block. If there are large numbers (such as hundreds or thousands) of snapshots of the same unchanged file, reading from the oldest snapshot can have a considerable impact on latency.

Performance Attribute Details
Large Directories Since a writable snap performs a copy-on-read to populate file metadata on first access, the initial access of a large directory (containing millions of files, for example) that tries to enumerate its contents will be relatively slow because the writable snapshot has to iteratively populate the metadata. This is applicable to namespace discovery operations such as ‘find’ and ‘ls’, unlinks and renames, plus other operations working on large directories. However, any subsequent access of the directory or its contents will be fast since file metadata will already be present and there will be no copy-on-read overhead.

The unlink_copy_batch & readdir_copy_batch parameters under the sysctl ‘efs.wsnap’ control of the size of batch metadata copy operations. These parameters can be helpful for tuning the number of iterative metadata copy-on-reads for datasets containing large directories. However, these sysctls should only be modified under the direct supervision of Dell technical support.

Writable snapshot metadata read/write Initial read and write operations will perform a copy-on-read and will therefore be marginally slower compared to the head. However, once the copy-on-read has been performed for the LINs, the performance of read/write operations will be nearly equivalent to head.
Writable snapshot data read/write In general, writable snapshot data reads and writes will be slightly slower compared to head.
Multiple writable snapshots of single source The performance of each subsequent writable snap created from the same source read-only snapshot will be the same as that of the first, up to the OneFS 9.3 default recommended limit of a total of 30 writable snapshots. This is governed by the ‘max_active_wsnpas’ sysctl.

# sysctl efs.wsnap.max_active_wsnaps

efs.wsnap.max_active_wsnaps: 30

While the ‘max_active_wsnaps’ sysctl can be configured up to a maximum of 2048 writable snapshots per cluster, changing this sysctl from its default value of 30 is strongly discouraged in OneFS 9.3.


Writable snapshots and SmartPools tiering Since unmodified file data in a writable snap is read directly from the source snapshot, if the source is stored on a lower performance tier than the writable snapshot’s directory structure this will negatively impact the writable snapshot’s latency.
Storage Impact The storage capacity consumption of a writable snapshot is proportional to the number of writes, truncate, or similar operations it receives, since only the changed blocks relative to its source snapshot are stored. The metadata overhead will grow linearly as a result of copy-on-reads with each new writable snapshots that is created and accessed.
Snapshot Deletes Writable snapshot deletes are de-staged and performed out of band by the TreeDelete job. As such, the performance impact should be minimal, although the actual delete of the data is not instantaneous. Additionally, the TreeDelete job has a path to avoid copy-on-writing any files within a writable snap that have yet to been enumerated.

Be aware that, since writable snaps are highly space efficient, the savings are strictly in terms of file data. This means that metadata will be consumed in full for each file and directory in a snapshot. So, for large sizes and quantities of writable snapshots, inode consumption should be considered, especially for metadata read and metadata write SSD strategies.

In the next and final article in this series, we’ll examine writable snapshots in the context of the other OneFS data services.

OneFS Writable Snapshots

OneFS 9.3 introduces writable snapshots to the PowerScale data services portfolio, enabling the creation and management of space and time efficient, modifiable copies of regular OneFS snapshots, at a directory path within the /ifs namespace, and which can be accessed and edited via any of the cluster’s file and object protocols, including NFS, SMB, and S3.

The primary focus of writable snaps in 9.3 is disaster recovery testing, where they can be used to quickly clone production datasets, allowing DR procedures to be routinely tested on identical, thin copies of production data. This is of considerable benefit to the growing number of enterprises that are using Isolate & Test, or Bubble networks, where DR testing is conducted inside a replicated environment that closely mimics production.

Other writable snapshot use cases can include parallel processing workloads that span a server fleet, which can be configured to use multiple writable snaps of a single production data set, to accelerate time to outcomes and results. And writable snaps can also be used to build and deploy templates for near-identical environments, enabling highly predictable and scalable dev and test pipelines.

The OneFS writable snapshot architecture provides an overlay to a read-only source snapshot, allowing a cluster administrator to create a lightweight copy of a production dataset using a simple CLI command, and present and use it as a separate writable namespace.

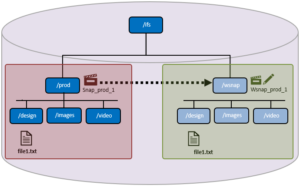
In this scenario, a SnapshotIQ snapshot (snap_prod_1) is taken of the /ifs/prod directory. The read-only ‘snap_prod_1’ snapshot is then used as the backing for a writable snapshot created at /ifs/wsnap. This writable snapshot contains the same subdirectory and file structure as the original ‘prod’ directory, just without the added data capacity footprint.

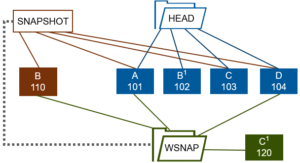
Internally, OneFS 9.3 introduces a new protection group data structure, ‘PG_WSNAP’, which provides an overlay that allows unmodified file data to be read directly from the source snapshot, while storing only the changes in the writable snapshot tree.

In this example, a file (Head) comprises four data blocks, A through D. A read-only snapshot is taken of the directory containing the Head file. This file is then modified through a copy-on-write operation. As a result, the new Head data, B1, is written to block 102, and the original data block ‘B’ is copied to a new physical block (110). The snapshot pointer now references block 110 and the new location for the original data ‘B’, so the snapshot has its own copy of that block.

Next, a writable snapshot is created using the read-only snapshot as its source. This writable snapshot is then modified, so its updated version of block C is stored in its own protection group (PG_WSNAP). A client then issues a read request for the writable snapshot version of the file. This read request is directed, through the read-only snapshot, to the Head versions of blocks A and D, the read-only snapshot version for block B and the writable snapshot file’s own version of block C (C1 in block 120).

OneFS directory quotas provide the writable snapshots accounting and reporting infrastructure, allowing users to easily view the space utilization of a writable snapshot. Additionally, IFS domains are also used to bound and manage writable snapshot membership. In OneFS, a domain defines a set of behaviors for a collection of files under a specified directory tree. If a directory has a protection domain applied to it, that domain will also affect all of the files and subdirectories under that top-level directory.

When files within a newly created writable snapshot are first accessed, data is read from the source snapshot, populating the files’ metadata, in a process known as copy-on-read (CoR). Unmodified data is read from the source snapshot and any changes are stored in the writable snapshot’s namespace data structure (PG_WSNAP).

Since a new writable snapshot is not copy-on-read up front, its creation is extremely rapid. As files are subsequently accessed, they are enumerated and begin to consume metadata space.

On accessing a writable snapshot file for the first time, a read is triggered from the source snapshot and the file’s data is accessed directly from the read-only snapshot. At this point, the MD5 checksums for both the source file and writable snapshot file are identical. If, for example, the first block of file is overwritten, just that single block is written to the writable snapshot, and the remaining unmodified blocks are still read from the source snapshot. At this point, the source and writable snapshot files are now different, so their MD5 checksums will also differ.

Before writable snapshots can be created and managed on a cluster, the following prerequisites must be met:

  • The cluster is running OneFS 9.3 or later with the upgrade committed.
  • SnapshotIQ is licensed across the cluster.

Note that for replication environments using writable snapshots and SyncIQ, all target clusters must be running OneFS 9.3 or later, have SnapshotIQ licensed, and provide sufficient capacity for the full replicated dataset.

By default, up to thirty active writable snapshots can be created and managed on a cluster from either the OneFS command-line interface (CLI) or RESTful platform API.

On creation of a new writable snap, all files contained in the snapshot source, or HEAD, directory tree are instantly available for both reading and writing in the target namespace.

Once no longer required, a writable snapshot can be easily deleted by CLI. Be aware that WebUI configuration of writable snapshots is not available as of OneFS 9.3. That said, a writable snapshot can easily be created from the CLI as follows:

The source snapshot (src-snap) is an existing read-only snapshot (prod1), and the destination path (dst-path) is a new directory within the /ifs namespace (/ifs/test wsnap1). A read-only source snapshot can be generated as follows:

# isi snapshot snapshots create prod1 /ifs/test/prod

# isi snapshot snapshots list

ID     Name                             Path

-------------------------------------------------------

7142   prod1                     /ifs/test/prod

Next, the following command creates a writable snapshot in an ‘active’ state.

# isi snapshot writable create prod1 /ifs/test/wsnap1

# isi snapshot snapshots delete -f prod1

Snapshot "prod1" can't be deleted because it is locked

While the OneFS CLI is not explicitly prevented from unlocking a writable snapshot’s lock on the backing snapshot, it does provide a clear warning.

# isi snap lock view prod1 1

     ID: 1

Comment: Locked/Unlocked by Writable Snapshot(s), do not force delete lock.           

Expires: 2106-02-07T06:28:15

  Count: 1

# isi snap lock delete prod1 1

Are you sure you want to delete snapshot lock 1 from s13590? (yes/[no]):

Be aware that a writable snapshot cannot be created on an existing directory. A new directory path must be specified in the CLI syntax, otherwise the command will fail with the following error:

# isi snapshot writable create prod1 /ifs/test/wsnap1

mkdir /ifs/test/wsnap1 failed: File exists

Similarly, if an unsupported path is specified, the following error will be returned:

# isi snapshot writable create prod1 /isf/test/wsnap2

Error in field(s): dst_path

Field: dst_path has error: The value: /isf/test/wsnap2 does not match the regular expression: ^/ifs$|^/ifs/ Input validation failed.

A writable snapshot also cannot be created from a source snapshot of the /ifs root directory, and will fail with the following error:

# isi snapshot writable create s1476 /ifs/test/ifs-wsnap

Cannot create writable snapshot from a /ifs snapshot: Operation not supported

Be aware that OneFS 9.3 does not currently provide support for scheduled or automated writable snapshot creation.

When it comes to deleting a writable snapshot, OneFS uses the job engine’s TreeDelete job under the hood to unlink all the contents. As such, running the ‘isi snapshots writable delete’ CLI command automatically queues a TreeDelete instance, which the job engine executes asynchronously in order to remove and clean up a writable snapshot’s namespace and contents. However, be aware that the TreeDelete job execution, and hence the data deletion, is not instantaneous. Instead, the writable snapshot’s directories and files are moved under a temporary ‘*.deleted’ directory. For example:

# isi snapshot writable create prod1 /ifs/test/wsnap2

# isi snap writable delete /ifs/test/wsnap2

Are you sure? (yes/[no]): yes

# ls /ifs/test

prod                            wsnap2.51dc245eb.deleted

wsnap1

Next, this temporary directory is removed in a non-synchronous operation. If the TreeDelete job fails for some reason, the writable snapshot can be deleted using its renamed path. For example:

# isi snap writable delete /ifs/test/wsnap2.51dc245eb.deleted

Deleting a writable snap removes the lock on the backing read-only snapshot so it can also then be deleted, if required, provided there are no other active writable snapshots based off that read-only snapshot.

The deletion of writable snapshots in OneFS 9.3 is also a strictly manual process. There is currently no provision for automated, policy-driven control such as the ability to set a writable snapshot expiry date, or a bulk snapshot deletion mechanism.

The recommended practice is to quiesce any client sessions to a writable snapshot prior to its deletion. Since the backing snapshot can no longer be trusted once its lock is removed during the deletion process, any ongoing IO may experience errors as the writable snapshot is removed.

In the next article in this series, we’ll take a look at writable snapshots monitoring and performance.

OneFS Replication Bandwidth Management

When it comes to managing replication bandwidth in OneFS, SyncIQ allows cluster admins to configure reservations on a per-policy basis, thereby permitting fine-grained bandwidth control.

SyncIQ attempts to satisfy these reservation requirements based on what is already running and on the existing bandwidth rules and schedules. If a policy doesn’t have a specified reservation, its bandwidth is allocated from the reserve specified in the global configuration. If there is insufficient bandwidth available, SyncIQ will evenly divide the resources across all running policies until they reach the requested reservation. The salient goal here is to prevent starvation of policies.

Under the hood, each PowerScale node has a SyncIQ scheduler process running, which is responsible for launching replication jobs, creating the initial job directory, and updating jobs in response to any configuration changes. The scheduler also launches a coordinator process, which manages bandwidth throttling, in addition to overseeing the replication worker processes, snapshot management, report generation, target monitoring, and work allocation.

Component Process Description
Scheduler isi_migr_sched The SyncIQ scheduler processes (isi_migr_sched) are responsible for the initialization of data replication jobs. The scheduler processes monitor the SyncIQ configuration and source record files for updates and reloads them whenever changes are detected in order to determine if and when a new job should be started. In addition, once a job has started, one of the schedulers will create a coordinator process (isi_migrate) responsible for the creation and management of the worker processes that handle the actual data replication aspect of the job.

The scheduler processes also creates the initial job directory when a new job starts. In addition, they are responsible for monitoring the coordinator process and restarting it if the coordinator crashes or becomes unresponsive during a job. The scheduler processes are limited to one per node.

Coordinator isi_migrate The coordinator process (isi_migrate) is responsible for the creation and management of worker processes during a data replication job. In addition, the coordinator is responsible for:

Snapshot management:  Takes the file system snapshots used by SyncIQ, keeps them locked while in use, and deletes them once they are no longer needed.

Writing reports:  Aggregates the job data reported from the workers and writes it to

/ifs/.ifsvar/modules/tsm/sched/reports/

Bandwidth throttling

Managing target monitor (tmonitor) process
Connects to the tmonitor process, a secondary worker process on the target, which helps manage worker processes on the target side.

Bandwidth Throttler isi_migr_bandwidth The bandwidth host (isi_migr_bandwidth) provides rationing information to the coordinator in order to regulate the job’s bandwidth usage.
Pworker isi_migr_pworker Primary worker processes on the source cluster, responsible for handling and transferring cluster data while a replication job runs.
Sworker isi_migr_sworker Secondary worker processes on the target cluster, responsible for handling and transferring cluster data while a replication job runs.
Tmonitor The coordinator process contacts the sworker daemon on the target cluster, which then forks off a new process to become the tmonitor. The tmonitor process acts as a target-side coordinator, providing a list of target node IP addresses to the coordinator, communicating target cluster changes (such as the loss or addition of a node), and taking target-side snapshots when necessary. Unlike a normal sworker process, the tmonitor process does not directly participate in any data transfer duties during a job.

These running processes can be viewed from the CLI as follows:

# ps -auxw | grep -i migr

root     493    0.0  0.0  62764  39604  -  Ss   Mon06        0:01.25 /usr/bin/isi_migr_pworker

root     496    0.0  0.0  63204  40080  -  Ss   Mon06        0:03.99 /usr/bin/isi_migr_sworker

root     499    0.0  0.0  39612  22148  -  Is   Mon06        2:41.30 /usr/bin/isi_migr_sched

root     523    0.0  0.0  44692  26396  -  Ss   Mon06        0:24.47 /usr/bin/isi_migr_bandwidth

root   49726    0.0  0.0  63944  41224  -  D    Thu06        0:42.04 isi_migr_sworker: onefs1.zone1-zone2 (isi_migr_sworker)

root   49801    0.0  0.0  63564  40992  -  S    Thu06        1:21.84 isi_migr_pworker: zone1-zone2 (isi_migr_pworker)

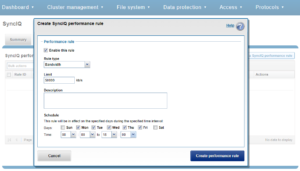
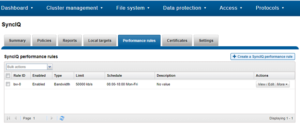
Global Bandwidth Reservation can be configured from the OneFS WebUI by browsing to Data Protection > SyncIQ > Performance Rules, or from CLI using the ‘isi sync rules’ command. Bandwidth limits are typically configured and associated with a schedule, creating a limit for the sum of all policies and applying a schedule. For example:

The newly created rule is displayed as follows:

Global bandwidth is applied as a combined limit of policies, allowing for a reservation configuration per policy. The recommended practice is to set a bandwidth reservation for each policy.

Per-policy bandwidth reservation can be configured via the OneFS CLI as follows:

  • Configure one or more bandwidth rules:
# isi sync rules
  • For each policy, configure desired bandwidth amount to reserve:
# isi sync policy <create | modify> --bandwidth-reservation=#
  • Optionally, specify global configuration defaults:
# isi sync settings modify --bandwidth-reservation-reserve-percentage=#

# isi sync settings modify --bandwidth-reservation-reserve-absolute=#

# isi sync settings modify --clear-bandwidth-reservation-reserve

These settings relate to how much bandwidth should be allocated to policies that do not have a reservation

By default, there is a 1% percentage reserve. Bandwidth calculations are based on the bandwidth rule that is set, not on actual network conditions. If a policy does not have a specified reservation, resources are allocated from the reserve defined in the global configuration settings.

If there is insufficient bandwidth available for all policies to get their requested amounts, the bandwidth is evenly split across all running policies until they reach their requested reservation. This effectively ensures that the policies with the lowest requirements will reach their reservation before policies with larger reservations, helping to prevent bandwidth starvation.

For example, take the following three policies:

Total of 15 Mb/s bandwidth    
Policy Requested Allocated
Policy 1 10 Mb/s 5 Mb/s
Policy 2 20 Mb/s 5 Mb/s
Policy 3 30 Mb/s 5 Mb/s

All three policies equally share the available 15 Mb/s of bandwidth (5 Mb/s each):

Say that the total bandwidth allocation in the scenario above is increased from 15 Mb/s to 40 Mb/s:

Total of 40 Mb/s bandwidth    
Policy Requested Allocated
Policy 1 10 Mb/s 10 Mb/s
Policy 2 20 Mb/s 15 Mb/s
Policy 3 30 Mb/s 15 Mb/s

The lowest reservation rule, policy 1, now receives its full allocation of 10 Mb/s, and the two other policies split the remaining bandwidth (15 Mb/s each).

There are several tools to aid comprehending and troubleshooting SyncIQ’s bandwidth allocation. For example, the following command will display the SyncIQ policy configuration:

# isi sync policies list

Name        Path            Action  Enabled  Target

------------------------------------------------------

policy1 /ifs/data/zone1 copy    Yes      onefs-trgt1

policy2 /ifs/data/zone3 copy    Yes      onefs-trgt2

------------------------------------------------------
# isi sync policies view <name>

# isi sync policies view zone1-zone2

ID: ce0cbbba832e60d7ce7713206f7367bb

Name: policy1

Path: /ifs/data/zone1

Action: copy

Enabled: Yes

Target: onefs-trgt1

Description:

Check Integrity: Yes

Source Include Directories: -

Source Exclude Directories: /ifs/data/zone1/zone4

Source Subnet: -

Source Pool: -

Source Match Criteria: -

Target Path: /ifs/data/zone2/zone1_sync

Target Snapshot Archive: No

Target Snapshot Pattern: SIQ-%{SrcCluster}-%{PolicyName}-%Y-%m-%d_%H-%M-%S

Target Snapshot Expiration: Never

Target Snapshot Alias: SIQ-%{SrcCluster}-%{PolicyName}-latest

Sync Existing Target Snapshot Pattern: %{SnapName}-%{SnapCreateTime}

Sync Existing Snapshot Expiration: No

Target Detect Modifications: Yes

Source Snapshot Archive: No

Source Snapshot Pattern:

Source Snapshot Expiration: Never

Snapshot Sync Pattern: *

Snapshot Sync Existing: No

Schedule: when-source-modified

Job Delay: 10m

Skip When Source Unmodified: No

RPO Alert: -

Log Level: trace

Log Removed Files: No

Workers Per Node: 3

Report Max Age: 1Y

Report Max Count: 2000

Force Interface: No

Restrict Target Network: No

Target Compare Initial Sync: No

Disable Stf: No

Expected Dataloss: No

Disable Fofb: No

Disable File Split: No

Changelist creation enabled: No

Accelerated Failback: No

Database Mirrored: False

Source Domain Marked: False

Priority: high

Cloud Deep Copy: deny

Bandwidth Reservation: -

Last Job State: running

Last Started: 2022-03-15T11:35:39

Last Success: 2022-03-15T11:35:39

Password Set: No

Conflicted: No

Has Sync State: Yes

Source Certificate ID:

Target Certificate ID:

OCSP Issuer Certificate ID:

OCSP Address:

Encryption Cipher List:

Encrypted: No

Linked Service Policies: -

Delete Quotas: Yes

Disable Quota Tmp Dir: No

Ignore Recursive Quota: No

Allow Copy Fb: No

Bandwidth Rules can be viewed via the CLI as follows:

# isi sync rules list

ID Enabled Type      Limit      Days    Begin  End

-------------------------------------------------------

bw-0 Yes bandwidth 50000 kbps Mon-Fri 08:00 18:00

-------------------------------------------------------

Total: 1


# isi sync rules view bw-0

ID: bw-0

Enabled: Yes

Type: bandwidth

Limit: 50000 kbps

Days: Mon-Fri

Schedule

Begin: 08:00

End: 18:00

Description:

Additionally, the following CLI command will show the global SyncIQ unallocated reserve settings

# isi sync settings view

Service: on

Source Subnet: -

Source Pool: -

Force Interface: No

Restrict Target Network: No

Tw Chkpt Interval: -

Report Max Age: 1Y

Report Max Count: 2000

RPO Alerts: Yes

Max Concurrent Jobs: 50

Bandwidth Reservation Reserve Percentage: 1

Bandwidth Reservation Reserve Absolute: -

Encryption Required: Yes

Cluster Certificate ID:

OCSP Issuer Certificate ID:

OCSP Address:

Encryption Cipher List:

Renegotiation Period: 8H

Service History Max Age: 1Y

Service History Max Count: 2000

Use Workers Per Node: No

OneFS File Filtering

OneFS file filtering enables a cluster administrator to either allow or deny access to files based on their file extensions. This allows the immediate blocking of certain types of files that might cause security issues, content licensing violations, throughput or productivity disruptions, or general storage bloat. For example, the ability to universally block an executable file extension such as ‘.exe’ after discovery of a software vulnerability is undeniably valuable.

File filtering in OneFS is multi-protocol, with support for SMB, NFS, HDFS and S3 at a per-access zone granularity. It also includes default share and per share level configuration for SMB, and specified file extensions can be instantly added or removed if the restriction policy changes.

Within OneFS, file filtering has two basic modes of operation:

  • Allow file writes
  • Deny file writes

In allow rights mode, an inclusion list specifies the file types by extension which can be written. In this example, OneFS only permits mp4 files, blocking all other file types.

# isi file-filter settings modify --file-filter-type allow

--file-filter-extensions .mp4

# isi file-filter settings view

               Enabled: Yes

File Filter Extensions: mp4

      File Filter Type: allow

In contrast, with deny writes configured, an exclusion list specifies file types by extension which are denied from being written. OneFS permits all other file types to be written.

# isi file-filter settings modify --file-filter-type deny --file-filter-extensions .txt

# isi file-filter settings view

               Enabled: Yes

File Filter Extensions: txt

      File Filter Type: deny

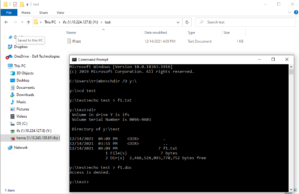
For example, with the configuration above, OneFS denies all other file types than ‘.txt’ from being written to the share, as shown in the following Windows client CMD shell output.

 Note that preexisting files with filtered extensions on the cluster are still be able to read or deleted, but not appended.

Additionally, file filtering can also be configured when creating or modifying a share via the ‘isi smb shares create’ or ‘isi smb shares modify’ commands.

For example, the following CLI syntax enables file filtering on a share named ‘prodA’ and denies writing ‘.wav’ and ‘.mp3’ file types:

# isi smb shares create prodA /ifs/test/proda --file-filtering-enabled=yes --file-filter-extensions=.wav,.mp3

Similarly, to enable file filtering on a share named ‘prodB’ and allow writing only ‘.xml’ files:

# isi smb shares modify prodB --file-filtering-enabled=yes --file-filter-extensions=xml --file-filter-type=allow

Note that if a preceding ‘.’ (dot character) is omitted from a ‘–file-filter-extensions’ argument, the dot will automatically be added as a prefix to any file filter extension specified. Also, up to 254 characters can be used to specify a file filter extension.

Be aware that characters such as ‘*’ and ‘?’ are not recognized as ‘wildcard’ characters in OneFS file filtering and cannot be used to match multiple extensions. For example, the file filter extension ‘mp*’ will match the file f1.mp*, but not f1.mp3 or f1.mp4, etc.

A previous set of file extensions can be easily removed from the filtering configuration as follows:

# isi file-filter settings modify --clear-file-filter-extensions

File filtering can also be configured to allow or deny file writes based on file type at a per-access zone level, limiting filtering rules exclusively to files in the specified zone. OneFS does not take into consideration which file sharing protocol was used to connect to the access zone when applying file filtering rules. However, additional file filtering can be applied at the SMB share level.

The ‘isi file-filter settings modify’ command can be used to enable file filtering per access zone and specify which file types users are denied or allowed write access. For example, the following CLI syntax enables file filtering in the ‘az3’ zone and only allows users to write html and xml file types:

# isi file-filter settings modify --zone=az3 --enabled=yes --file-filter-type=allow --file-filter-extensions=.xml,.html

Similarly, the following command prevents writing pdf, txt, and word files in zone ‘az3’:

# isi file-filter settings modify --zone=az3 --enabled=yes --file-filter-type=deny --file-filter-extensions=.doc,.pdf,.txt

The file filtering settings in an access zone can be confirmed by running the ‘isi file-filter settings view’ command. For example, the following syntax displays file filtering config in the az3 access zone:

# isi file-filter settings view --zone=az3

               Enabled: Yes

File Filter Extensions: doc, pdf, txt

      File Filter Type: deny

For security post-mortem and audit purposes, file filtering events are written to /var/log/lwiod.log at the ‘verbose’ log level. The following CLI commands can be used to configure the lwiod.log level:

# isi smb log-level view

Current logging level: 'info'

# isi smb log-level modify verbose

# isi smb log-level view

Current logging level: 'verbose'

For example, the following entry is logged when unsuccessfully attempting to create file /ifs/test/f1.txt from a Windows client with ‘txt’ file filtering enabled:

# grep -i "f1.txt" /var/log/lwiod.log

2021-12-15T19:34:04.181592+00:00 <30.7> isln1(id8) lwio[6247]: Operation blocked by file filtering for test\f1.txt

After enabling file filtering, you can confirm that the filter drivers are running via the following command:

# /usr/likewise/bin/lwsm list * | grep -i 'file_filter'

flt_file_filter            [filter]      running (lwio: 6247)

flt_file_filter_hdfs       [filter]      running (hdfs: 35815)

flt_file_filter_lwswift    [filter]      running (lwswift: 6349)

flt_file_filter_nfs        [filter]      running (nfs: 6350)

When disabling file filtering, previous settings that specify filter type and file type extensions are preserved but no longer applied. For example, the following command disables file filtering in the az3 access zone but retains the type and extensions configuration:

# isi file-filter settings modify --zone=az3 --enabled=no

# isi file-filter settings view

               Enabled: No

File Filter Extensions: html, xml

      File Filter Type: deny

When disabled, the filter drivers will no longer be running:

# /usr/likewise/bin/lwsm list * | grep -i 'file_filter'

flt_file_filter            [filter]      stopped

flt_file_filter_hdfs       [filter]      stopped

flt_file_filter_lwswift    [filter]      stopped

flt_file_filter_nfs        [filter]      stopped

OneFS and Long Filenames

Another feature debut in OneFS 9.3 is support for long filenames. Until now, the OneFS filename limit has been capped 255 bytes. However, depending on the encoding type, this could potentially be an impediment for certain languages such as Chinese, Hebrew, Japanese, Korean, and Thai, and can create issues for customers who work with international languages that use multi-byte UTF-8 characters.

Since some international languages use up to 4 bytes per character, a file name of 255 bytes could be limited to as few as 63 characters when using certain languages on a cluster.

To address this, the new long filenames feature provides support for names up to 255 Unicode characters, by increasing the maximum file name length from 255 bytes to 1024 bytes. In conjunction with this, the OneFS maximum path length is also increased from 1024 bytes to 4096 bytes.

Before creating a name length configuration, the cluster must be running OneFS 9.3. However, the long filename feature is not activated or enabled by default. You have to opt-in by creating a “name length” configuration. That said, the recommendation is to only enable long filename support if you are actually planning on using it.  This is because, once enabled, OneFS does not track if, when, or where, a long file name or path is created.

The following procedure can be used to configure a PowerScale cluster for long filename support:

Step 1:  Ensure cluster is running OneFS 9.3 or later.

The ‘uname’ CLI command output will display a cluster’s current OneFS version.

For example:

# uname -sr

Isilon OneFS v9.3.0.0

The current OneFS version information is also displayed at the upper right of any of the OneFS WebUI pages. If the output from step 1 shows the cluster running an earlier release, an upgrade to OneFS 9.3 will be required. This can be accomplished either using the ‘isi upgrade cluster’ CLI command or from the OneFS WebUI, by going to Cluster Management > upgrade.

Once the upgrade has completed it will need to be committed, either by following the WebUI prompts, or using the ‘isi upgrade cluster commit’ CLI command.

Step 2.  Verify Cluster’s Long Filename Support Configuration

  1. Viewing a Cluster’s Long Filename Support Settings

The ‘isi namelength list’ CLI command output will verify a cluster’s long filename support status. For example, the following cluster already has long filename support enabled on the /ifs/tst path:

# isi namelength list

Path     Policy     Max Bytes  Max Chars

-----------------------------------------

/ifs/tst restricted 255        255

-----------------------------------------

Total: 1

Step 3.  Configure Long Filename Support

The ‘isi namelength create <path>’ CLI command can be run on the cluster to enable long filename support.

# mkdir /ifs/lfn

# isi namelength create --max-bytes 1024 --max-chars 1024 /ifs/lfn

By default, namelength support is created with default maximum values of 255 Bytes in length and 255 characters.

Step 4:  Confirm Long Filename Support is Configured

The ‘isi namelength list’ CLI command output will confirm that the cluster’s /ifs/lfn directory path is now configured to support long filenames:

# isi namelength list

Path     Policy     Max Bytes  Max Chars

-----------------------------------------

/ifs/lfn custom     1024       1024

/ifs/tst restricted 255        255

-----------------------------------------

Total: 2

Name length configuration is setup per directory and can be nested. Plus, cluster-wide configuration can be applied by configuring at the root /ifs level.

Filename length configurations have two defaults:

  • “Full” – which is 1024 bytes, 255 characters.
  • “Restricted” – which is 255 bytes, 255 characters, and the default if no long additional filename configuration is specified.

Note that removing the long name configuration for a directory will not affect its contents, including any previously created files and directories with long names. However, it will prevent any new long-named files or subdirectories from being created under that directory.

If a filename is too long for a particular protocol, OneFS will automatically truncate the name to around 249 bytes with a ‘hash’ appended to it, which can be used to consistently identify and access the file. This shortening process is referred to as ‘name mangling’. If, for example, a filename longer than 255 bytes is returned in a directory listing over NFSv3, the file’s mangled name will be presented. Any subsequent lookups of this mangled name will resolve to the same file with the original long name. Be aware that filename extensions will be lost when a name is mangled, which can have ramifications for Windows applications, etc.

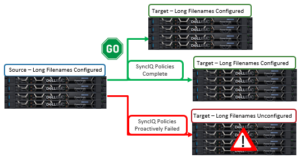
If long filename support is enabled on a cluster with active SyncIQ policies, all source and target clusters must have OneFS 9.3 or later installed and committed, and long filename support enabled.

However, the long name configuration does not need to be identical between the source and target clusters; it only needs to be enabled. This can be done via the following sysctl:

# sysctl efs.bam.long_file_name_enabled=1

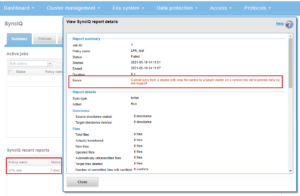
When the target cluster for a Sync policy does not support long file names for a SyncIQ policy and the source domain has long file names enabled, the replication job will fail. The subsequent SyncIQ job report will include the following error message:

Note that the OneFS checks are unable to identify a cascaded replication target running an earlier OneFS version and/or without long filenames configured.

So there are a couple of things to bear in mind when using long filenames:

  • Restoring data from a 9.3 NDMP backup containing long filenames to a cluster running an earlier OneFS version will fail with an ‘ENAMETOOLONG’ error for each long-named file. However, all the files with regular length names will be successfully restored from the backup stream.
  • OneFS ICAP does not support long filenames. However CAVA, ICAP’s replacement, is compatible.
  • The ‘isi_vol_copy’ migration utility does not support long filenames.
  • Neither does the OneFS WebDAV protocol implementation.
  • Symbolic links created via SMB are limited to 1024 bytes due to the size limit on extended attributes.
  • Any pathnames specified in long filename pAPI operations are limited to 4068 bytes.
  • And finally, while an increase in long named files and directories could potentially reduce the number of names the OneFS metadata structures can hold, the overall performance impact of creating files with longer names is negligible.

PowerScale P100 & B100 Accelerators

In addition to a variety of software features, OneFS 9.3 also introduces support for two new PowerScale accelerator nodes. Based on the 1RU Dell PE R640 platform, these include the:

  • PowerScale P100 performance accelerator
  • PowerScale B100 backup accelerator.

Other than a pair of low capacity SSD boot drives, neither the B100 or P100 nodes contain any local storage or journal. Both accelerators are fully compatible with clusters containing the current PowerScale and Gen6+ nodes, plus the previous generation of Isilon Gen5 platforms. Also, unlike storage nodes which require the addition of a 3 or 4 node pool of similar nodes, a single P100 or B100 can be added to a cluster.

The P100 accelerator nodes can simply, and cost effectively, augment the CPU, RAM, and bandwidth of a network or compute-bound cluster without significantly increasing its capacity or footprint.

Since the accelerator nodes contain no storage and a sizable RAM footprint, they have a substantial L1 cache, since all the data is fetched from other storage nodes. Cache aging is based on a least recently used (LRU) eviction policy and the P100 is available in two memory configurations, with either 384GB or 768GB of DRAM per node. The P100 also supports both inline compression and deduplication.

In particular, the P100 accelerator can provide significant benefit to serialized, read-heavy, streaming workloads by virtue of its substantial, low-churn L1 cache, helping to increase throughput and reduce latency. For example, a typical scenario for P100 addition could be a small all-flash cluster supporting a video editing workflow that is looking for a performance and/or front-end connectivity enhancement, but no additional capacity.

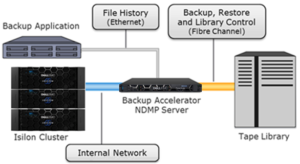
On the backup side, the PowerScale B100 contains a pair of 16Gb fibre channel ports, enabling direct or two-way NDMP backup from a cluster directly to tape or VTL, or across an FC fabric.

The B100 backup accelerator integrates seamlessly with current DR infrastructure, as well as with leading data backup and recovery software technologies to satisfy the availability and recovery SLA requirements of a wide variety of workloads. The B100 can be added to a cluster containing  current and prior generation all-flash, hybrid, and archive nodes.

The B100 aids overall cluster performance by offloading NDMP backup traffic directly to the FC ports and reducing CPU and memory consumption on storage nodes, thereby minimizing impact on front end workloads. This can be of particular benefit to clusters that have been using gen-6 nodes populated with FC cards. In these cases, a simple, non-disruptive addition of B100 node(s) will free up compute resources on the storage nodes, both improving client workload performance and shrinking NDMP backup windows.

Finally, the hardware specs for the new PowerScale P100 and B100 accelerator platforms are as follows:

Component (per node) P100 B100
OneFS release 9.3 or later 9.3 or later
Chassis PowerEdge R640 PowerEdge R640
CPU 20 cores (dual socket @ 2.4Ghz) 20 (dual socket @ 2.4Ghz)
Memory 384GB or 768GB 384GB
Front-end I/O Dual port 10/25 Gb Ethernet

Or

Dual port 40/100Gb Ethernet

Dual port 10/25 Gb Ethernet

Or

Dual port 40/100Gb Ethernet

Back-end I/O Dual port 10/25 Gb Ethernet

Or

Dual port 40/100Gb Ethernet

Or

Dual port QDR Infiniband

Dual port 10/25 Gb Ethernet

Or

Dual port 40/100Gb Ethernet

Or

Dual port QDR Infiniband

Journal N/A N/A
Data Reduction Support Inline compression and dedupe Inline compression and dedupe
Power Supply Dual redundant 750W 100-240V, 50/60Hz Dual redundant 750W 100-240V, 50/60Hz
Rack footprint 1RU 1RU
Cluster addition Minimum one node, and single node increments Minimum one node, and single node increments

Note: Unlike PowerScale storage nodes, since these accelerators do not provide any storage capacity, the PowerScale P100 and B100 nodes do not require OneFS feature licenses for any of the various data services running in a cluster.

OneFS S3 Protocol Enhancements

The new OneFS 9.3 sees some useful features added to its S3 object protocol stack, including:

  • Chunked Upload
  • Delete Multiple Objects support
  • Non-slash delimiter support for ListObjects/ListObjectsV2

When uploading data to OneFS via S3, there are two types of uploading options for authenticating requests using the S3 Authorization header:

  • Transfer payload in a single chunk
  • Transfer payload in multiple chunks (chunked upload)

Applications that typically use the chunked upload option by default include Restic, Flink, Datadobi, and the AWS S3 Java SDK. The new 9.3 release enables these and other applications to work seamlessly with OneFS.

Chunked upload, as the name suggests, facilitates breaking data payload into smaller units, or chunks for more efficient upload. These can be fixed or variable-size, and chunking aids performance by avoiding reading the entire payload in order to calculate the signature. Instead, for the first chunk, a seed signature is calculated which uses only the request headers. The second chunk contains the signature for the first chunk, and each subsequent chunk contains the signature for the preceding one. At the end of the upload, a zero byte chunk is transmitted which contains the last chunk’s signature. This protocol feature is described in more detail in the AWS S3 Chunked Upload documentation.

The AWS S3 DeleteObjects API enables the deletion of multiple objects from a bucket using a single HTTP request. If you know the object keys that you wish to delete, the DeleteObjects API provides an efficient alternative to sending individual delete requests, reducing per-request overhead.

For example, the following python code can be used to delete the three objects file1, file2, and file3 from bkt01 in a single operation:

import boto3


# set HOST IP, user access id and secret key

HOST='192.168.198.10'  # Your SmartConnect name or cluster IP goes here

USERNAME='1_s3test_accid'  # Your access ID

USERKEY='WttVbuRv60AXHiVzcYn3b8yZBtKc'   # Your secret key

URL = 'http://{}:9020'.format(HOST)


s3 = boto3.resource('s3')

session = boto3.Session()


s3client = session.client(service_name='s3',aws_access_key_id=USERNAME,aws_secret_access_key=USERKEY,endpoint_url=URL,use_ssl=False,verify=False)


bkt_name='bkt01'

response=s3client.delete_objects(

Bucket='bkt01',

Delete={

'Objects': [

{

'Key': 'file1'

},

{

'Key': 'file2'

},

{

'Key': 'file3'

}

]

}

)

print(response)

Note that Boto3, the AWS S3 SDK for python, is used in the code above. Boto3 can be downloaded here and installed on a Linux client via pip (ie. # pip install boto3).

Another S3 feature that’s added in OneFS 9.3 is non-slash delimiter support. The AWS S3 data model is a flat structure with no physical hierarchy of directories or folders: A bucket is created, under which objects are stored. However, AWS S3 does make provision for a logical hierarchy using object key name prefixes and delimiters to support a rudimentary concept of folders, as described in Amazon S3 Delimiter and Prefix. In prior OneFS releases, only a slash (‘/’) was supported as a delimiter. However, the new OneFS 9.3 release now expands support to include non-slash delimiters for listing objects in buckets. Also, the new delimiter can comprise multiple characters.

To illustrate this, take the keys “a/b/c”, “a/bc/e” , abc”:

  • If the delimiter is “b” with no prefix, “a/b” and “ab” are returned as the common prefix.
  • With delimiter “b” and prefix “a/b”, “a/b/c” and “a/bc/e” will be returned.

The delimiter can also have either ‘no slash’ or ‘slash’ at the end. For example, “abc”, “/”, “xyz/” are all supported. However, “a/b”, “/abc”, “//” are invalid.

In the following example, three objects (file1, file2, and file3) are uploaded from a Linux client to a cluster via the OneFS S3 protocol with object keys, and stored under the following topology:

# tree bkt1

bkt1

├── dir1
│   ├── file2
│   └── sub-dir1
│       └── file3
└── file1

2 directories, 3 files

These objects can be listed using ‘sub’ as the delimiter value by running the following python code:

import boto3

# set HOST IP, user access id and secret key

HOST='192.168.198.10'  # Your SmartConnect name or cluster IP goes here

USERNAME='1_s3test_accid'  # Your access ID

USERKEY=' WttVbuRv60AXHiVzcYn3b8yZBtKc'   # Your secret key

URL = 'http://{}:9020'.format(HOST)  


s3 = boto3.resource('s3')

session = boto3.Session()


s3client = session.client(service_name='s3',aws_access_key_id=USERNAME,aws_secret_access_key=USERKEY,endpoint_url=URL,use_ssl=False,verify=False)


bkt_name='bkt1'

response=s3client.list_objects(

    Bucket=bkt_name,

    Delimiter='sub'

)

print(response)

The keys ‘file1’ and ‘dir1/file2’ are returned in the , and ‘dir1/sub’ is returned as a common prefix.

{'ResponseMetadata': {'RequestId': '564950507', 'HostId': '', 'HTTPStatusCode': 200, 'HTTPHeaders': {'connection': 'keep-alive', 'x-amz-request-id': '564950507', 'content-length': '796'}, 'RetryAttempts': 0}, 'IsTruncated': False, 'Marker': '', 'Contents': [{'Key': 'dir1/file2', 'LastModified': datetime.datetime(2021, 11, 24, 16, 15, 6, tzinfo=tzutc()), 'ETag': '"d41d8cd98f00b204e9800998ecf8427e"', 'Size': 0, 'StorageClass': 'STANDARD', 'Owner': {'DisplayName': 's3test', 'ID': 's3test'}}, {'Key': 'file1', 'LastModified': datetime.datetime(2021, 11, 24, 16, 10, 43, tzinfo=tzutc()), 'ETag': '"d41d8cd98f00b204e9800998ecf8427e"', 'Size': 0, 'StorageClass': 'STANDARD', 'Owner': {'DisplayName': 's3test', 'ID': 's3test'}}], 'Name': 'bkt1', 'Prefix': '', 'Delimiter': 'sub', 'MaxKeys': 1000, 'CommonPrefixes': [{'Prefix': 'dir1/sub'}]}

OneFS 9.3 also delivers significant improvements to the S3 multi-part upload functionality. In prior OneFS versions, each constituent piece of an upload was written to a separate file, and all the parts concatenated on a completion request. As such, the concatenation process could take a significant duration for large file.

With the new OneFS 9.3 release, multi-part upload instead writes data directly into a single file, so completion is near-instant. The multiple parts are consecutively numbered, and all have same size except for the final one. Since no re-upload or concatenation is required, the process is both lower overhead as well as significantly quicker.

OneFS 9.3 also includes improved handling of inter-level directories. For example, if ‘a/b’ is put on a cluster via S3, the directory ‘a’ is created implicitly. In previous releases, if ‘b’ was then deleted, the directory ‘a’ remained and was treated as an object. However, with OneFS 9.3, the directory is still created and left, but is now identified as an inter-level directory. As such, it is not shown as an object via either ‘Get Bucket’ or ‘Get Object’. With 9.3, an S3 client can now remove a bucket if it only has inter-level directories. In prior releases, this would have failed with a ‘bucket not empty’ error. However, the multi-protocol behavior is unchanged, so a directory created via another OneFS protocol, such as NFS, is still treated as an object. Similarly, if an inter-level directory was created on a cluster prior to a OneFS 9.3 upgrade, that directory will continue to be treated as an object.

OneFS Virtual Hot Spare

There have been a several recent questions from the field around how a cluster manages space reservation and pre-allocation of capacity for data repair and drive rebuilds.

OneFS provides a mechanism called Virtual Hot Spare (VHS), which helps ensure that node pools maintain enough free space to successfully re-protect data in the event of drive failure.

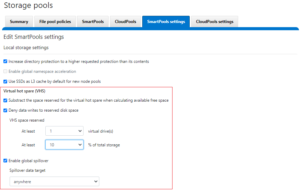
Although globally configured, Virtual Hot Spare actually operates at the node pool level so that nodes with different size drives reserve the appropriate VHS space. This helps ensure that, while data may move from one disk pool to another during repair, it remains on the same class of storage. VHS reservations are cluster wide and configurable as either a percentage of total storage (0-20%) or as a number of virtual drives (1-4). To achieve this, the reservation mechanism allocates a fraction of the node pool’s VHS space in each of its constituent disk pools.

No space is reserved for VHS on SSDs unless the entire node pool consists of SSDs. This means that a failed SSD may have data moved to HDDs during repair, but without adding additional configuration settings. This avoids reserving an unreasonable percentage of the SSD space in a node pool.

The default for new clusters is for Virtual Hot Spare to have both “subtract the space reserved for the virtual hot spare…” and “deny new data writes…” enabled with one virtual drive. On upgrade, existing settings are maintained.

It is strongly encouraged to keep Virtual Hot Spare enabled on a cluster, and a best practice is to configure 10% of total storage for VHS. If VHS is disabled and you upgrade OneFS, VHS will remain disabled. If VHS is disabled on your cluster, first check to ensure the cluster has sufficient free space to safely enable VHS, and then enable it.

VHS can be configured via the OneFS WebUI, and is always available, regardless of whether SmartPools has been licensed on a cluster. For example:

From the CLI, the cluster’s VHS configuration are part of the storage pool settings, and can be viewed with the following syntax:

# isi storagepool settings view

     Automatically Manage Protection: files_at_default

Automatically Manage Io Optimization: files_at_default

Protect Directories One Level Higher: Yes

       Global Namespace Acceleration: disabled

       Virtual Hot Spare Deny Writes: Yes

        Virtual Hot Spare Hide Spare: Yes

      Virtual Hot Spare Limit Drives: 1

     Virtual Hot Spare Limit Percent: 10

             Global Spillover Target: anywhere

                   Spillover Enabled: Yes

        SSD L3 Cache Default Enabled: Yes

                     SSD Qab Mirrors: one

            SSD System Btree Mirrors: one

            SSD System Delta Mirrors: one

Similarly, the following command will set the cluster’s VHS space reservation to 10%.

# isi storagepool settings modify --virtual-hot-spare-limit-percent 10

Bear in mind that reservations for virtual hot sparing will affect spillover. For example, if VHS is configured to reserve 10% of a pool’s capacity, spillover will occur at 90% full.

The VHS percentage parameter is governed by the following sysctl:

# sysctl efs.bam.disk_pool_min_vhs_pct

efs.bam.disk_pool_min_vhs_pct: 10

There’s also a related sysctl that constrains the upper VHS bounds to a maximum of 50% by default:

# sysctl efs.bam.disk_pool_max_vhs_pct

efs.bam.disk_pool_max_vhs_pct: 50

Spillover allows data that is being sent to a full pool to be diverted to an alternate pool. Spillover is enabled by default on clusters that have more than one pool. If you have a SmartPools license on the cluster, you can disable Spillover. However, it is recommended that you keep Spillover enabled. If a pool is full and Spillover is disabled, you might get a “no space available” error but still have a large amount of space left on the cluster.

If the cluster is inadvertently configured to allow data writes to the reserved VHS space, the following informational warning will be displayed in the SmartPools WebUI:

There is also no requirement for reserved space for snapshots in OneFS. Snapshots can use as much or little of the available file system space as desirable and necessary.

A snapshot reserve can be configured if preferred, although this will be an accounting reservation rather than a hard limit and is not a recommend best practice. If desired, snapshot reserve can be set via the OneFS command line interface (CLI) by running the ‘isi snapshot settings modify –reserve’ command.

For example, the following command will set the snapshot reserve to 10%:

# isi snapshot settings modify --reserve 10

It’s worth noting that the snapshot reserve does not constrain the amount of space that snapshots can use on the cluster. Snapshots can consume a greater percentage of storage capacity specified by the snapshot reserve.

Additionally, when using SmartPools, snapshots can be stored on a different node pool or tier than the one the original data resides on.

For example, as above, the snapshots taken on a performance aligned tier can be physically housed on a more cost effective archive tier.

OneFS NFSv4.1 Trunking

As part of new OneFS 9.3 release’s support for NFSv4.1 and NFSv4.2, the NFS session model, is now incorporated into the OneFS NFS stack, which allows clients to leverage trunking and its associated performance benefits. Similar to multi-pathing in the SMB3 world, NFS trunking enables the use of multiple connections between a client and the cluster in order to dramatically increase the I/O path.

OneFS 9.3 supports both session and client ID trunking:

  • Client ID trunking is the association of multiple sessions per client.

  • Session trunking involves multiple connections per mount.

A connection, which represents a socket, exists within an object called a channel, and there can be many sessions associated with a channel. The fore channel represents client > cluster communication, and the back channel cluster > client.

Each channel has a set of configuration values that affect a session’s connections. With a few exceptions, the cluster must respect client-negotiated values. Typically, the configuration value meanings are the same for both the fore and back channels, although the defaults are typically significantly different for each.

Also, be aware that there can only be one client per session, but multiple sessions per client. And here’s what combined session and client ID trunking looks like:

Most Linux flavors support session trunking via the ‘nconnect’ option within the ‘mount’  command, which is included in kernel version 5.3 and later. However, support for client ID trunking is fairly nascent across the current Linux distributions. As such, we’ll focus on session trunking for the remainder of this article.

So let’s walk through a simple example of configuring NFS v4.1 and session trunking in OneFS 9.3.

The first step is to enable the NFS service, if it’s not already running, and select the desired protocol versions. This can be done from the CLI via the following command syntax:

# isi services nfs enable
# isi nfs settings global modify --nfsv41-enabled=true --nfsv42-enabled=true

Next, create an NFS export:

# isi nfs exports create --paths=/ifs/data

When using NFSv4.x, the domain name should be uniform across both the cluster and client(s). The NFSv4.x domain is presented as user@domain or group@domain pairs in ‘getattr’ and ‘setattr’ operations, for example. If the domain does not match, new and existing files will appear as owned by user ‘nobody user on the cluster.

The cluster’s NFSv4.x domain can be configured via the CLI using the ‘isi nfs settings zone modify’ command as follows:

# isi nfs settings zone modify --nfsv4-domain=nfs41test --zone=System

Once the cluster is configured, the next step is to prepare the NFSv4.1 client(s). As mentioned previously, Linux clients running the 5.3 kernel or later can use the nconnect mount option to configure session trunking.

Note that the current maximum limit of client-server connections opened by nconnect is 16. If unspecified, this value defaults to 1.

The following example uses an Ubuntu 21.04 client with the Linux 5.11 kernel version. The linux client will need to have the ‘nfs-common’ package installed in order to obtain the necessary nconnect binaries and libraries. If not already present, this can be installed as follows:

# sudo apt-get install nfs-common nfs-kernel-server

Next, edit the client’s /etc/idmapd.conf and add the appropriate the NFSv4.x domain:

# cat /etc/idmapd.conf

[General]

Verbosity = 0

Pipefs-Directory = /run/rpc_pipefs

# set your own domain here, if it differs from FQDN minus hostname

Domain = nfs41test

[Mapping]

Nobody-User = nobody

Nobody-Group = nogroup

NFSv4.x clients use the nfsidmap daemon for the NFSv4.x ID <-> name mapping translation, and the following CLI commands will restart the nfs-idmapd daemon and confirm that it’s happily running:

# systemctl restart nfs-idmapd
# systemctl status nfs-idmapd

 nfs-idmapd.service - NFSv4 ID-name mapping service

     Loaded: loaded (/lib/systemd/system/nfs-idmapd.service; static)

     Active: active (running) since Thurs 2021-11-18 19:47:01 PDT; 6s ago

    Process: 2611 ExecStart=/usr/sbin/rpc.idmapd $RPCIDMAPDARGS (code=exited, status=0/SUCCESS)

   Main PID: 2612 (rpc.idmapd)

      Tasks: 1 (limit: 4595)

     Memory: 316.0K

     CGroup: /system.slice/nfs-idmapd.service

             └─2612 /usr/sbin/rpc.idmapd

Nov 18 19:47:01 ubuntu systemd[1]: Starting NFSv4 ID-name mapping service...

Nov 18 25 19:47:01 ubuntu systemd[1]: Started NFSv4 ID-name mapping service.

The domain value can also be verified by running the nfsidmap command as follows:.

# sudo nfsidmap -d

nfs41test

Next, mount the cluster’s NFS export via NFSv4.1, v4.2, and trunking, as desired. For example, the following syntax will establish an NFSv4.1 mount using 4 trunked sessions, specified via the nconnect argument:

# sudo mount -t nfs -vo nfsvers=4.1,nconnect=4 10.1.128.10:/ifs/data/ /mnt/nfs41

This can be verified on the client side by running nestat and grepping for port 2049, the output in this case confirming the four TCP connections established for the above mount, as expected:

# netstat -ant4 | grep 2049

tcp        0      0 0.0.0.0:2049            0.0.0.0:*               LISTEN    

tcp        0      0 10.1.128.131:857     10.1.128.10:2049     ESTABLISHED

tcp        0      0 10.1.128.131:681     10.1.128.10:2049     ESTABLISHED

tcp        0      0 10.1.128.131:738     10.1.128.10:2049     ESTABLISHED

tcp        0      0 10.1.128.131:959     10.1.128.10:2049     ESTABLISHED

Similarly, from the cluster side, the NFS connections can be checked with the OneFS ‘isi_nfs4mgmt’ CLI command. The command output includes the client ID, NFS version, session ID, etc.

# isi_nfs4mgmt –list

ID                 Vers  Conn  SessionId  Client Address  Port  O-Owners  Opens Handles L-Owners

456576977838751506  4.1   n/a   4          912.168.198.131 959   0         0     0       0

The OneFS isi_nfs4mgmt CLI command also includes a ‘—dump’ flag, which when used with the ID as the argument, will display the details of a client mount, such as the TCP port, NFSv4.1 channel options, auth type, etc.

# isi_nfs4mgmt --dump=456576977838751506

Dump of client 456576977838751506

  Open Owners (0):

Session ID: 4

Forward Channel

Connections:

             Remote: 10.1.128.131.959    Local: 10.1.128.10.2049

             Remote: 10.1.128.131.738    Local: 10.1.128.10.2049

             Remote: 10.1.128.131.857    Local: 10.1.128.10.2049

             Remote: 10.1.128.131.681    Local: 10.1.128.10.2049

Attributes:

             header pad size                  0

             max operations                   8

             max request size           1048576

             max requests                    64

             max response size          1048576

             max response size cached      7584


Slots Used/Available: 1/63

         Cache Contents:

             0)  SEQUENCE


Back Channel

Connections:

             Remote: 10.1.128.131.959    Local: 10.1.128.10.2049

Attributes:

             header pad size                  0

             max operations                   2

             max request size              4096

             max requests                    16

             max response size             4096

             max response size cached         0

Security Attributes:

         AUTH_SYS:

             gid                              0

             uid                              0


Summary of Client 456576977838751506:

  Long Name (hex): 0x4c696e7578204e465376342e31207562756e74752e312f3139322e3136382e3139382e313000

  Long Name (ascii): Linux.NFSv4.1.ubuntu.1/10.1.128.10.

  State: Confirmed

  Open Owners: 0

  Opens: 0

  Open Handles: 0

  Lock Owners: 0

  Sessions: 1

Full JSON dump can be found at /var/isi_nfs4mgmt/nfs_clients.dump_2021-11-18T15:25:18

Be aware that sessions trunking is not permitted across access zones, because of different auth levels, since a session represents a single auth level. Similarly, sessions trunking is disallowed across dynamic IP addresses.