Configure SSH Multi-Factor Authentication on OneFS 8.2 Using Duo

SSH Multi-Factor Authentication (MFA) with Duo is a new feature introduced in OneFS 8.2. Currently, OneFS supports SSH MFA with Duo service through SMS (short message service), phone callback, and Push notification via the Duo app. This blog will cover the configuration to integrate OneFS SSH MFA with Duo service.

Duo provides service to many kinds of applications, like Microsoft Azure Active Directory, Cisco Webex, Amazon Web Services and etc. For an OneFS cluster, it is represented as a “Unix Application” entry.  To integrate OneFS with Duo service, configuration is required on Duo service and OneFS cluster. Before configuring OneFS with Duo, you need to have Duo account. In this blog, we used a trial version account for demonstration purposes.

Failback mode

By default, the SSH failback mode for Duo in OneFS is “safe”, which will allow common authentication if Duo service is not available. The “secure” mode will deny SSH access if Duo service is not available, including the bypass users, because the bypass users are defined and validated in the Duo service. To configure the failback mode in OneFS, specify –failmode  option using command isi auth duo modify .

Exclusion group

By default, all groups are required to use Duo unless the Duo group is configured to bypass Duo auth. The groups option allows you to exclude or specify dedicated user groups from using Duo service authentication. This method provides a way to configure users that can still SSH into the cluster even when the Duo service is not available and failback mode is set to “secure”. Otherwise, all users may be locked out of cluster in this situation.

To configure the exclusion group option, add an exclamation character “!” before the group name and preceded by an asterisk to ensure that all other groups use Duo service. An example is shown as below:

# isi auth duo modify --groups=”*,!groupname”

Note: zsh shell requires the “!” to be escaped. In this case, the example above should be changed to isi auth duo modify –groups=”*,\!groupname”

Prepare Duo service for OneFS

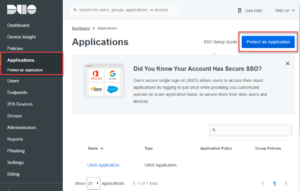
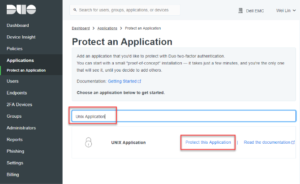
  1. Use your new Duo account to log into the Duo Admin Panel. Select the “Application” item from the left menu. And then click “Protect an Application”, Shown in Figure 1.
Figure 1 Protect an Application
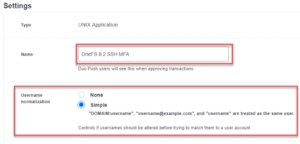
  1. Type “Unix Application” in the search bar. Click “Protect this Application” to create a new Unix Application entry. See Figure 2.
Figure 2 Search for Unix Application
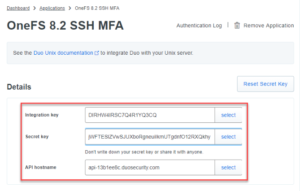
  1. Scroll down the creation page and find the “Settings” section. Type a name for the new Unix Application. It is recommended to use a name which can recognize your OneFS cluster, shown as Figure 3. In this section, you can also find the Duo’s name normalization setting. By default, Duo username normalization is not AD aware, it will alter incoming usernames before trying to match them to a user account. For example, “DOMAIN\username”, “username@domain.com“, and “username” are treated as the same user. For other options, refer to here.
Figure 3 Unix Application Name
  1. Check the required information for OneFS under “Details” section, including API hostnameintegration key, and secret key. Shown as Figure 4
Figure 4 Required Information for OneFS
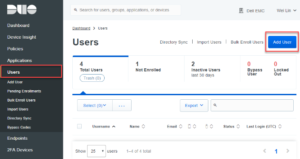
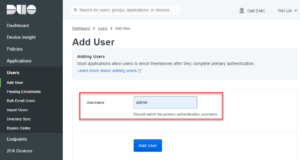
  1. Manually enroll a user. In this example, we will create a user named “admin” which is the default OneFS administrator user. Switch the menu item to “Users” and click “Add User” button, shown as Figure 5. For details about user enrollment on Duo service, refer to Duo documentation Enrolling Users.
Figure 5 User Enrollment
  1. Type the user name, shown as Figure 6.
Figure 6 Manually User Enrollment
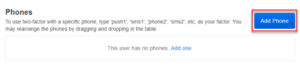
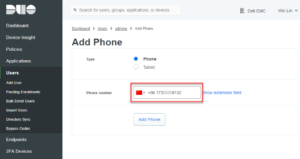
  1. Find the “Phones” settings in the user page and click “Add Phone” button to add a device for the user. Shown in Figure 7.
Figure 7 Add Phone for User
  1. Type your phone number.
Figure 8 Add New Phone
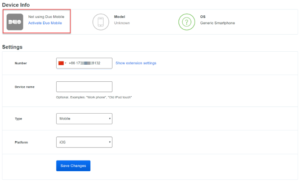
  1. (optional) If you want to use Duo push authentication methods, you need to install Duo Mobile app in the phone and activate the Duo Mobile. As highlighted in Figure 9, click the link to activate the Duo Mobile.
Figure 9 Activate Duo Mobile

OneFS Configuration and Verification

  1. By default, the authentication setting template is set for “any”. To use OneFS with Duo service, the authentication setting template must not be set to “any” or “custom”. It should be set to “password”, “publickey”, or “both”. In this example, we configure the setting to “password”, which will use user password and Duo for SSH MFA. Shown as the following command:
# isi ssh modify --auth-settings-template=password
  1. Confirm the authentication method using the following command:
# isi ssh settings view| grep "Auth Settings Template"
      Auth Settings Template: password
  1. Configure required Duo service information and enable it for SSH MFA, shown as below, use the information when we set up Unix Application in Duo, including API hostname, integration key, and secret key.
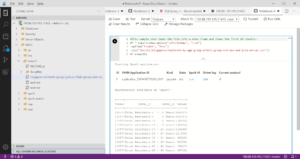
# isi auth duo modify --enabled=true --failmode=safe --host=api-13b1ee8c.duosecurity.com --ikey=DIRHW4IRSC7Q4R1YQ3CQ --set-skey

Enter skey:

Confirm:
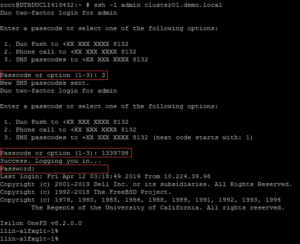
  1. Verify SSH MFA using the user “admin”. An SMS passcode and user’s password are used for authentication in this example, shown as Figure 10.
Figure 10 SSH MFA Verification

Using Dell EMC Isilon with Microsoft’s SQL Server Big Data Clusters

By Boni Bruno, Chief Solutions Architect | Dell EMC

Dell EMC Isilon

Dell EMC Isilon solves the hard scaling problems our customers have with consolidating and storing large amounts of unstructured data.  Isilon’s scale-out design and multi-protocol support provides efficient deployment of data lakes as well as support for big data platforms such as Hadoop, Spark, and Kafka to name a few examples.

In fact, the embedded HDFS implementation that comes with Isilon OneFS has been CERTIFIED by Cloudera for both HDP and CDH Hadoop distributions.  Dell EMC has also been recognized by Gartner as a Leader in the Gartner Magic Quadrant for Distributed File Systems and Object Storage four years in a row.  To that end, Dell EMC is delighted to announce that Isilon is a validated HDFS tiering solution for Microsoft’s SQL Server Big Data Clusters.

SQL Server Big Data Clusters & HDFS Tiering with Dell EMC Isilon

SQL Server Big Data Clusters allow you to deploy clusters of SQL Server, Spark, and HDFS containers on Kubernetes. With these components, you can combine and analyze MS SQL relational data with high-volume unstructured data on Dell EMC Isilon. This means that Dell EMC customers who have data on their Isilon clusters can now make their data available to their SQL Server Big Data Clusters for analytics using the embedded HDFS interface that comes with Isilon OneFS.

Note:  The HDFS Tiering feature of SQL Server 2019 Big Data Clusters currently does not support Cloudera Hadoop, Isilon provides immediate access to HDFS data with or without a Hadoop distribution being deployed in the customers’ environment.  This is a unique value proposition of Dell EMC Isilon storage solution for SQL Server Big Data Clusters.  Unstructured data stored on Isilon is directly accessed over HDFS and will transparently appear as local data to the SQL Server Big Data Cluster platform.

The Figure below depicts the overall architecture between SQL Server Big Data Cluster platform and Dell EMC Isilon or ECS storage solutions.

Dell EMC provides two storage solutions that can integrate with SQL Server Big Data Clusters. Dell EMC Isilon provides a high-performance scale-out HDFS solution and Dell EMC ECS provides a high-capacity scale-out S3A solution, both are on-premise storage solutions.

We are currently working with the Microsoft’s Azure team to get these storage solutions available to customers in the cloud as well.  The remainder of this article provides details on how Dell EMC Isilon integrates with SQL Server Big Data Cluster over HDFS.

Setting up HDFS on Dell EMC Isilon

Enabling HDFS on Isilon is as simple as clicking a button in the OneFS GUI.  Customers have the choice of having multiple access zones if needed, access zones provide a logical separation of the data and users with support for independent role-based access controls.  For the purposes of this article, a “msbdc” access zone will be used for reference.  By default, HDFS is disabled on a given access zone as shown below:

To activate HDFS, simply click the Activate HDFS button.  Note:  HDFS licenses are free with the purchase of Isilon, HDFS licenses can be installed under Cluster Management\Licenses.

Once an HDFS license in installed and HDFS is activated on a given access zone, the HDFS settings can be viewed as shown below:

The GUI allows you to easily change the HDFS block size, Authentication Type, Enable the Ranger Security Plugin, etc.  Isilon OneFS also supports various authentication providers and additional protocols as shown below:

Simply pick the authentication provider of your choice and specify the provider details to enable remote authentication services on Isilon.  Note:  Isilon OneFS has a robust security architecture and authentication, identity management, and authorization stack, you can find more details here.

The multi-protocol support included with Isilon allows customers to land data on Isilon over SMB, NFS, FTP, or HTTP and make all or part of the data available to SQL Server Big Data Clusters over HDFS without having a Hadoop cluster installed – Beautiful!

A key performance aspect of Dell EMC Isilon is the scale-out design of both the hardware and the integrated OneFS storage operating system.  Isilon OneFS provides a unique SmartConnect feature that provides HDFS namenode and datanode load balancing and redundancy.

To use SmartConnect, simply delegate a sub-domain of your choice on your internal DNS server to Isilon and OneFS will automatically load balance all the associated HDFS connections from SQL Server Big Data Clusters transparently across all the physical nodes on the Isilon storage cluster.

The SmartConnect zone name is configured under Cluster Management\Network Configuration\ in the OneFS GUI as shown below:


In the example screen shot above, the SmartConnect Zone name is msbdc.dellemc.com, this means the delegated subdomain on the internal DNS server should be msbdc, a nameserver record for this msbdc subdomain needs to point to the defined SmartConnect Service IP.

The Service IP information is in the subnet details in the OneFS GUI as shown below:

In the above example, the service IP address is 10.10.10.10.  So, creating DNS records for 10.10.10.10 (e.g. isilon.dellemc.com) and a NS record for msbdc.dellemc.com that is served by isilon.dellemc.com (10.10.10.10) is all that would be needed on the internal DNS server configuration to take advantage of the built-in load balancing capabilities of Isilon.

Use “ping” to validate the SmartConnect/DNS configuration.  Multiple ping tests to msbdc.dellemc.com should result with different IP address responses returned by Isilon, the range of IP addresses returned is defined by the IP Pool Range in the Isilon GUI.

SQL Server Big Data Cluster would simply have a single mount configuration pointing to the defined SmartConnect Zone name on Isilon.  Details on how to setup the HDFS mount to Isilon from SQL Server Big Data Cluster is presented in the next section.

SmartConnect makes storage administration easy.  If more storage capacity is required, simply add more Isilon nodes to the cluster and storage capacity and I/O performance instantly increases without having to make a single configuration change to the SQL Server Big Data Clusters – BRILLIANT!

With HDFS enabled, the access zone defined, and the network/DNS configuration complete, the Isilon storage system can now be mounted by SQL Server Big Data Clusters.

Mounting Dell EMC Isilon from SQL Server Big Data Cluster

Assuming you have a SQL Server Big Data Cluster running, begin with opening a terminal session to connect to your SQL Server Big Data Cluster.  You can obtain the IP address of the end point controller-svc-external service of your cluster with the following command:

Using the IP of the controller end point obtained from the above command, log into your big data cluster:

Mount Isilon using HDFS on your SQL Server Big Data Cluster with the following command:

Note:  hdfs://msbdc.dellemc.com is shown as an example, the hdfs uri must match the SmartConnect Zone name defined in the Isilon configuration.  The data directory specified is also an example, any directory name that exists within the Isilon Access Zone can be used.  Also, the mount point /mount1 that is shown above is just an example, any name can be used for the mount point.

An example of a successful response of the above mount command is shown below:

Create mount /mount1 submitted successfully.  Check mount status for progress.

Check the mount status with the following command:

sample output:

Run an hdfs shell and list the contents on Isilon:

sample output:

In addition to using hdfs shell commands, you can use tools like Azure Data Studio to access and browse files over the HDFS service on Dell EMC Isilon.  The example below is using Spark to read the data over HDFS:

To learn more about Dell EMC Isilon, please visit us at DellEMC.com.


Setting Up Share Host ACLs Isilon OneFS

Setting Up Share Host ACLs

How do you allow or deny host for SMB shares?

In Isilon’s OneFS administrators can set Host ACLs on SMB shares. Setting up theses ACLs can add an extra layer of security for files in a specific share. For example administrators can deny all traffic except from certain servers.

OneFS Setting Up Share Host ACLs Commands

Below are the commands used in the Setting Up Share Host ACLs demo. NASA refers to the SMB Share used deny all traffic except from the specific host or hosts.

List out all the shares specific zone

isi smb shares list

View specifics on particular share in access zone

isi smb shares view nasa

Modify Host ACLs on particular share in access zone

isi smb share modify nasa --add-acl

Clear Host ACLs on specific share

isi smb share modify nasa --clear-host-acl
or 
isi smb share modify nasa --revert-host-acl


Video – Setting Up Host ACLs on Isilon File Share

Transcript


Hi, folks. Thomas Henson here with thomashenson.com. And today is another episode of Isilon Quick Tips. So, what we want to cover on today’s episode is I want to go in through the CLI, and look at some of the commands that we can do on isi shares. And specifically, I want to look at some of the advanced features. So, something around the ACLs where we can deny certain hosts or allow certain hosts, too. So, follow along with me right after this. [Music]. So, in today’s episode we want to look at SMB Shares, but specifically from the Command Line. What we’re really going to focus on as I open this Share here is some of these advanced settings. So, you can see that we have some of these advanced settings, like continuous availability of time. And it looks like that we can change some of these. But when we change them, we’re just going to type in how we want to change those here. So, if you wanted to, for example in the host ACL, be able to deny or allow certain hosts, this is where we can do that. But let’s find out how we can this from the Command Line. Because there is a couple of different options, and a couple ways we can do it, and specifically we want to learn how to do it from the Command Line. So, here we are. I’m log back in to my Command Line. So, you can see I’m on Isilon-2. So, the first command I want to do is I want to list out all those SMB Shares that we had. So, we had three of those. So, the command is that we’re going to use in is the smb shares. And I’m just going to type return, so we can see what those actions are. So, you can see that we can do a list, which is the first thing we want to do. But you can also create those shares, you can delete shares, and we can view specific properties on each one of those shares. So, going back in. Let’s run a list on our shares. And you can see… All right. So, we have all those shares that we were just looking at from our [INAUDIBLE 00:02:00]. One thing to note here is if you are using this shares list command and you don’t see your zones, make sure that you type in the zone here. So, we will type in a specific zone. So, if you didn’t see the shares, make sure that you’re specifying exactly what zone there is. I only have one zone in my lab environment here on the system, so I can see that all may shares are there. So, now that I know my shares are there, let’s go back. I want to look at the nasa share that we have. So, let’s use the view command NASA. And you can see here that it’s going to give me my permissions, but then also those advanced features that we were talking about, we can see those here. So, for example we have the Access Based Enumeration. So, if you’re looking to be able to hide files or folders for users that don’t have those permissions, you can see that if that set here. Then also the File Mask. So, you can see that on default directly in File Mask is 700. So, if you’re looking about [INAUDIBLE 00:02:54] the File Mask is, if you’re not familiar, that’s the default permissions that are set whenever you have a File Directory that’s created in this share. So, you can see that in mine, the default setting is 700. Then specifically, the one that I really want to go over was the Host ACL. So, you can see the Hos ACL. I don’t have anything set here. And this is the property we can change, that will allow or deny certain hosts to the specific share. So, one of the reasons this came up is we were trying to secure an application from a share, and we wanted to able to say, ͞Hey, it’s only going to accept traffic from two or one specific server, and then we’re going to deny all those.͟ So, what we’re going to do is I want to walk through how to do that. So specifically, we’re still going to use our isismb share. But now we’re going to use the modify. So, you see the isi smb share modify command. You can see that when we do that… I’m just going to show you some of the commands that we have here. But you can see we have a lot of different options we can do. But the first thing is, remember, we’re going to type in that share.

So, here I want to pass in my nasa string. I don’t have to pass in zone, because I only have one zone. But if you have different zones, then you’re going to want to pass that zone in. The command that we’re specifically looking for is this host-acl. So, we have some options here with the host-acl. We can clear the host, we can add a host, and we can remove a host. So, what we want to do is we want to add a host that’s going to allow for host coming from. We’re just going to say 192.170.170.001. Then we’re going to deny our host from that. So, we’re going to clear this out, so we can have that at the top of the screen. So, you can see we have it here. So, that isi smb shares modify. Then you’re going to put in here you share name. So, mine is nasa. And we’re going to do –add-host-acl=, the first thing that we’re going to do is we’re going to allow. So, we’re going to allow traffic from 192.170.170.001 Then we’re going to use a comma to separate that out, and then we’re going to say that we’re going to deny all. So, specifically we could do this different, and say that we want to allow traffic from all and then deny from specific ones. But from this use case, and this is probably the most common one especially when you’re trying to lock down a certain share, you’re going to want to use this command. So, we’re typing the command, get the command prompt back again. And now let’s do that view. So, it’s view our nasa, and see if our changes are in there. So, you can see in our Host ACL, we have it. Then if we wanted to go back to our share from the [INAUDIBLE 00:05:43] and just see if those changes took. You can see in our advanced setting here, now it showing us are allow and deny all. Now, [INAUDIBLE 00:05:52] to say that I want to keep this going on my [INAUDIBLE 00:05:55] or if I want to revert back. So, there is a couple of different options. If you remember we had the clear-host-acl or the revert back. So, now I can just use this isi smb shares modify on my nasa directory. Once again, just as a reminder, use your own name if you have a specific zone. Then now I can revert my Host ACL. Now, we have that, I’m going to clear this out, and check. You can see our Host ACL is reverted back. We don’t have one set there. So, now we’re allowing traffic as long as you have the permissions to get to this file, and we don’t have one set. Well, that’s all for Isilon Quick Tips for today. Make sure to subscribe so that you never miss an episode of Isilon Quick Tips, or some of the other amazing contents that I have on my YouTube Channel here. And I will see you next time. [Music]