OneFS Firewall Configuration – Part 2

In the previous article in this OneFS firewall series, we reviewed the upgrade, activation, and policy selection components of the firewall provisioning process.

Now, we turn our attention to the firewall rule configuration step of the process.

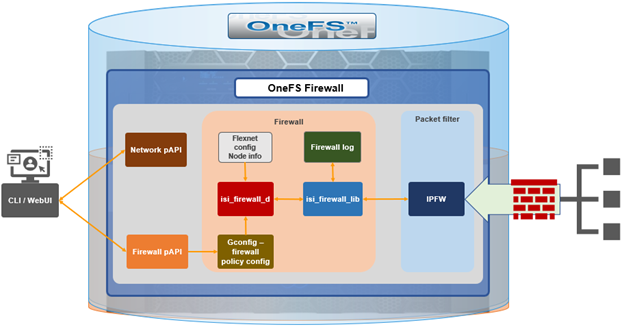
As stated previously, role-based access control (RBAC) explicitly limits who has access to manage the OneFS firewall. So ensure that the user account which will be used to enable and configure the OneFS firewall belongs to a role with the ‘ISI_PRIV_FIREWALL’ write privilege.

  1. Configuring Firewall Rules

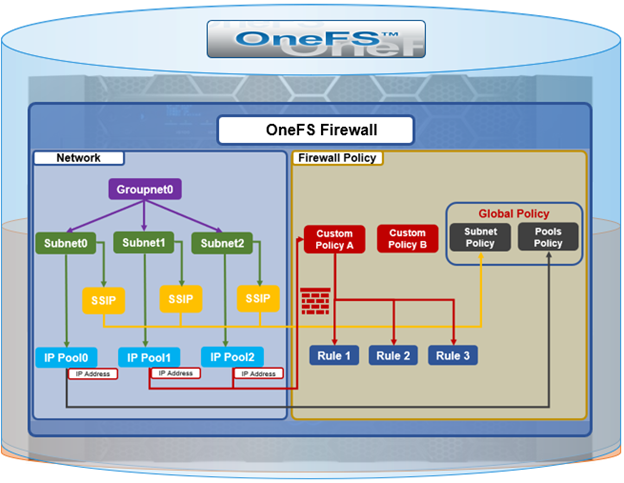
Once the desired policy is created, the next step is to configure the rules. Clearly, the first step here is decide what ports and services need securing or opening, beyond the defaults.

The following CLI syntax will return a list of all the firewall’s default services, plus their respective ports, protocols, and aliases, sorted by ascending port number:

# isi network firewall services list

Service Name     Port  Protocol  Aliases

---------------------------------------------

ftp-data         20    TCP       -

ftp              21    TCP       -

ssh              22    TCP       -

smtp             25    TCP       -

dns              53    TCP       domain

                       UDP

http             80    TCP       www

                                 www-http

kerberos         88    TCP       kerberos-sec

                       UDP

rpcbind          111   TCP       portmapper

                       UDP       sunrpc

                                 rpc.bind

ntp              123   UDP       -

dcerpc           135   TCP       epmap

                       UDP       loc-srv

netbios-ns       137   UDP       -

netbios-dgm      138   UDP       -

netbios-ssn      139   UDP       -

snmp             161   UDP       -

snmptrap         162   UDP       snmp-trap

mountd           300   TCP       nfsmountd

                       UDP

statd            302   TCP       nfsstatd

                       UDP

lockd            304   TCP       nfslockd

                       UDP

nfsrquotad       305   TCP       -

                       UDP

nfsmgmtd         306   TCP       -

                       UDP

ldap             389   TCP       -

                       UDP

https            443   TCP       -

smb              445   TCP       microsoft-ds

hdfs-datanode    585   TCP       -

asf-rmcp         623   TCP       -

                       UDP

ldaps            636   TCP       sldap

asf-secure-rmcp  664   TCP       -

                       UDP

ftps-data        989   TCP       -

ftps             990   TCP       -

nfs              2049  TCP       nfsd

                       UDP

tcp-2097         2097  TCP       -

tcp-2098         2098  TCP       -

tcp-3148         3148  TCP       -

tcp-3149         3149  TCP       -

tcp-3268         3268  TCP       -

tcp-3269         3269  TCP       -

tcp-5667         5667  TCP       -

tcp-5668         5668  TCP       -

isi_ph_rpcd      6557  TCP       -

isi_dm_d         7722  TCP       -

hdfs-namenode    8020  TCP       -

isi_webui        8080  TCP       apache2

webhdfs          8082  TCP       -

tcp-8083         8083  TCP       -

ambari-handshake 8440  TCP       -

ambari-heartbeat 8441  TCP       -

tcp-8443         8443  TCP       -

tcp-8470         8470  TCP       -

s3-http          9020  TCP       -

s3-https         9021  TCP       -

isi_esrs_d       9443  TCP       -

ndmp             10000 TCP       -

cee              12228 TCP       -

nfsrdma          20049 TCP       -

                       UDP

tcp-28080        28080 TCP       -

---------------------------------------------

Total: 55

Similarly, the following CLI command will generate a list of existing rules and their associated policies, sorted in alphabetical order. For example, to show the first 5 rules:

# isi network firewall rules list –-limit 5

ID                                            Index  Description                                                                             Action

----------------------------------------------------------------------------------------------------------------------------------------------------

default_pools_policy.rule_ambari_handshake    41     Firewall rule on ambari-handshake service                                               allow

default_pools_policy.rule_ambari_heartbeat    42     Firewall rule on ambari-heartbeat service                                               allow

default_pools_policy.rule_catalog_search_req  50     Firewall rule on service for global catalog search requests                             allow

default_pools_policy.rule_cee                 52     Firewall rule on cee service                                                            allow

default_pools_policy.rule_dcerpc_tcp          18     Firewall rule on dcerpc(TCP) service                                                    allow

----------------------------------------------------------------------------------------------------------------------------------------------------

Total: 5

Both the ‘isi network firewall rules list’ and ‘isi network firewall services list’ commands also have a ‘-v’ verbose option, plus can return their output in csv, list, table, or json formats with the ‘–flag’.

The detailed info for a given firewall rule, in this case the default SMB rule, can be viewed with the following CLI syntax:

# isi network firewall rules view default_pools_policy.rule_smb

          ID: default_pools_policy.rule_smb

        Name: rule_smb

       Index: 3

 Description: Firewall rule on smb service

    Protocol: TCP

   Dst Ports: smb

Src Networks: -

   Src Ports: -

      Action: allow

Existing rules can be modified and new rules created and added into an existing firewall policy with the ‘isi network firewall rules create’ CLI syntax. Command options include:

Option Description
–action Allow, which mean pass packets.

Deny, which means silently drop packets.

Reject which means reply with ICMP error code.

id Specifies the ID of the new rule to create. The rule must be added to an existing policy. The ID can be up to 32 alphanumeric characters long and can include underscores or hyphens, but cannot include spaces or other punctuation. Specify the rule ID in the following format:

<policy_name>.<rule_name>

The rule name must be unique in the policy.

–index the rule index in the pool. the valid value is between 1 and 99. the lower value has the higher priority. if not specified, automatically go to the next available index (before default rule 100).
–live The live option must only be used when a user issues a command to create/modify/delete a rule in an active policy. Such changes will take effect immediately on all network subnets and pools associated with this policy. Using the live option on a rule in an inactive policy will be rejected, and an error message will be returned.
–protocol  Specify the protocol matched for the inbound packets.  Available value are tcp,udp,icmp,all.  if not configured, the default protocol all will be used.
–dst-ports   Specify the network ports/services provided in storage system which is identified by destination port(s). The protocol specified by –protocol will be applied on these destination ports.
–src-networks Specify one or more IP addresses with corresponding netmasks that are to be allowed by this firewall policy. The correct format for this parameter is address/netmask, similar to “192.0.2.128/25”. Multiple address/netmask pairs should be separated with commas. Use the value 0.0.0.0/0 for “any”.
–src-ports Specify the network ports/services provided in storage system which is identified by source port(s). The protocol specified by –protocol will be applied on these source ports.

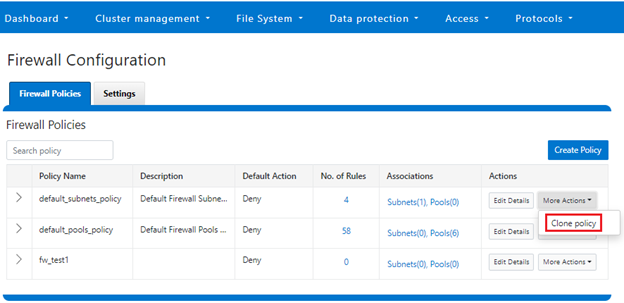
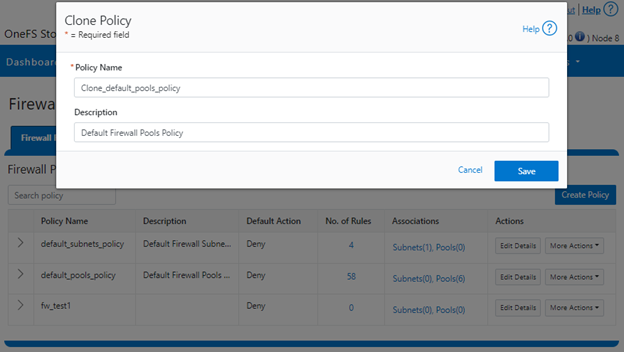
Note that, unlike for firewall policies, there is no provision for cloning individual rules.

The following CLI syntax can be used to create new firewall rules. For example, to add ‘allow’ rules for the HTTP and SSH protocols, plus a ‘deny’ rule for port TCP 9876, into firewall policy fw_test1:

# isi network firewall rules create  fw_test1.rule_http  --index 1 --dst-ports http --src-networks 10.20.30.0/24,20.30.40.0/24 --action allow

# isi network firewall rules create  fw_test1.rule_ssh  --index 2 --dst-ports ssh --src-networks 10.20.30.0/24,20.30.40.0/16 --action allow

# isi network firewall rules create fw_test1.rule_tcp_9876 --index 3 --protocol tcp --dst-ports 9876  --src-networks 10.20.30.0/24,20.30.40.0/24 -- action deny

When a new rule is created in a policy, if the index value is not specified, it will automatically inherit the next available number in the series (ie. index=4 in this case).

# isi network firewall rules create fw_test1.rule_2049  --protocol udp -dst-ports 2049 --src-networks 30.1.0.0/16 -- action deny

For a more draconian approach, a ‘deny’ rule could be created using the match-everything ‘*’ wildcard for destination ports and a 0.0.0.0/0 network and mask, which would silently drop all traffic:

# isi network firewall rules create fw_test1.rule_1234  --index=100--dst-ports * --src-networks 0.0.0.0/0 --action deny

When modifying existing firewall rules, the following CLI syntax can be used, in this case to change the source network of an HTTP allow rule (index 1) in firewall policy fw_test1:

# isi network firewall rules modify fw_test1.rule_http --index 1  --protocol ip --dst-ports http --src-networks 10.1.0.0/16 -- action allow

Or to modify an SSH rule (index 2) in firewall policy fw_test1, changing the action from ‘allow’ to ‘deny’:

# isi network firewall rules modify fw_test1.rule_ssh --index 2 --protocol tcp --dst-ports ssh --src-networks 10.1.0.0/16,20.2.0.0/16 -- action deny

Also, to re-order the custom TCP 9876 rule form the earlier example from index 3 to index 7 in firewall policy fw_test1.

# isi network firewall rules modify fw_test1.rule_tcp_9876 --index 7

Note that all rules equal or behind index 7 will have their index values incremented by one.

When deleting a rule from a firewall policy, any rule reordering is handled automatically. If the policy has been applied to a network pool, the ‘–live’ option can be used to force the change to take effect immediately. For example, to delete the HTTP rule from the firewall policy ‘fw_test1’:

# isi network firewall policies delete fw_test1.rule_http --live

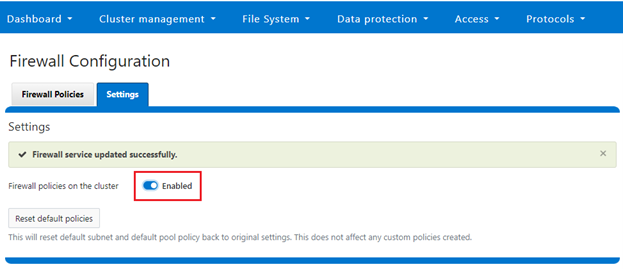
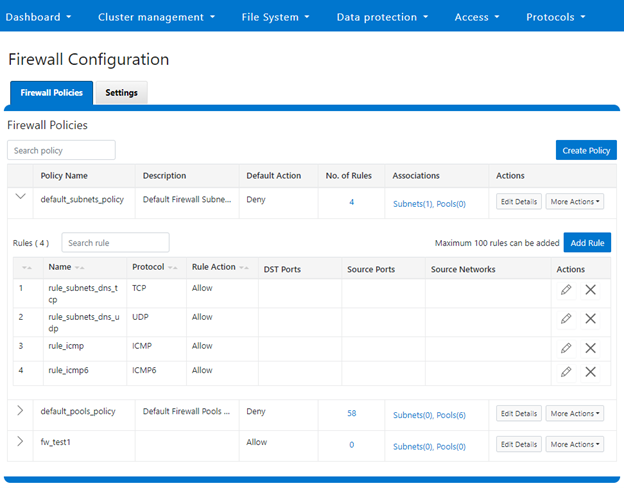
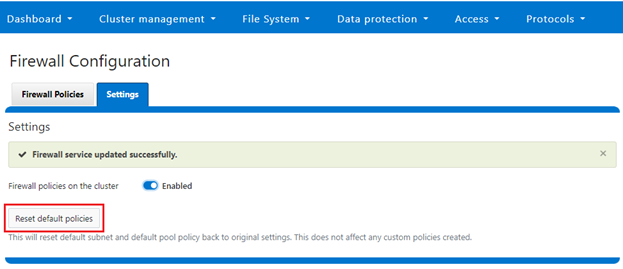
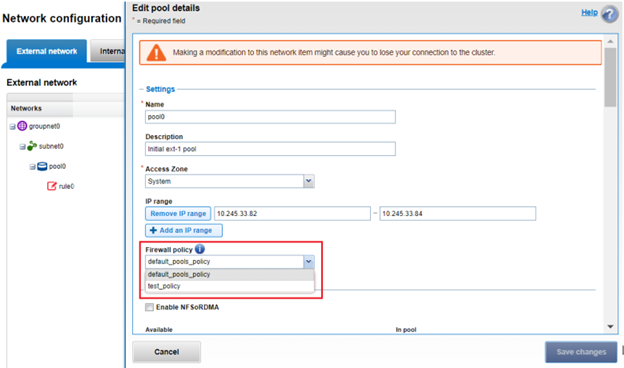
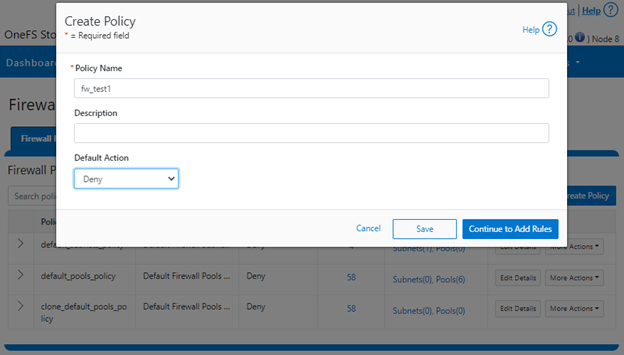
Firewall rules can also be created, modified and deleted within a policy from the WebUI by navigating to Cluster management > Firewall Configuration > Firewall Policies. For example, to create a rule that permits SupportAssist and Secure Gateway traffic on the 10.219.0.0/16 network:

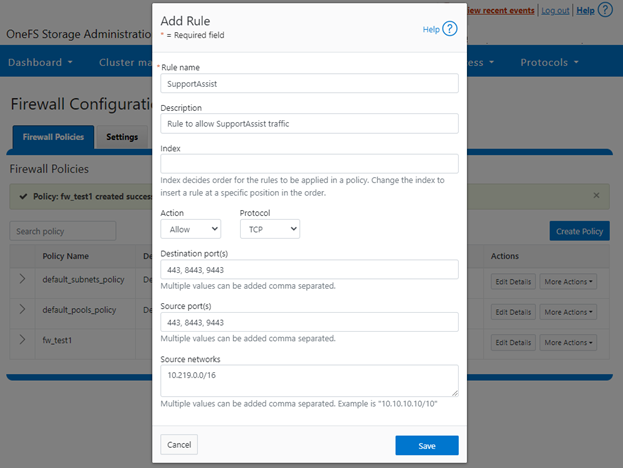
Once saved, the new rule is then displayed in the Firewall Configuration page:

  1. Firewall management and monitoring.

In the next and final article in this series, we’ll turn our attention to managing, monitoring, and troubleshooting the OneFS firewall (step 5).

OneFS Firewall Configuration – Part 1

The new firewall in OneFS 9.5 enhances the security of the cluster and helps prevent unauthorized access to the storage system. When enabled, the default firewall configuration allows remote systems access to a specific set of default services for data, management, and inter-cluster interfaces (network pools).

The basic OneFS firewall provisioning process is as follows:

Note that role-based access control (RBAC) explicitly limits who has access to manage the OneFS firewall. In addition to the ubiquitous ‘root’, the cluster’s built-in SystemAdmin role has write privileges to configure and administer the firewall.

  1. Upgrade to OneFS 9.5

First, the cluster must be running OneFS 9.5 in order to provision the firewall.

If upgrading from an earlier release, the OneFS 9.5 upgrade must be committed before enabling the firewall.

Also, be aware that configuration and management of the firewall in OneFS 9.5 requires the new ISI_PRIV_FIREWALL administration privilege. This can be granted to a role with either  read-only or read-write privileges.

# isi auth privilege | grep -i firewall

ISI_PRIV_FIREWALL                   Configure network firewall

This privilege can be granted to a role with either  read-only or read-write permissions. By default, the built-in ‘SystemAdmin’ roles is granted write privileges to administer the firewall:

# isi auth roles view SystemAdmin | grep -A2 -i firewall

             ID: ISI_PRIV_FIREWALL

     Permission: w

Additionally, the built-in ‘AuditAdmin’ role has read permission to view the firewall configuration and logs, etc:

# isi auth roles view AuditAdmin | grep -A2 -i firewall

             ID: ISI_PRIV_FIREWALL

     Permission: r

Ensure that the user account which will be used to enable and configure the OneFS firewall belongs to a role with the ‘ISI_PRIV_FIREWALL’ write privilege.

  1. Activate Firewall

As mentioned previously, the OneFS firewall can be either ‘enabled’ or ‘disabled’, with the latter as the default state. The following CLI syntax will display the firewall’s global status – in this case ‘disabled’ (the default):

# isi network firewall settings view

Enabled: False

Firewall activation can be easily performed from the CLI as follows:

# isi network firewall settings modify --enabled true

# isi network firewall settings view

Enabled: True

Or from the WebUI under Cluster management > Firewall Configuration > Settings:

Note that the firewall is automatically enabled when STIG Hardening applied to a cluster.

  1. Pick policies

A cluster’s existing firewall policies can be easily viewed from the CLI with the following command:

# isi network firewall policies list

ID        Pools                    Subnets                   Rules
-----------------------------------------------------------------------------
fw_test1  groupnet0.subnet0.pool0  groupnet0.subnet1         test_rule1
-----------------------------------------------------------------------------
Total: 1

Or from the WebUI under Cluster management > Firewall Configuration > Firewall Policies:

The OneFS firewall offers four main strategies when it comes to selecting a firewall policy. These include:

  1. Retaining the default policy
  2. Reconfiguring the default policy
  3. Cloning the default policy and reconfiguring
  4. Creating a custom firewall policy

We’ll consider each of these strategies in order:

a.  Retaining the default policy

In many cases, the default OneFS firewall policy value will provide acceptable protection for a security conscious organization. In these instances, once the OneFS firewall has been enabled on a cluster, no further configuration is required, and the cluster administrators can move on to the management and monitoring phase.

The firewall policy for all front-end cluster interfaces (network pool) is ‘default’. While the default policy can be modified, be aware that this default policy is global. As such, any change against it will impact all network pools using this default policy.

The following table describes the default firewall policies that are assigned to each interface:

Policy Description
Default pools policy Contains rules for the inbound default ports for TCP and UDP services in OneFS.
Default subnets policy Contains rules for:

·         DNS port 53

·         Rule for ICMP

·         Rule for ICMP6

These can be viewed from the CLI as follows:

# isi network firewall policies view default_pools_policy

            ID: default_pools_policy

          Name: default_pools_policy

   Description: Default Firewall Pools Policy

Default Action: deny

     Max Rules: 100

         Pools: groupnet0.subnet0.pool0, groupnet0.subnet0.testpool1, groupnet0.subnet0.testpool2, groupnet0.subnet0.testpool3, groupnet0.subnet0.testpool4, groupnet0.subnet0.poolcava

       Subnets: -

         Rules: rule_ldap_tcp, rule_ldap_udp, rule_reserved_for_hw_tcp, rule_reserved_for_hw_udp, rule_isi_SyncIQ, rule_catalog_search_req, rule_lwswift, rule_session_transfer, rule_s3, rule_nfs_tcp, rule_nfs_udp, rule_smb, rule_hdfs_datanode, rule_nfsrdma_tcp, rule_nfsrdma_udp, rule_ftp_data, rule_ftps_data, rule_ftp, rule_ssh, rule_smtp, rule_http, rule_kerberos_tcp, rule_kerberos_udp, rule_rpcbind_tcp, rule_rpcbind_udp, rule_ntp, rule_dcerpc_tcp, rule_dcerpc_udp, rule_netbios_ns, rule_netbios_dgm, rule_netbios_ssn, rule_snmp, rule_snmptrap, rule_mountd_tcp, rule_mountd_udp, rule_statd_tcp, rule_statd_udp, rule_lockd_tcp, rule_lockd_udp, rule_nfsrquotad_tcp, rule_nfsrquotad_udp, rule_nfsmgmtd_tcp, rule_nfsmgmtd_udp, rule_https, rule_ldaps, rule_ftps, rule_hdfs_namenode, rule_isi_webui, rule_webhdfs, rule_ambari_handshake, rule_ambari_heartbeat, rule_isi_esrs_d, rule_ndmp, rule_isi_ph_rpcd, rule_cee, rule_icmp, rule_icmp6, rule_isi_dm_d


# isi network firewall policies view default_subnets_policy

            ID: default_subnets_policy

          Name: default_subnets_policy

   Description: Default Firewall Subnets Policy

Default Action: deny

     Max Rules: 100

         Pools: -

       Subnets: groupnet0.subnet0

         Rules: rule_subnets_dns_tcp, rule_subnets_dns_udp, rule_icmp, rule_icmp6

Or from the WebUI under Cluster Management > Firewall Configuration > Firewall Policies:


b.  Reconfiguring the default policy

Depending on an organization’s threat levels or security mandates, there may be a need to restrict access to certain additional IP addresses and/or management service protocols.

If the default policy is deemed insufficient, reconfiguring the default firewall policy can be a good option if only a small number of rule changes are required. The specifics of creating, modifying, and deleting individual firewall rules is covered later in this article (step 3 below).

Note that if new rule changes behave unexpectedly, or configurating the firewall generally goes awry, OneFS does provide a ‘get out of jail free’ card. In a pinch, the global firewall policy can be quickly and easily restored to its default values. This can be achieved with the following CLI syntax:

# isi network firewall reset-global-policy

This command will reset the global firewall policies to the original system defaults. Are you sure you want to continue? (yes/[no]):


Alternatively, the default policy can also be easily reverted from the WebUI too, by clicking the ‘Reset default policies’ button:

c.  Cloning the default policy and reconfiguring

Another option is cloning, which can be useful when batch modification or a large number of changes to the current policy are required. By cloning the default firewall policy, an exact copy of the existing policy and its rules is generated, but with a new policy name. For example:

# isi network firewall policies clone default_pools_policy clone_default_pools_policy

# isi network firewall policies list | grep -i clone

clone_default_pools_policy -

Cloning can also be initiated from the WebUI under Firewall Configuration > Firewall Policies > More Actions > Clone Policy:

Enter the desired name of the clone in the ‘Policy Name’ field in the pop-up window and click ‘Save’:

Once cloned, the policy can then be easily reconfigured to suit. For example, to modify the policy ‘fw_test1’ and change its default-action from deny-all to allow-all:

# isi network firewall policies modify fw_test1 --default--action allow-all

When modifying a firewall policy, the ‘–live’ option CLI option can be used to force it take effect immediately. Note that the ‘—live’ option is only valid when issuing a command to modify or delete an active custom policy and to modify default policy. Such changes will take effect immediately on all network subnets and pools associated with this policy. Using the live option on an inactive policy will be rejected, and an error message returned.

Options for creating or modifying a firewall policy include:

Option Description
–default-action Automatically add one rule to ‘deny all’ or ‘allow all’ to the bottom of the rule set for this created policy (Index = 100).
max-rule-num By default, each policy when created could have maximum 100 rules (include one default rule), so user could config maximum 99 rules.  User could expand the maximum rule number to a specified value. Currently this value is limited to 200 (and user could config maximum 199 rules).
–add-subnets  Specify the network subnet(s) to add to policy, separated by a comma.
–remove-subnets  Specify the networks subnets to remove from policy and fall back to global policy.
–add-pools  Specify the network pool(s) to add to policy, separated by a comma.
–remove-pools  Specify the networks pools to remove from policy and fall back to global policy.

When modifying firewall policies, OneFS prints the following warning to verify the changes and help avoid the risk of a self-induced denial-of-service:

# isi network firewall policies modify --pools groupnet0.subnet0.pool0 fw_test1

Changing the Firewall Policy associated with a subnet or pool may change the networks and/or services allowed to connect to OneFS. Please confirm you have selected the correct Firewall Policy and Subnets/Pools. Are you sure you want to continue? (yes/[no]): yes

Once again, having the following CLI command handy, plus console access to the cluster is always a prudent move:

# isi network firewall reset-global-policy

So adding network pools or subnets to a firewall policy will cause the previous policy to be removed from them. Similarly, adding network pools or subnets to the global default policy will revert any custom policy configuration they might have. For example, to apply the firewall policy fw_test1 to IP Pool groupnet0.subnet0.pool0 and groupnet0.subnet0.pool1:

# isi network pools view groupnet0.subnet0.pool0 | grep -i firewall

      Firewall Policy: default_pools_policy

# isi network firewall policies modify fw_test1 --add-pools groupnet0.subnet0.pool0, groupnet0.subnet0.pool1

# isi network pools view groupnet0.subnet0.pool0 | grep -i firewall

      Firewall Policy: fw_test1

Or to apply the firewall policy fw_test1 to IP Pool groupnet0.subnet0.pool0 and groupnet0.subnet0:

# isi network firewall policies modify fw_test1 --apply-subnet groupnet0.subnet0.pool0, groupnet0.subnet0

# isi network pools view groupnet0.subnet0.pool0 | grep -i firewall

 Firewall Policy: fw_test1

# isi network subnets view groupnet0.subnet0 | grep -i firewall

 Firewall Policy: fw_test1

To reapply global policy at any time, either add the pools to the default policy:

# isi network firewall policies modify default_pools_policy --add-pools groupnet0.subnet0.pool0, groupnet0.subnet0.pool1

# isi network pools view groupnet0.subnet0.pool0 | grep -i firewall

 Firewall Policy: default_subnets_policy

# isi network subnets view groupnet0.subnet1 | grep -i firewall

 Firewall Policy: default_subnets_policy

Or remove the pool from the custom policy:

# isi network firewall policies modify fw_test1 --remove-pools groupnet0.subnet0.pool0 groupnet0.subnet0.pool1

Firewall policies can also be managed on the desired network pool in the OneFS WebUI by navigating to Cluster configuration > Network configuration > External network > Edit pool details. For example:

Be aware that cloning is also not limited to the default policy, as clones can be made of any custom policies too. For example:

# isi network firewall policies clone clone_default_pools_policy fw_test1

d.  Creating a custom firewall policy

Alternatively, a custom firewall policy can also be created from scratch. This can be accomplished from the CLI using the following syntax, in this case to create a firewall policy named ‘fw_test1’:

# isi network firewall policies create fw_test1 --default-action deny

# isi network firewall policies view fw_test1

            ID: fw_test1

          Name: fw_test1

   Description:

Default Action: deny

     Max Rules: 100

         Pools: -

       Subnets: -

         Rules: -

Note that if a ‘default-action’ is not specified in the CLI command syntax, it will automatically default to deny.

Firewall policies can also be configured via the OneFS WebUI by navigating to Cluster management > Firewall Configuration > Firewall Policies > Create Policy:

However, in contrast to the CLI, if a ‘default-action’ is not specified when creating a policy in the WebUI, it will automatically default to ‘Allow’ instead, since the drop-down list works alphabetically.

If and when a firewall policy is no longer required, it can be swiftly and easily removed. For example, the following CLI syntax will delete the firewall policy ‘fw_test1’, clearing out any rules within this policy container:

# isi network firewall policies delete fw_test1

Are you sure you want to delete firewall policy fw_test1? (yes/[no]): yes

Note that the default global policies cannot be deleted.

# isi network firewall policies delete default_subnets_policy

Are you sure you want to delete firewall policy default_subnets_policy? (yes/[no]): yes

Firewall policy: Cannot delete default policy default_subnets_policy.
  1. Configuring Firewall Rules

In the next article in this series, we’ll turn our attention to configuring the OneFS firewall rule(s) (step 4).

OneFS Firewall

Among the array of security features introduced in OneFS 9.5 is a new host-based firewall. This firewall allows cluster administrators to configure policies and rules on a PowerScale cluster in order to meet the network and application management needs and security mandates of an organization.

The OneFS firewall protects the cluster’s external, or front-end, network and operates as a packet filter for inbound traffic. It is available upon installation or upgrade to OneFS 9.5, but is disabled by default in both cases. However, the OneFS STIG hardening profile automatically enables the firewall and the default policies, in addition to manual activation.

The firewall generally manages IP packet filtering in accordance with the OneFS Security Configuration Guide, especially in regards to the network port usage. Packet control is governed by firewall policies, which are comprised of one or more individual rules.

Item Description Match Action
Firewall Policy Each policy is a set of firewall rules. Rules are matched by index in ascending order Each policy has a default action.
Firewall Rule Each rule specifies what kinds of network packets should be matched by Firewall engine and what action should be taken upon them. Matching criteria includes protocol, source ports, destination ports, source network address) Options are ‘allow’, ‘deny’ or ‘reject’.

A security best practice is to enable the OneFS firewall using the default policies, with any adjustments as required. The recommended configuration process is as follows:

Step Details
1.  Access Ensure that the cluster uses a default SSH or HTTP port before enabling. The default firewall policies block all nondefault ports until you change the policies.
2.  Enable Enable the OneFS firewall.
3.  Compare Compare your cluster network port configurations against the default ports listed in Network port usage.
4.  Configure Edit the default firewall policies to accommodate any non-standard ports in use in the cluster. NOTE: The firewall policies do not automatically update when port configurations are changed.
5.  Constrain Limit access to the OneFS Web UI to specific administrator terminals

Under the hood, the OneFS firewall is built upon the ubiquitous ‘ipfirewall’, or ‘ipfw’, which is FreeBSD’s native stateful firewall, packet filter and traffic accounting facility.

Firewall configuration and management is via the CLI, or platform API, or WebUI and OneFS 9.5 introduces a new Firewall Configuration page to support this. Note that the firewall is only available once a cluster is already running OneFS 9.5 and the feature has been manually enabled, activating the isi_firewall_d service. The firewall’s configuration is split between gconfig, which handles the settings and policies, and the ipfw table, which stores the rules themselves.

The firewall gracefully handles any SmartConnect dynamic IP movement between nodes since firewall policies are applied per network pool. Additionally, being network pool based allows the firewall to support OneFS access zones and shared/multitenancy models.

The individual firewall rules, which are essentially simplified wrappers around ipfw rules, work by matching packets via the 5-tuples that uniquely identify an IPv4 UDP or TCP session:

  • Source IP address
  • Source port
  • Destination IP address
  • Destination port
  • Transport protocol

The rules are then organized within a firewall policy, which can be applied to one or more network pools.

Note that each pool can only have a single firewall policy applied to it. If there is no custom firewall policy configured for a network pool, it automatically uses the global default firewall policy.

When enabled, the OneFS firewall function is cluster wide, and all inbound packets from external interfaces will go through either the custom policy or default global policy before reaching the protocol handling pathways. Packets passed to the firewall are compared against each of the rules in the policy, in rule-number order. Multiple rules with the same number are permitted, in which case they are processed in order of insertion. When a match is found, the action corresponding to that matching rule is performed. A packet is checked against the active ruleset in multiple places in the protocol stack, and the basic flow is as follows:

  1. Get the logical interface for incoming packets
  2. Find all network pools assigned to this interface
  3. Compare these network pools one by one with destination IP address to find the matching pool (either custom firewall policy, or default global policy).
  4. Compare each rule with service (protocol & destination ports) & source IP address in this pool from in order of lowest index value.  If matched, perform actions according to the associated rule.
  5. If no rule matches, go to the final rule (deny all or allow all) which is specified upon policy creation.

The OneFS firewall automatically reserves 20,000 rules in the ipfw table for its custom and default policies and rules. By default, each policy can gave a maximum of 100 rules, including one default rule. This translates to an effective maximum of 99 user-defined rules per policy, because the default rule is reserved and cannot be modified. As such, a maximum of 198 policies can be applied to pools or subnets since the default-pools-policy and default-subnets-policy are reserved and cannot be deleted.

Additional firewall bounds and limits to keep in mind include:

Name Value Description
MAX_INTERFACES 500 Maximum number of Layer 2 interfaces per node (including Ethernet, VLAN, LAGG interfaces).
MAX _SUBNETS 100 Maximum number of subnets within a OneFS cluster
MAX_POOLS 100 Maximum number of network pools within a OneFS cluster
DEFAULT_MAX_RULES 100 Default value of maximum rules within a firewall policy
MAX_RULES 200 Upper limit of maximum rules within a firewall policy
MAX_ACTIVE_RULES 5000 Upper limit of total active rules across the whole cluster
MAX_INACTIVE_POLICIES 200 Maximum number of policies which are not applied to any network subnet or pool. They will not be written into ipfw table.

The firewall default global policy is ready to use out of box and, unless a custom policy has been explicitly configured, all network pools use this global policy. Custom policies can be configured by either cloning and modifying an existing policy or creating one from scratch.

Component Description
Custom policy A user-defined container with a set of rules. A policy can be applied to multiple network pools, but a network pool can only apply one policy.


Firewall rule An ipfw-like rule which can be used to restrict remote access. Each rule has an index which is valid within the policy. Index values range from 1 to 99, with lower numbers having higher priority. Source networks are described by IP and netmask, and services can be expressed either by port number (ie. 80) or service name (ie. http,ssh,smb). The ‘*‘ wildcard can also be used to denote all services. Supported actions include ‘allow’, ‘drop’ and ‘reject’.
Default policy A global policy to manage all default services, used for maintaining OneFS minimum running and management. While ‘Deny any‘ is the default action of the policy, the defined service rules have a default action to ‘allow all remote access’. All packets not matching any of the rules are automatically dropped.

Two default policies: 

·         default-pools-policy

·         default-subnets-policy

Note that these two default policies cannot be deleted, but individual rule modification is permitted in each.

Default services The firewall’s default pre-defined services include the usual suspects, such as: DNS, FTP, HDFS, HTTP, HTTPS, ICMP, NDMP, NFS, NTP, S3, SMB, SNMP, SSH, etc. A full listing is available via the ‘isi network firewall services list’ CLI command output.

For a given network pool, either the global policy or a custom policy is assigned and takes effect. Additionally, all configuration changes to either policy type are managed by gconfig and are persistent across cluster reboots.

In the next article in this series we’ll take a look at the configuration and management of the OneFS firewall.

OneFS Snapshot Security

In this era of elevated cyber-crime and data security threats, there is increasing demand for immutable, tamper-proof snapshots. Often this need arises as part of a broader security mandate, ideally proactively, but oftentimes as a response to a security incident. OneFS addresses this requirement in the following ways:

On-cluster Off-cluster
·         Read-only snapshots

·         Snapshot locks

·         Role-based administration

·         SyncIQ snapshot replication

·         Cyber-vaulting


  1. Read-only snapshots

At its core, OneFS SnapshotIQ generates read-only, point-in-time, space efficient copies of a defined subset of a cluster’s data.

Only the changed blocks of a file are stored when updating OneFS snapshots, ensuring efficient storage utilization. They are also highly scalable and typically take less than a second to create, while generating little performance overhead. As such, the RPO (recovery point objective) and RTO (recovery time objective) of a OneFS snapshot can be very small and highly flexible, with the use of rich policies and schedules.

OneFS Snapshots are created manually, via a scheduled, or automatically generated by OneFS to facilitate system operations. But whatever the generation method, once a snapshot has been taken, its contents cannot be manually altered.

  1. Snapshot Locks

In addition to snapshot contents immutability, for an enhanced level of tamper-proofing, SnapshotIQ also provides the ability to lock snapshots with the ‘isi snapshot locks’ CLI syntax. This prevents snapshots from being accidentally or unintentionally deleted.

For example, a manual snapshot, ‘snaploc1’ is taken of /ifs/test:

# isi snapshot snapshots create /ifs/test --name snaploc1

# isi snapshot snapshots list | grep snaploc1

79188 snaploc1                                     /ifs/test

A lock is then placed on it (in this case lock ID=1):

# isi snapshot locks create snaplock1

# isi snapshot locks list snaploc1

ID

----

1

----

Total: 1

Attempts to delete the snapshot fails because the lock prevents its removal:

# isi snapshot snapshots delete snaploc1

Are you sure? (yes/[no]): yes

Snapshot "snaploc1" can't be deleted because it is locked

The CLI command ‘isi snapshot locks delete <lock_ID>’ can be used to clear existing snapshot locks, if desired. For example,  to remove the only lock (ID=1) from snapshot ‘snaploc1’:

# isi snapshot locks list snaploc1

ID

----

1

----

Total: 1

# isi snapshot locks delete snaploc1 1

Are you sure you want to delete snapshot lock 1 from snaploc1? (yes/[no]): yes

# isi snap locks view snaploc1 1

No such lock

Once the lock is removed, the snapshot can then be deleted:

# isi snapshot snapshots delete snaploc1

Are you sure? (yes/[no]): yes

# isi snapshot snapshots list| grep -i snaploc1 | wc -l

       0

Note that a snapshot can have up to a maximum of sixteen locks on it at any time. Also, lock numbers are continually incremented and not recycled upon deletion.

Like snapshot expiry, snapshot locks can also have an expiry time configured. For example, to set a lock on snapshot ‘snaploc1’ that expires at 1am on April 1st April, 2024:

# isi snap lock create snaploc1 --expires '2024-04-01T01:00:00'

# isi snap lock list snaploc1

ID

----

36

----

Total: 1

# isi snap lock view snaploc1 33

     ID: 36

Comment:

Expires: 2024-04-01T01:00:00

  Count: 1

Note that if the duration period of a particular snapshot lock expires but others remain, OneFS will not delete that snapshot until all the locks on it have been deleted or expired.

The following table provides an example snapshot expiration schedule, with monthly locked snapshots to prevent deletion:

Snapshot Frequency Snapshot Time Snapshot Expiration Max Retained Snapshots
Every other hour Start at 12:00AM

End at 11:59AM

1 day 27
Every day At 12:00AM 1 week
Every week Saturday at 12:00AM 1 month
Every month First Saturday of month at 12:00AM Locked

3. Roles-based Access Control

Read-only snapshots plus locks present physically secure snapshots on a cluster. However, if you are able to login to the cluster and have the required elevated administrator privileges to do so, you can still remove locks and/or delete snapshots.

Since data security threats come from inside an environment as well as out, such as from a disgruntled IT employee or other internal bad actor, another key to a robust security profile is to constrain the use of all-powerful ‘root’, ‘administrator’, and ‘sudo’ accounts as much as possible. Instead, of granting cluster admins full rights, a preferred security best practice is to leverage the comprehensive authentication, authorization, and accounting framework that OneFS natively provides.

OneFS role-based access control (RBAC) can be used to explicitly limit who has access to manage and delete snapshots. This granular control allows administrative roles to be crafted which can create and manage snapshot schedules, but prevent their unlocking and/or deletion. Similarly, lock removal and snapshot deletion can be isolated to a specific security role (or to root only).

A cluster security administrator selects the desired access zone, creates a zone-aware role within it, assigns privileges, and then assigns members.

For example, from the WebUI under Access > Membership and roles > Roles:

When these members login to the cluster via a configuration interface (WebUI, Platform API, or CLI) they inherit their assigned privileges.

The specific privileges that can be used to segment OneFS snapshot management include:

Privilege Description
ISI_PRIV_SNAPSHOT_ALIAS Aliasing for snapshots
ISI_PRIV_SNAPSHOT_LOCKS Locking of snapshots from deletion
ISI_PRIV_SNAPSHOT_PENDING Upcoming snapshot based on schedules
ISI_PRIV_SNAPSHOT_RESTORE Restoring directory to a particular snapshot
ISI_PRIV_SNAPSHOT_SCHEDULES Scheduling for periodic snapshots
ISI_PRIV_SNAPSHOT_SETTING Service and access settings
ISI_PRIV_SNAPSHOT_SNAPSHOTMANAGEMENT Manual snapshots and locks
ISI_PRIV_SNAPSHOT_SNAPSHOT_SUMMARY Snapshot summary and usage details

Each privilege can be assigned one of four permission levels for a role, including:

Permission Indicator Description
No permission.
R Read-only permission.
X Execute permission.
W Write permission.

The ability for a user to delete a snapshot is governed by the ‘ISI_PRIV_SNAPSHOT_SNAPSHOTMANAGEMENT’ privilege.  Similarly, the ‘ISI_PRIV_SNAPSHOT_LOCKS’ governs lock creation and removal.

In the following example, the ‘snap’ role has ‘read’ rights for the ‘ISI_PRIV_SNAPSHOT_LOCKS’ privilege, allowing a user associated with this role to view snapshot locks:

# isi auth roles view snap | grep -I -A 1 locks

             ID: ISI_PRIV_SNAPSHOT_LOCKS

     Permission: r

--

# isi snapshot locks list snaploc1

ID

----

1

----

Total: 1

However, attempts to remove the lock ‘ID 1’ from the ‘snaploc1’ snapshot fail without write privileges:

# isi snapshot locks delete snaploc1 1

Privilege check failed. The following write privilege is required: Snapshot locks (ISI_PRIV_SNAPSHOT_LOCKS)

Write privileges are added to ‘ISI_PRIV_SNAPSHOT_LOCKS’ in the ‘’snaploc1’ role:

# isi auth roles modify snap –-add-priv-write ISI_PRIV_SNAPSHOT_LOCKS

# isi auth roles view snap | grep -I -A 1 locks

             ID: ISI_PRIV_SNAPSHOT_LOCKS

     Permission: w

--

This allows the lock ‘ID 1’ to be successfully deleted from the ‘snaploc1’ snapshot:

# isi snapshot locks delete snaploc1 1

Are you sure you want to delete snapshot lock 1 from snaploc1? (yes/[no]): yes

# isi snap locks view snaploc1 1

No such lock

Using OneFS RBAC, an enhanced security approach for a site could be to create three OneFS roles on a cluster, each with an increasing realm of trust:

a.  First, an IT ops/helpdesk role with ‘read’ access to the snapshot attributes would permit monitoring and troubleshooting, but no changes:

Snapshot Privilege Permission
ISI_PRIV_SNAPSHOT_ALIAS Read
ISI_PRIV_SNAPSHOT_LOCKS Read
ISI_PRIV_SNAPSHOT_PENDING Read
ISI_PRIV_SNAPSHOT_RESTORE Read
ISI_PRIV_SNAPSHOT_SCHEDULES Read
ISI_PRIV_SNAPSHOT_SETTING Read
ISI_PRIV_SNAPSHOT_SNAPSHOTMANAGEMENT Read
ISI_PRIV_SNAPSHOT_SNAPSHOT_SUMMARY Read

b.  Next, a cluster admin role, with ‘read’ privileges for ‘ISI_PRIV_SNAPSHOT_LOCKS’ and ‘ISI_PRIV_SNAPSHOT_SNAPSHOTMANAGEMENT’ would prevent snapshot and lock deletion, but provide ‘write’ access for schedule configuration, restores, etc..

Snapshot Privilege Permission
ISI_PRIV_SNAPSHOT_ALIAS Write
ISI_PRIV_SNAPSHOT_LOCKS Read
ISI_PRIV_SNAPSHOT_PENDING Write
ISI_PRIV_SNAPSHOT_RESTORE Write
ISI_PRIV_SNAPSHOT_SCHEDULES Write
ISI_PRIV_SNAPSHOT_SETTING Write
ISI_PRIV_SNAPSHOT_SNAPSHOTMANAGEMENT Read
ISI_PRIV_SNAPSHOT_SNAPSHOT_SUMMARY Write

c.  Finally, a cluster security admin role (root equivalence) would provide full snapshot configuration and management, lock control, and deletion rights:

Snapshot Privilege Permission
ISI_PRIV_SNAPSHOT_ALIAS Write
ISI_PRIV_SNAPSHOT_LOCKS Write
ISI_PRIV_SNAPSHOT_PENDING Write
ISI_PRIV_SNAPSHOT_RESTORE Write
ISI_PRIV_SNAPSHOT_SCHEDULES Write
ISI_PRIV_SNAPSHOT_SETTING Write
ISI_PRIV_SNAPSHOT_SNAPSHOTMANAGEMENT Write
ISI_PRIV_SNAPSHOT_SNAPSHOT_SUMMARY Write

Note that when configuring OneFS RBAC, remember to remove the ‘ISI_PRIV_AUTH’ and ‘ISI_PRIV_ROLE’ privilege from all but the most trusted administrators.

Additionally, enterprise security management tools such as CyberArk can also be incorporated to manage authentication and access control holistically across an environment. These can be configured to frequently change passwords on trusted accounts (ie. every hour or so), require multi-Level approvals prior to retrieving passwords, as well as track and audit password requests and trends.

While this article focuses exclusively on OneFS snapshots, the expanded use of RBAC granular privileges for enhanced security is germane to most key areas of cluster management and data protection, such as SyncIQ replication, etc.

  1. Snapshot replication

In addition to utilizing snapshots for its own checkpointing system, SyncIQ, the OneFS data replication engine, supports snapshot replication to a target cluster.

OneFS SyncIQ replication policies contain an option for triggering a replication policy when a snapshot of the source directory is completed. Additionally, at the onset of a new policy configuration, when the “Whenever a Snapshot of the Source Directory is Taken” option is selected, a checkbox appears to enable any existing snapshots in the source directory to be replicated. More information is available in this SyncIQ paper.

  1. Cyber-vaulting

File data is arguably the most difficult to protect, because:

  • It is the only type of data where potentially all employees have a direct connection to the storage (with the other type of storage it’s via an application)
  • File data is linked (or mounted) to the operating system of the client. This means that it’s sufficient to gain file access to the OS to get access to potentially critical data.
  • Users are the largest breach points that happen.

The Cyber Security Framework (CSF) from the National Institute of Standards and Technology (NIST) categorizes the threat through recovery process:

Within the ‘Protect’ phase, there are two core aspects:

  • Applying all the core protection features available on the OneFS platform, namely:
Feature Description
Access control Where the core data protection functions are being executed. Assess who actually needs write access.
Immutability Having immutable snapshots, replica versions, etc. Augmenting backup strategy with an archiving strategy with SmartLock WORM.
Encryption Encrypting both data in-flight and data at rest.
Anti-virus Integrating with anti-virus/anti-malware protection that does content inspection.
Security advisories Dell Security Advisories (DSA) inform about fixes to common vulnerabilities and exposures.


  • Data isolation provides a last resort copy of business critical data, and can be achieved by using an air gap to isolate the cyber vault copy of the data. The vault copy is logically separated from the production copy of the data. Data syncing happens only intermittently by closing the airgap after ensuring there are no known issues.

The combination of OneFS snapshots and SyncIQ replication allows for granular data recovery. This means that only the affected files are recovered, while the most recent changes are preserved for the unaffected data. While an on-prem air-gapped cyber vault can still provide secure network isolation, in the event of an attack, the ability to failover to a fully operational ‘clean slate’ remote site provides additional security and peace of mind.

We’ll explore PowerScale cyber protection and recovery in more depth in a future article.

OneFS SmartQoS Monitoring and Troubleshooting

The previous articles in this series have covered the SmartQoS architecture, configuration, and management. Now, we’ll turn out attention to monitoring and troubleshooting.

The ‘isi statistics workload’ CLI command can be used to monitor the dataset’s performance. The ‘Ops’ column displays the current protocol operations per second. In the following example, OPs stabilize  around 9.8, which is just below the configured limit value of 10 Ops.

# isi statistics workload --dataset ds1 & data

Similarly, this next example from the SmartQoS WebUI shows a small NFS workflow performing 497 protocol OPS in a pinned workload with a limit of 500 OPS:

Multiple paths and protocols can be pinned by selecting ‘Pin Workload’ option for a given Dataset. Here, four directory path workloads are each configured with different Protocol OPs limits:

When it comes to troubleshooting SmartQoS, there are a few areas that are worth checking right away, including the SmartQoS Ops limit configuration, isi_pp_d and isi_stats_d daemons, and the protocol service(s).

  1. For suspected Ops limit configuration issues, first confirm that the SmartQoS limits feature is enabled:
# isi performance settings view
Top N Collections: 1024
Time In Queue Threshold (ms): 10.0
Target read latency in microseconds: 12000.0
Target write latency in microseconds: 12000.0
Protocol Ops Limit Enabled: Yes

Next, verify that the workload level protocols_ops limit is correctly configured:

# isi performance workloads view <workload>

Check whether any errors are reported in the isi_tardis_d configuration log:

# cat /var/log/isi_tardis_d.log
  1. To investigating isi_pp_d, first check that the service is enabled
# isi services –a isi_pp_d

Service 'isi_pp_d' is enabled.

If necessary, the isi_pp_d service can be restarted as follows:

# isi services isi_pp_d disable

Service 'isi_pp_d' is disabled.

# isi services isi_pp_d enable

Service 'isi_pp_d' is enabled.

There’s also an isi_pp_d debug tool, which can be helpful in a pinch:

# isi_pp_d -h

Usage: isi_pp_d [-ldhs]

-l Run as a leader process; otherwise, run as a follower. Only one leader process on the cluster will be active.

-d Run in debug mode (do not daemonize).

-s Display pp_leader node (devid and lnn)

-h Display this help.

Debugging can be enabled on the isi_pp_d log file with the following command syntax:

# isi_ilog -a isi_pp_d -l debug, /var/log/isi_pp_d.log

For example, the following log snippet shows a typical isi_ppd_d.log message communication between isi_pp_d leader and isi_pp_d followers:

/ifs/.ifsvar/modules/pp/comm/SETTINGS

[090500b000000b80,08020000:0000bfddffffffff,09000100:ffbcff7cbb9779de,09000100:d8d2fee9ff9e3bfe,090001 00:0000000075f0dfdf]      

100,,,,20,1658854839  < in the format of <workload_id, cputime, disk_reads, disk_writes, protocol_ops, timestamp>

Here, the extract from the /var/log/isi_pp_d.log logfiles from nodes 1 and 2 of a cluster illustrate the different stages of Protocol Ops limit enforcement and usage:

  1. To investigate the isi_stats_d, first confirm that the isi_pp_d service is enabled:
# isi services -a isi_stats_d
Service 'isi_stats_d' is enabled.

If necessary, the isi_stats_d service can be restarted as follows:

# isi services isi_stats_d disable

# isi services isi_stats_d enable

The workload level statistics can be viewed with the following command:

# isi statistics workload list --dataset=<name>

Debugging can be enabled and on the isi_stats_d log file with the following command syntax:

# isi_stats_tool --action set_tracelevel --value debug

# cat /var/log/isi_stats_d.log
  1. To investigate protocol issues, the ‘isi services’ and ‘lwsm’ CLI commands can be useful. For example, to check the status of the S3 protocol:
# /usr/likewise/bin/lwsm list | grep -i protocol
hdfs                       [protocol]    stopped
lwswift                    [protocol]    running (lwswift: 8393)
nfs                        [protocol]    running (nfs: 8396)
s3                         [protocol]    stopped
srv                        [protocol]    running (lwio: 8096)

# /usr/likewise/bin/lwsm status s3
stopped

# /usr/likewise/bin/lwsm info s3
Service: s3
Description: S3 Server
Categories: protocol
Path: /usr/likewise/lib/lw-svcm/s3.so
Arguments:
Dependencies: lsass onefs_s3 AuditEnabled?flt_audit_s3
Container: s3

The above CLI output confirms that the S3 protocol is inactive. The S3 service can be started as follows:

# isi services -a | grep -i s3
s3                   S3 Service                               Enabled

Similarly, the S3 service can be restarted as follows:

# /usr/likewise/bin/lwsm restart s3
Stopping service: s3
Starting service: s3

To investigate further, the protocol’s log level verbosity can be increase. For example, to set the s3 log to ‘debug’:

# isi s3 log-level view
Current logging level is 'info'

# isi s3 log-level modify debug

# isi s3 log-level view
Current logging level is 'debug'

Next, view and monitor the appropriate protocol log. For example, for the S3 protocol:

# cat /var/log/s3.log

# tail -f /var/log/s3.log

Beyond the above, /var/log/messages can also be monitored for pertinent errors, since the main partition performance (PP) modules log to this file. Debug level logging can be enabled for the various PP modules as follows

Dataset:

# sysctl ilog.ifs.acct.raa.syslog=debug+ 
ilog.ifs.acct.raa.syslog: error,warning,notice (inherited) -> error,warning,notice,info,debug

Workload:

# sysctl ilog.ifs.acct.rat.syslog=debug+
ilog.ifs.acct.rat.syslog: error,warning,notice (inherited) -> error,warning,notice,info,debug

Actor work:

# sysctl ilog.ifs.acct.work.syslog=debug+
ilog.ifs.acct.work.syslog: error,warning,notice (inherited) -> error,warning,notice,info,debug

When finished, the default logging levels for the above modules can be restored as follows:

# sysctl ilog.ifs.acct.raa.syslog=notice+

# sysctl ilog.ifs.acct.rat.syslog=notice+

# sysctl ilog.ifs.acct.work.syslog=notice+

OneFS SmartQoS Configuration and Setup

In the previous article in this series, we looked at the underlying architecture and management of SmartQoS in OneFS 9.5. Next, we’ll step through an example SmartQoS configuration via the CLI and WebUI.

After an initial set up, configuring a SmartQoS protocol Ops limit comprises four fundamental steps. These are:

Step Task Description Example
1 Identify Metrics of interest Used for tracking, to enforce an Ops limit Uses ‘path and ‘protocol’ for the metrics to identify the workload.
2 Create a Dataset For tracking all of the chosen metric categories Create the dataset ‘ds1’ with the metrics identified.
3 Pin a Workload To specify exactly which values to track within the chosen metrics path: /ifs/data/client_exports

protocol: nfs3

4 Set a Limit To limit Ops based on the dataset, metrics (categories), and metric values defined by the workload Protocol_ops limit: 100


Step 1:

First, select a metric of interest. For this example we’ll use the following:

  • Protocol: NFSv3
  • Path: /ifs/test/expt_nfs

If not already present, create and verify an NFS export – in this case at /ifs/test/expt_nfs:

# isi nfs exports create /ifs/test/expt_nfs

# isi nfs exports list

ID Zone Paths Description

------------------------------------------------

1 System /ifs/test/expt_nfs

------------------------------------------------

Or from the WebUI, under Protocols UNIX sharing (NFS) > NFS exports:


Step 2:

The ‘dataset’ designation is used to categorize workload by various identification metrics including:

ID Metric Details
Username UID or SID
Primary groupname Primary GID or GSID
Secondary groupname Secondary GID or GSID
Zone name
IP address Local or remote IP address or IP address range
Path Except for S3 protocol
Share SMB share or NFS export ID
Protocol NFSv3, NFSv4, NFSoRDMA, SMB, or S3

SmartQoS in OneFS 9.5 only allows protocol OPs as the transient resources used for configuring a limit ceiling.

For example, the following CL I command can be used to create a dataset ‘ds1’, specifying protocol and path as the ID metrics:

# isi performance datasets create --name ds1 protocol path

Created new performance dataset 'ds1' with ID number 1.

Note: Resource usage tracking by ‘path’ metric is only supported by SMB and NFS.

The following command will display any configured datasets:

# isi performance datasets list

Or, from the WebUI by navigating to Cluster management > Smart QoS:


Step 3:

After the dataset has been created, a workload can be pinned to it by specifying the metric values. For example:

# isi performance workloads pin ds1 protocol:nfs3 path: /ifs/test/expt_nfs

Pinned performance dataset workload with ID number 100.

Or from the WebUI by browsing to Cluster management > Smart QoS > Pin workload:

After pinning a workload, the entry will show in the ‘Top Workloads’ section of the WebUI page. However, wait at least 30 seconds to start receiving updates.

To list all the pinned workloads from a specified dataset, use the following command:

# isi performance workloads list ds1

The prior command’s output indicates that there are currently no limits set for this workload.

By default, a protocol ops limit exists for each workload. However it is set to the maximum (the maximum value of a 64-bit unsigned integer). This is represented in the CLI output by a dash (“-“) if a limit has not been explicitly configured:

# isi performance workloads list ds1

ID   Name  Metric Values           Creation Time       Cluster Resource Impact  Client Impact  Limits

--------------------------------------------------------------------------------------

100  -     path:/ifs/test/expt_nfs 2023-02-02T12:06:05  -          -             -

           protocol:nfs3

--------------------------------------------------------------------------------------

Total: 1


Step 4:

For a pinned workload in dataset, a limit for the protocol ops limit can be configured from the CLI using the following syntax:

# isi performance workloads modify <dataset> <workload ID> --limits protocol_ops:<value>

When configuring SmartQoS, always be aware that it is a powerful performance throttling tool which can be applied to significant areas of a cluster’s data and userbase. For example, protocol OPs limits can be configured for metrics such as ‘path:/ifs’, which would affect the entire /ifs filesystem, or ‘zone_name:System’ which would limit the System access zone and all users within it. While such configurations are entirely valid, they would have a significant, system-wide impact. As such, caution should be exercised when configuring SmartQoS to avoid any inadvertent, unintended or unexpected performance constraints.

In the following example, the dataset is ‘ds1’, the workload ID is ‘100’, and the protocol OPs limit is set to value ‘10’:

# isi performance workloads modify ds1 100 --limits protocol_ops:10

protocol_ops: 18446744073709551615 -> 10

Or from the WebUI by browsing to Cluster management > Smart QoS > Pin and throttle workload:

The ‘isi performance workloads’ command can be used in ‘list’ mode to show details of the workload ‘ds1’. In this case, ‘Limits’ is set to protocol_ops = 10.

# isi performance workloads list test

ID   Name  Metric Values           Creation Time       Cluster Resource Impact  Client Impact  Limits

--------------------------------------------------------------------------------------

100  -     path:/ifs/test/expt_nfs 2023-02-02T12:06:05  -  -  protocol_ops:10

           protocol:nfs3

--------------------------------------------------------------------------------------

Total: 1

Or in ‘view’ mode:

# isi performance workloads view ds1 100

                     ID: 100

                   Name: -

          Metric Values: path:/ifs/test/expt_nfs, protocol:nfs3

          Creation Time: 2023-02-02T12:06:05

Cluster Resource Impact: -

          Client Impact: -

                 Limits: protocol_ops:10

Or from the WebUI by browsing to Cluster management > Smart QoS:

The limit value of a pinned workload can be easily modified with the following CLI syntax. For example, to set the limit to 100 OPs:

# isi performance workloads modify ds1 100 --limits protocol_ops:100

Or from the WebUI by browsing to Cluster management > Smart QoS > Edit throttle:

Similarly, the following CLI command can be used to easily remove a protocol ops limit for a pinned workload:

# isi performance workloads modify ds1 100 --no-protocol-ops-limit

Or from the WebUI by browsing to Cluster management > Smart QoS > Remove throttle:

OneFS SmartQoS Architecture and Management

The SmartQoS Protocol Ops limits architecture, introduced in OneFS 9.5, involves three primary capabilities:

  • Resource tracking
  • Resource limit distribution
  • Throttling

Under the hood, the OneFS protocol heads (NFS, SMB and S3) identify and track how many protocol operations are being processed through a specific export or share. The existing partitioned performance (PP) reporting infrastructure is leveraged for cluster wide resource usage collection, limit calculation and distribution, along with new OneFS 9.5 functionality to support pinned workload protocol Ops limits.

The protocol scheduling module (LwSched) has an inbuilt throttling capability that allows the execution of individual operations to be delayed by temporarily pausing them, or ‘sleeping’. Additionally, in OneFS 9.5, the partitioned performance kernel modules have also been enhanced to calculate ‘sleep time’ based on operation count resource information (requested, average usage etc.) – both within the current throttling window, and for a specific workload.

The fundamental SmartQoS workflow can be characterized as follows:

  1. Configuration via CLI, pAPI, or WebUI.
  2. Statistics gatherer obtains Op/s data from the partitioned performance (PP) kernel.
  3. Stats gatherer communicates Op/s data to PP leader service.
  4. Leader queries config manager for per-cluster rate limit.
  5. Leader calculates per-node limit.
  6. PP follower service is notified of per-node Op/s limit.
  7. Kernel is informed of new per-node limit.
  8. Work is scheduled with rate-limited resource.
  9. Kernel returns sleep time, if needed.

When an admin configures a per-cluster protocol Ops limit, the statistics gathering service, isi_stats_d, begins collecting workload resource information every 30 seconds by default from the partitioned performance (PP) kernel on each node in the cluster and notifies the isi_pp_d leader service of this resource info. Next, the leader gets the per-cluster protocol Ops limit plus additional resource consumption metrics from the isi_acct_cpp service via isi_tardis_d, the OneFS cluster configuration service and calculates the protocol Ops limit of each node for the next throttling window. It then instructs the isi_pp_d follower service on each node to update the kernel with the newly calculated protocol Ops limit, plus a request to reset throttling window.

Upon receipt of a scheduling request for a work item from the protocol scheduler (LwSched), the kernel calculates the required ‘sleep time’ value, based on the current node protocol Ops limit and resource usage in the current throttling window. If insufficient resources are available, the thread for work item execution thread is put to sleep for a specific interval returned from PP kernel. If resources are available, or the thread is reactivated from sleeping, it executes the work item and reports the resource usages statistics back to PP, releasing any scheduling resources it may own.

SmartQoS can be configured through either the CLI, platform API, or WebUI, and OneFS 9.5 introduces a new SmartQoS WebUI page to support this. Note that SmartQoS is only available once an upgrade to OneFS 9.5 has been committed, and any attempt to configure or run the feature prior to upgrade commit will fail with the following message:

# isi performance workloads modify DS1 -w WS1 --limits protocol_ops:50000

 Setting of protocol ops limits not available until upgrade has been committed

Once a cluster is running OneFS 9.5 and the release is committed, the SmartQoS feature is enabled by default. This, and the current configuration, can be confirmed using the following CLI command:

 # isi performance settings view

                   Top N Collections: 1024

        Time In Queue Threshold (ms): 10.0

 Target read latency in microseconds: 12000.0

Target write latency in microseconds: 12000.0

          Protocol Ops Limit Enabled: Yes

In OneFS 9.5, the ‘isi performance settings modify’ CLI command now includes a ‘protocol-ops-limit-enabled’ parameter to allow the feature to be easily disabled (or re-enabled) across the cluster. For example:

# isi performance settings modify --protocol-ops-limit-enabled false

protocol_ops_limit_enabled: True -> False

Similarly, the ‘isi performance settings view’ CLI command has been extended to report the protocol OPs limit state:

# isi performance settings view *

Top N Collections: 1024

Protocol Ops Limit Enabled: Yes

In order to set a protocol OPs limit on workload from the CLI, the ‘isi performance workload pin’ and ‘isi performance workload modify’ commands now accept an optional ‘–limits’ parameter. For example, to create a pinned workload with the ‘protocol_ops’ limit set to 10000:

# isi performance workload pin test protocol:nfs3 --limits

protocol_ops:10000

Similarly, to modify an existing workload’s ‘protocol_ops’ limit to 20000:

# isi performance workload modify test 101 --limits protocol_ops:20000

protocol_ops: 10000 -> 20000

When configuring SmartQoS, always be cognizant of the fact that it is a powerful throttling tool which can be applied to significant areas of a cluster’s data and userbase. For example, protocol OPs limits can be configured for metrics such as ‘path:/ifs’, which would affect the entire /ifs filesystem, or ‘zone_name:System’ which would limit the System access zone and all users within it.

While such configurations are entirely valid, they would have a significant, system-wide impact. As such, caution should be exercised when configuring SmartQoS to avoid any inadvertent, unintended or unexpected performance constraints.

To clear a protocol Ops limit on workload, the ‘isi performance workload’ modify CLI command has been extended to accept an optional ‘–noprotocol-ops-limit’ argument. For example:

# isi performance workload modify test 101 --no-protocol-ops-limit

protocol_ops: 20000 -> 18446744073709551615

Note that the value of ‘18446744073709551615’ in the command output above represents ‘NO_LIMIT’ set.

A workload’s protocol Ops limit can be viewed using the ‘isi performance workload list’ and ‘isi performance workload view’ CLI commands, which have been modified in OneFS 9.5 to display the limits appropriately. For example:

# isi performance workload list test

ID Name Metric Values Creation Time Impact Limits

---------------------------------------------------------------------

101 - protocol:nfs3 2023-02-02T22:35:02 - protocol_ops:20000

---------------------------------------------------------------------


# isi performance workload view test 101

ID: 101

Name: -

Metric Values: protocol:nfs3

Creation Time: 2023-02-02T22:35:02

Impact: -

Limits: protocol_ops:20000

In the next article in this series, we’ll step through an example SmartQoS configuration and verification from both the CLI and WebUI.

OneFS SmartQoS

Built atop the partitioned performance (PP) resource monitoring framework, OneFS 9.5 introduces a new SmartQoS performance management feature. SmartQoS allows a cluster administrator to set limits on the maximum number of protocol operations per second (Protocol Ops) that individual pinned workloads can consume, in order to achieve desired business workload prioritization. Among the benefits of this new QoS functionality are:

  • Enabling IT infrastructure teams to achieve performance SLAs.
  • Allowing throttling of rogue or low priority workloads and hence prioritization of other business critical workloads.
  • Helping minimize data unavailability events due to overloaded clusters.

This new SmartQoS feature in OneFS 9.5 supports the NFS, SMB and S3 protocols, including mixed traffic to the same workload.

But first, a quick refresher. The partitioned performance resource monitoring framework, which initially debuted in OneFS 8.0.1, enables OneFS to track and report the use of transient system resources (resources that only exist at a given instant), providing insight into who is consuming what resources, and how much of them. Examples include CPU time, network bandwidth, IOPS, disk accesses, and cache hits, etc.

OneFS partitioned performance is an ongoing project which, in OneFS 9.5 now provides control as well as insights. This allows control of work flowing through the system, prioritization and protection of mission critical workflows, and the ability to detect if a cluster is at capacity.

Since identification of work is highly subjective, OneFS partitioned performance resource monitoring provides significant configuration flexibility, allowing cluster admins to craft exactly how they wish to define, track, and manage workloads. For example, an administrator might want to partition their work based on criterial like which user is accessing the cluster, the export/share they are using, which IP address they’re coming from – and often a combination of all three.

OneFS has always provided client and protocol statistics, however they were typically front-end only. Similarly, OneFS provides CPU, cache and disk statistics, but they did not display who was consuming them. Partitioned performance unites these two realms, tracking the usage of the CPU, drives and caches, and spanning the initiator/participant barrier.

OneFS collects the resources consumed, grouped into distinct workloads, and the aggregation of these workloads comprise a performance dataset.

Item Description Example
Workload A set of identification metrics and resources used {username:nick, zone_name:System} consumed {cpu:1.5s, bytes_in:100K, bytes_out:50M, …}
Performance Dataset The set of identification metrics to aggregate workloads by

The list of workloads collected matching that specification

{usernames, zone_names}
Filter A method for including only workloads that match specific identification metrics. Filter{zone_name:System}

·         {username:nick, zone_name:System}

·         {username:jane, zone_name:System}

·         {username:nick, zone_name:Perf}

The following metrics are tracked by partitioned performance resource monitoring:

Category Items
Identification Metrics ·         Username / UID / SID

·         Primary Groupname / GID / GSID

·         Secondary Groupname / GID / GSID

·         Zone Name

·         Local/Remote IP Address/Range

·         Path

·         Share / Export ID

·         Protocol

·         System Name

·         Job Type

Transient Resources ·         CPU Usage

·         Bytes In/Out – Net traffic minus TCP headers

·         IOPs – Protocol OPs

·         Disk Reads – Blocks read from disk

·         Disk Writes – Block written to the journal, including protection

·         L2 Hits – Blocks read from L2 cache

·         L3 Hits – Blocks read from L3 cache

·         Latency – Sum of time taken from start to finish of OP

o   ReadLatency

o   WriteLatency

o   OtherLatency

Performance Statistics ·         Read/Write/Other Latency
Supported Protocols ·         NFS

·         SMB

·         S3

·         Jobs

·         Background Services


Be aware that, in OneFS 9.5, SmartQoS currently does not support the following Partitioned Performance criteria:

Unsupported Group Unsupported Items
Metrics •       System Name

•       Job Type

Workloads •       Top workloads (as they are dynamically and automatically generated by kernel)

•       Workloads belonging to the ‘system’ dataset

Protocols •       Jobs

•       Background services

When pinning a workload to a dataset, note that the more metrics there are in that dataset, the more parameters need to be defined when pinning to it. For example:

Dataset = zone_name, protocol, username

To set a limit on this dataset, you’d need to pin the workload by also specifying the zone name, protocol, and username.

When using the remote_address and/or local_address metrics, you can also specify a subnet. For example: 10.123.456.0/24

With the exception of the system dataset, performance datasets must be configured before statistics are collected.

For SmartQoS in OneFS 9.5, limits can be defined and configured as a maximum number of protocol operations (Protocol Ops) per second across the following protocols:

  • NFSv3
  • NFSv4
  • NFSoRDMA
  • SMB
  • S3

A Protocol Ops limit can be applied to up to 4 custom datasets. All pinned workloads within a dataset can have a limit configured, up to a maximum of 1024 workloads per dataset. If multiple workloads happen to share a common metric value with overlapping limits, the lowest limit that is configured would be enforced

Note that, on upgrading to OneFS 9.5, SmartQoS is activated only once the new release has been successfully committed.

In the next article in this series, we’ll take a deeper look at SmartQoS’ underlying architecture and workflow.

OneFS SmartPools Transfer Limits Configuration and Management

In the first article in this series, we looked at the architecture and considerations of the new OneFS 9.5’s SmartPools Transfer Limits. Now, we turn our attention to the configuration and management of this feature.

From the control plane side, OneFS 9.5 contains several WebUI and CLI enhancements to reflect the new SmartPools Transfer Limits functionality. Probably the most obvious change is in the ‘local storage usage status’ histogram, where tiers and their child nodepools have been aggregated, for a more logical grouping. Also blue limit-lines have been added above each of the storagepools, and a red warning status displayed for any pools that have exceeded the transfer limit.

Similarly, the storage pools status page now includes transfer limit details, with the 90% limit displayed for any storagepools using the default setting.

From the CLI, the ‘isi storagepool nodepools view’ command reports the transfer limit status and percentage for a pool. The used SSD and HDD bytes percentages, in the command output indicate where the pool utilization is relative to the transfer limit.

# isi storagepool nodepools view h5600_200tb_6.4tb-ssd_256gb
ID: 42
Name: h5600_200tb_6.4tb-ssd_256gb
Nodes: 77, 78, 79, 80, 81, 82, 83, 84
Node Type IDs: 10
Protection Policy: +2d:1n
Manual: No
L3 Enabled: Yes
L3 Migration Status: l3
Tier: -
Transfer Limit: 90%
Transfer Limit State: default
Usage
Avail Bytes: 1.13P
Avail SSD Bytes: 0.00
Avail HDD Bytes: 1.13P
Balanced: No
Free Bytes: 1.18P
Free SSD Bytes: 0.00
Free HDD Bytes: 1.18P
Total Bytes: 1.41P
Total SSD Bytes: 0.00
Total HDD Bytes: 1.41P
Used Bytes: 229.91T (17%)
Used SSD Bytes: 0.00 (0%)
Used HDD Bytes: 229.91T (17%)
Virtual Hot Spare Bytes: 56.94T

The storage transfer limit can be easily configured from the CLI as for either a  specific pool, as a default, or disabled, using the new –transfer-limit and –default-transfer-limit flags.

The following CLI command can be used to set the transfer limit for a specific storagepool:

# isi storagepool nodepools/tier modify --transfer-limit={0-100, default, disabled}

For example, to set a limit of 80% on an A200 nodepool:

# isi storagepool a200_30tb_1.6tb-ssd_96gb modify --transfer-limit=80

Or to set the default limit of 90% on tier ‘perf1’:

# isi storagepool perf1 --transfer-limit=default

Note that setting the transfer limit of a tier automatically applies to all its child nodepools, regardless of any prior child limit configurations.

The global ‘isi storage settings view’ CLI command output shows the default transfer limit, which is 90%, but can be configured between 0 to 100% if desired.

# isi storagepool settings view

     Automatically Manage Protection: files_at_default

Automatically Manage Io Optimization: files_at_default

Protect Directories One Level Higher: Yes

       Global Namespace Acceleration: disabled

       Virtual Hot Spare Deny Writes: Yes

        Virtual Hot Spare Hide Spare: Yes

      Virtual Hot Spare Limit Drives: 2

     Virtual Hot Spare Limit Percent: 0

             Global Spillover Target: anywhere

                   Spillover Enabled: Yes

              Default Transfer Limit: 90%

        SSD L3 Cache Default Enabled: Yes

                     SSD Qab Mirrors: one

            SSD System Btree Mirrors: one

            SSD System Delta Mirrors: one

This default limit can be reconfigured from the CLI with the following syntax::

# isi storagepool settings modify --default-transfer-limit={0-100, disabled}

For example, to set a new default transfer limit of 85%:

# isi storagepool settings modify --default-transfer-limit=85

And the same changes can be made from the SmartPools WebUI, too, by navigating to Storage pools > SmartPools settings:

Once a SmartPools job has completed in OneFS 9.5, the job report contains a new field that reports any ‘files not moved due to transfer limit exceeded’.

# isi job reports view 1056

...

...

Policy/testpolicy/Access changes skipped 0

Policy/testpolicy/ADS containers matched 'head’ 0

Policy/testpolicy/ADS containers matched 'snapshot’ 0

Policy/testpolicy/ADS streams matched 'head’ 0

Policy/testpolicy/ADS streams matched 'snapshot’ 0

Policy/testpolicy/Directories matched 'head’ 0

Policy/testpolicy/Directories matched 'snapshot’ 0

Policy/testpolicy/File creation templates matched 0

Policy/testpolicy/Files matched 'head’ 0

Policy/testpolicy/Files matched 'snapshot’ 0

Policy/testpolicy/Files not moved due to transfer limit exceeded 0 

Policy/testpolicy/Files packed 0

Policy/testpolicy/Files repacked 0

Policy/testpolicy/Files unpacked 0

Policy/testpolicy/Packing changes skipped 0

Policy/testpolicy/Protection changes skipped 0

Policy/testpolicy/Skipped files already in containers 0

Policy/testpolicy/Skipped packing non-regular files 0

Policy/testpolicy/Skipped packing regular files 0

Additionally, the ‘SYS STORAGEPOOL FILL LIMIT EXCEEDED’ alert is triggered when a storagepool’s usage has exceeded its transfer limit. Raised at the INFO level. Each hour, CELOG fires off a monitor helper script which will measure how full each storagepool is relative to its transfer limit. The usage is gathered by reading from the diskpool database, and the transfer limits are stored in gconfig. If a nodepool has a transfer limit of 50% and usage of 75%, the monitor helper will report a measurement of 150%, triggering an alert.

# isi event view 126

ID: 126

Started: 11/29 20:32

Causes Long: storagepool: vonefs_13gb_4.2gb-ssd_6gb:hdd usage: 33.4, transfer limit: 30.0

Lnn: 0

Devid: 0

Last Event: 2022-11-29T20:32:16

Ignore: No

Ignore Time: Never

Resolved: No

Resolve Time: Never

Ended: --

Events: 1

Severity: information

And from the WebUI:

And there you have it: Transfer Limits, and the first step in the evolution towards a smarter SmartPools.

OneFS SmartPools Transfer Limits

The new OneFS 9.5 release introduces the first phase of engineering’s Smarter SmartPools initiative, and delivers a new feature called SmartPools transfer limits.

The goal of SmartPools transfer limits is to address spill over. Previously, when file pool policies were executed, OneFS had no guardrails to protect against overfilling the destination or target storage pool. So if a pool was overfilled, data would unexpectedly spill over into other storage pools.

The effects of an overflow would result in storagepool usage exceeding 100%, and the SmartPools job itself doing a considerable amount of unnecessary work, trying to send files to a given storagepool. But since the pool was full, it would then have to send those files off to another storage pool that was below capacity. This would result in data going where it wasn’t intended, and the potential for individual files to end up getting split between pools. Also, if the full pool was on the most performant storage in the cluster, all subsequent newly created data would now land on slower storage, affecting its throughput and latency. The recovery from a spillover can be fairly cumbersome since it’s tough for the cluster to regain balance, and urgent system administration may be required to free space on the affected tier.

In order to address this, SmartPools Transfer Limits allows a cluster admin to configure a storagepool capacity-usage threshold, expressed as a percentage, and beyond which file pool policies stop moving data to that particular storage pool.

These transfer limits only take effect when running jobs that apply filepool policies, such as SmartPools, SmartPoolsTree, and FilePolicy.

The main benefits of this feature are two-fold:

  • Safety, in that OneFS avoids undesirable actions, so the customer is prevented from getting into escalation situations, because SmartPools won’t overfill storage pools.
  • Performance, since transfer limits avoid unnecessary work, and allow the SmartPools job to finish sooner.

Under the hood, a cluster’s storagepool SSD and HDD usage is calculated using the same algorithm as reported by the ‘isi storagepools list’ CLI command. This means that a pool’s VHS (virtual hot spare) reserved capacity is respected by SmartPools transfer limits. When a SmartPools job is running, there is at least one worker on each node processing a single LIN at any given time. In order to calculate the current HDD and SSD usage per storagepool, the worker must read from the diskpool database. To circumvent this potential bottleneck, the filepool policy algorithm caches the diskpool database contents in memory for up to 10 seconds.

Transfer limits are stored in gconfig, and a separate entry is stored within the ‘smartpools.storagepools’ hierarchy for each explicitly defined transfer limit.

Note that in the SmartPools lexicon, ‘storage pool’ is a generic term denoting either a tier or nodepool. Additionally, SmartPools tiers comprise one or more constituent nodepools.

Each gconfig transfer limit entry stores a limit value and the diskpool database identifier of the storagepool that the transfer limit applies to. Additionally, a ‘transfer limit state’ field specifies which of three states the limit is in:

Limit State Description
Default Fallback to the default transfer limit.
Disabled Ignore transfer limit.
Enabled The corresponding transfer limit value is valid.

A SmartPools transfer limit does not affect the general ingress, restriping, or reprotection of files, regardless of how full the storage pool is where that file is located.  So if you’re creating or modifying a file on the cluster, it will be created there anyway. This will continue up until the pool reaches 100% capacity, at which point it will then spill over.

The default transfer limit is 90% of a pool’s capacity, and this applies to all storage pools where the cluster admin hasn’t explicitly set a threshold. Another thing to note is that the default limit doesn’t get set until a cluster upgrade to OneFS 9.5 has been committed. So if you’re running a SmartPools policy job during an upgrade, you’ll have the preexisting behavior, which is send the file to wherever the file pool policy instructs it to go. It’s also worth noting that, even though the default transfer limit is set on commit, if a job was running over that commit edge, you’d have to pause and resume it for the new limit behavior to take effect. This is because the new configuration is loaded lazily when the job workers are started up, so even though the configuration changes, a pause and resume is needed to pick up those changes.

SmartPools itself needs to be licensed on a cluster in order for transfer limits to work. And limits can be configured at the tier or nodepool level. But if you change the limit of a tier, it automatically applies to all its child nodepools, regardless of any prior child limit configurations. The transfer limit feature can also be disabled, which results in the same spillover behavior OneFS always displayed, and any configured limits will not be respected.

Note that a filepool policy’s transfer limits algorithm does not consider the size of the file when deciding whether to move it to the policy’s target storagepool, regardless of whether the file is empty, or a large file. Similarly, a target storagepool’s usage must exceed its transfer limit before the filepool policy will stop moving data to that target pool. The assumption here is that any storagepool usage overshoot is insignificant in scale compared to the capacity of a cluster’s storagepool.

A SmartPools file pool policy allow you to send snapshot or HEAD data blocks to different targets, if so desired.

Because the transfer limit applies to the storagepool itself, and not to the file pool policy, it’s important to note that, if you’ve got varying storagepool targets and one file pool policy, you may have a situation where the head data blocks do get moved. But if the snapshot is pointing at a storage pool that has exceeded its transfer limit, it’s blocks will not be moved.

File pool policies also allow you to specify how a mixed node’s SSDs are used: Either as L3 cache, or as an SSD strategy for head and snapshot blocks. If the SSDs in a node are configured for L3, they are not being used for storage, so any transfer limits are irrelevant to it. As an alternative to L3 cache, SmartPools offers three main categories of SSD strategy:  Avoid, which means send all blocks to HDD, Data, which means send everything to SSD, and then metadata read or read-write, which send varying numbers of metadata mirrors to SSD, and data blocks to hard disk.

To reflect this, SmartPools transfer limits are slightly nuanced when it comes to SSD strategies. That is, if the storagepool target contains both HDD and SSD, the usage capacity of both mediums needs to be below the transfer limit in order for the file to be moved to that target. For example, take two node pools, NP1 and NP2.

A file pool policy, Pol1, is configured, that matches all files under /ifs/dir1, with an SSD strategy of metadata write, and pool NP1 as the target for HEAD’s data blocks. For snapshots, the target is NP2, with an ‘avoid’ SSD strategy, so just writing to hard disk for both snapshot data and metadata.

When a SmartPools job runs and attempts to apply this file pool policy, it sees that SSD usage is above the 85% configured transfer limit for NP1. So, even though the hard disk capacity usage is below the limit, neither HEAD data nor metadata will be sent to NP1.

For the snapshot, the SSD usage is also above the NP2 pool’s transfer limit of 90%.

However, since the SSD strategy is ‘avoid’, and because the hard disk usage is below the limit, the snapshot’s data and metadata get successfully sent to the NP2 HDDs.