OneFS SmartQuotas Accounting and Reporting

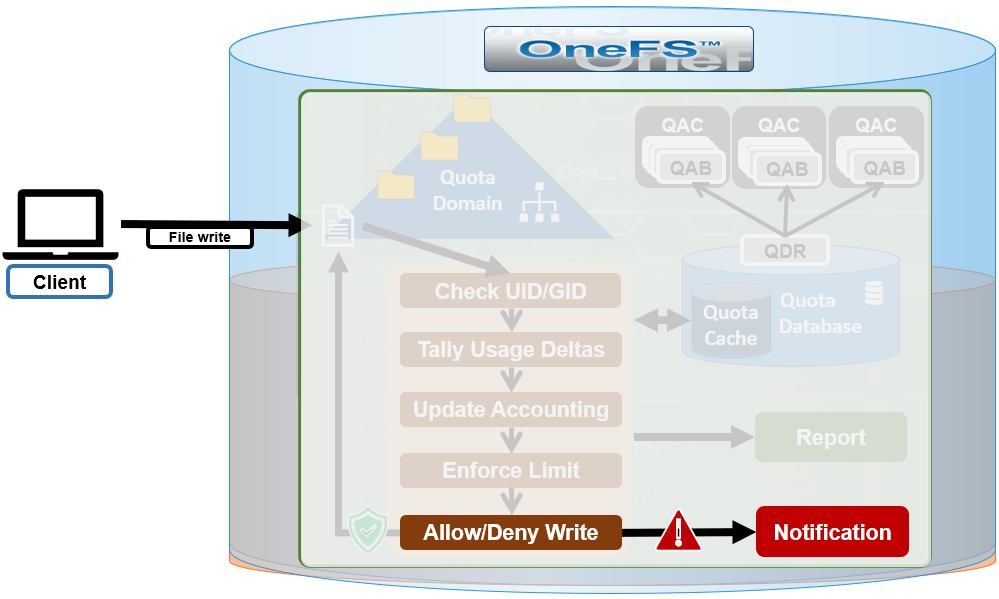
In this next article in the OneFS SmartQuotas series we turn our attention to quota accounting and reporting:

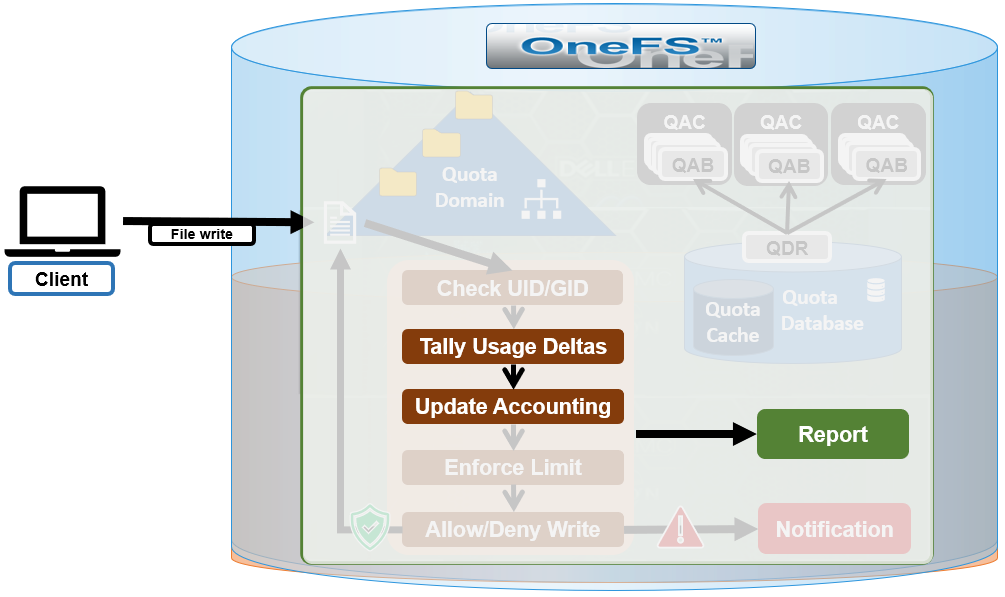
SmartQuotas has four main resources used in quota accounting:

Accounting Resource Description
Physical Size This includes all the on-disk storage associated with files and directories, with the exception of some metadata objects including the LIN tree, snapshot tracking files (STFs). For deduplicated data and file clones, each file’s 8 KB reference to a shadow store is included in the physical space calculation.
File system logical size File system logical size calculation approximates disk usage on ‘typical’ storage arrays by ignoring the erasure code, or FEC, protection overhead that OneFS employs. For regular files, the logical data space is the amount of storage required to house a particular file if it was 1x mirrored. Logical space also incorporates a file’s metadata resources.
Application Logical Size Reports total logical data store across different tiers, including CloudPools. This allows users to view quotas and free space as an application would view it, in terms of how much capacity is available to store logical data regardless of data reduction or tiering technology.
Inodes SmartQuotas counts the number of logical inodes, which allows accounting for files without any ambiguity from hard links or protection.

 When configuring a quota, these are accounting resource options are available as enforcement limits. For example, from the OneFS WebUI:

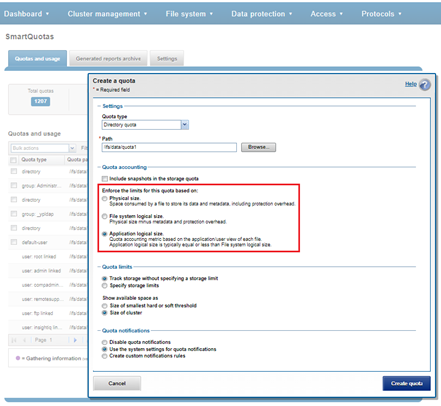
Application logical size quotas are available in OneFS 8.2 and later. Existing quotas can easily be configured to use application logical size upon upgrading from an earlier OneFS version. The benefits of application logical size quotas include:

  • Snapshots, protection overhead, deduplication, compression, and location of files all have no effect on quota consumption
  • Removes previous limitation where SmartQuotas only reported on-cluster storage, ignoring cloud consumption
  • Presents view that aligns with Windows storage accounting
  • Enables accounting and enforcing quota on actual file sizes
  • Precisely accounts for small files
  • Enables enforcing quotas on a path irrespective of the physical location of file.

The following table describes how SmartQuotas accounts for a 1KB file with the various datatypes:

Data Type Accounting
File: physical size Every non-sparse 8 KB disk block a file consumes including protection
File: file system logical size Every non-sparse 8 KB disk block a file consumes excluding protection
File: application logical size Actual size of file (rather than total of 8 KB disk blocks consumed)
CloudPools file: file system logical size Size of CloudPools SmartLink stub file (8 KB)
CloudPools file: application logical size Actual size of file on cloud storage (rather than local stub file)
Directories Sum of all directory entries
Symlinks Data size
ACL and similar Data size
Alternate data stream Each ADS is charged as a file and a container as a directory

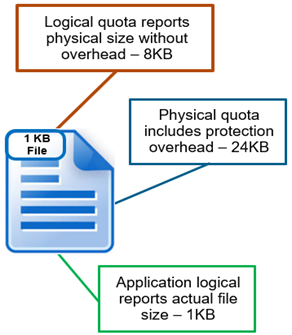
The example below shows each method of accounting for a 1KB file.

Method Details
Logical size accounting Sum of physical sizes of all files/directories without overhead.
Physical size accounting Sum of physical sizes of all files/dirs with protection overhead.
Application Logical Accounting Sum of actual sizes of all files/directories.

So the logical size is reported as 8 KB, or one block, physical size reports 24 KB (file with 3x mirroring protection), and application logical shows its actual size of 1 KB.

Other resources encountered during quota accounting include:

Resource Description
Hard Link Each logical inode is accounted exactly once in every domain to which it belongs. If an inode is present in multiple domains, it is accounted in multiple domains. Alternatives such as shared accounting were considered. However, if inodes are not accounted once in every domain, it is possible for the deletion of a hard link in one domain to put another domain over quota.
Alternate Data Stream (ADS) A file with an alternate data stream or resource fork is accounted as the sum of the resource usage of the individual file, the usage for the container directory and the usage for each ADS. SmartQuotas handles the rename of a file with ADS synchronously, despite the fact that the ADS container is just a directory. SmartQuotas will store an accounting summary on the ADS container to handle renames.
Directory Rename A directory rename presents a unique challenge to a per-directory quota system. Renames of directories within a domain are trivial – if both the source and target directories have the same domain membership, no accounting changes. However, non-empty directories are not permitted to be moved when the SmartQuotas configuration is different on the source and the target parent directories. If a user trusts the client operating systems to copy files and preserve all the necessary attributes, then the user may set dir_rename_errno to EXDEV, which causes most UNIX and Windows clients to do a copy and delete of the directory tree to affect the move.
Snapshot Accounting If wanted, a quota domain can also include snapshot usage in its accounting. SmartQuotas will only support snapshots created after the quota domain was created. This is because determining quota governance (including QuotaScan job) for existing snapshots is a very time and resource consuming operation. As most administrators cycle their snapshots through timed expirations, SmartQuotas will eventually accrue enough accounting information to include the entire set of relevant snapshots on the system.

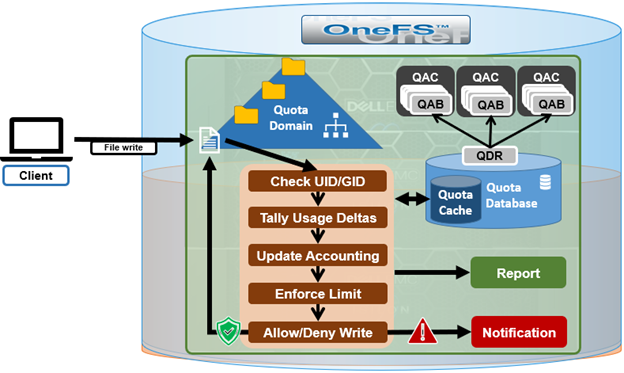
SmartQuotas supports flexible reporting options that enable administrators to more effectively manage cluster resources and analyze usage statistics. The goal of Quota Reporting is to provide a summarized view of the past or present state of the Quota Domains. There are three methods of data collection and reporting that are supported:

Reporting Method Detail
Scheduled Scheduled reports are generated and saved on a regular interval.
Ad-hoc Ad-hoc reports are generated and saved per request of the user.
Live Live reports are generated for immediate and temporary viewing

 A summary of general quota usage info can be viewed from the CLI via the ‘isi quota quotas list’ command syntax. Or from the WebUI, by navigating to File System > SmartQuotas > Quotas and Usage.

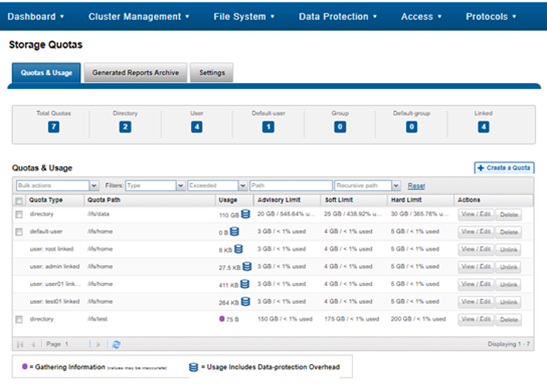
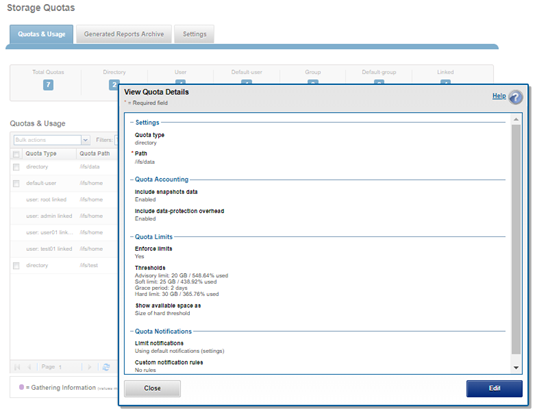
For each quota entry, additional information and context is available via the ‘isi quota quotas view <quota_name>’ CLI command, or by clicking on the WebUI ‘View / Edit’ button:

Client-side quota reporting includes support for rpc.quotad, which allows NFS clients to view quota consumption for both hard and soft quotas using the native Linux and UNIX ‘quota’ CLI utilities. There is also the ability to view available user capacity set by soft and/or hard user or group quotas, rather than the entire cluster capacity or parent directory-quotas.

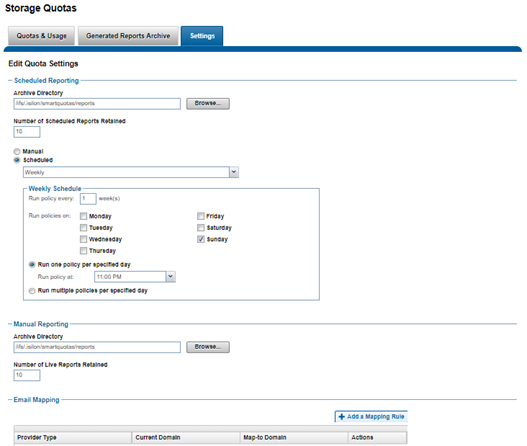
The quota reports and summaries are typically stored in the /ifs/.isilon/smartquotas/reports directory, but this location is configurable. Each generated report includes the quota domain definition, state, usage, and global configuration settings. By default, ten reports and ten summaries are kept at a time, and older versions are purged. This can be configured from the WebUI, by navigating to File System > SmartQuotas > Settings:

On demand reports can also be created at any time to view the current state of the storage quotas system. These live reports can be saved manually.

Reports and summaries are prefixed by either ‘ad hoc’ or ‘scheduled’ to aid with identification.

The OneFS CLI export functionality makes use of the same data generation and storage format as quota reporting but should not require any extra requirements beyond the three types of reports. After the collection of the raw reporting data, data summaries can be produced given a set of filtering parameters and sorting type.

Reports can be viewed from historical sampled data or a live system. In either case, the reports are views of usage data at a given time. SmartQuotas does not provide reports on aggregated data over time (trending reports). However, the raw data can be used by a Quota Administrator to answer trending questions.

A quota report is a time-stamped XML file that starts off with global configuration settings and global notification rules:

# cat scheduled_quota_report_1465786800.xml

    <global-config>

        <quota-global-config>

            <reports>

                <schedule-pattern>1100000000|every sunday at 11pm</schedule-pattern>

                <schedule-dir>/ifs/.isilon/smartquotas/reports</schedule-dir>

                <schedule-copies>10</schedule-copies>

                <adhoc-dir>/ifs/.isilon/smartquotas/reports</adhoc-dir>

                <adhoc-copies>10</adhoc-copies>

            </reports>

        </quota-global-config>

    </global-config>

    <global-notify>

    </global-notify>

    <domains>

        <domain type="default-group" snaps="0" lin="0x0000000100020006">

            <path>/ifs/home</path>

            <inactive/>

            <enforcements default-resource="logical">

            </enforcements>

            <notifications use="global"/>

        </domain>

        <domain type="group" snaps="0" lin="0x0000000100020006" id="0">

            <inherited/>

            <id-name>wheel</id-name>

            <usage resource="physical">109568</usage>

            <usage resource="logical">32929</usage>

            <usage resource="inodes">6</usage>

            <path>/ifs/home</path>

            <inactive/>

            <enforcements default-resource="logical">

            </enforcements>

            <notifications use="default"/>

        </domain>

        <domain type="group" snaps="0" lin="0x0000000100020006" id="10">

            <inherited/>

            <id-name>admin</id-name>

            <usage resource="physical">28160</usage>

            <usage resource="logical">8208</usage>

            <usage resource="inodes">2</usage>

            <path>/ifs/home</path>

            <inactive/>

            <enforcements default-resource="logical">

            </enforcements>

            <notifications use="default"/>

        </domain>

        <domain type="group" snaps="0" lin="0x0000000100020006" id="1800">

            <inherited/>

            <id-name>Isilon Users</id-name>

            <usage resource="physical">1811456</usage>

            <usage resource="logical">705620</usage>

            <usage resource="inodes">42</usage>

            <path>/ifs/home</path>

            <inactive/>

            <enforcements default-resource="logical">

            </enforcements>

            <notifications use="default"/>

        </domain>

        <domain type="user" snaps="0" lin="0x0000000100020596" id="2002">

            <id-name>nick</id-name>

            <usage resource="physical">1001984</usage>

            <usage resource="logical">483743</usage>

            <usage resource="inodes">12</usage>

            <path>/ifs/home/nick</path>

            <enforcements default-resource="logical">

                <enforcement type="soft" resource="logical">

                    <limit>10485760</limit>

                    <grace>7776000</grace>

                </enforcement>

                <enforcement type="advisory" resource="logical">

                    <limit>5242880</limit>

                </enforcement>

            </enforcements>

            <notifications>

                <quota-notify-map tag="1"></quota-notify-map>

            </notifications>

        </domain>

    </domains>

</quota-report>

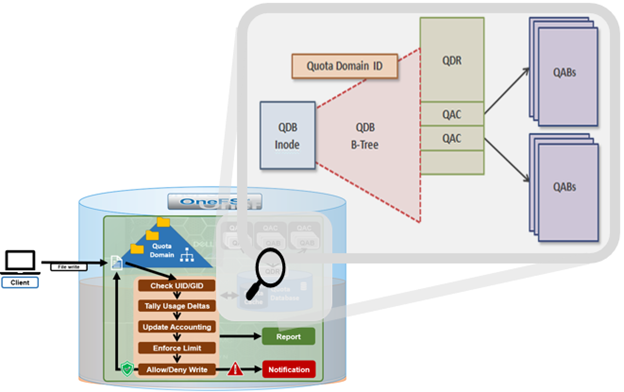
When listing domains, both inode and path, as well as name and ID, are stored with each domain. Quota Notification Rules are read and inserted into a domain entry only if the domain is not inherited to avoid any performance impact of reading the Quota Notification Rules with each domain.

SmartQuotas can be configured to produce scheduled reports to help monitor, track, and analyze storage use on a OneFS powered cluster.

Quota reports are managed by configuring settings that provide control over when reports are scheduled, how they are generated, where and how many are stored and how they are viewed. The maximum number of scheduled reports that are available for viewing in the web-administration interface can be configured for each report type. When the maximum number of reports is stored, the system automatically deletes the oldest reports to make space for new reports as they are generated.

SmartQuotas can be easily configured to generate quota report settings to generate the quota report on a specified schedule. These settings determine whether and when scheduled reports are generated, and where and how the reports are stored. Even if scheduled reports are disabled, you can still run unscheduled reports at any time.

The method to do this is:

  1. From the OneFS WebUI, go to File System Management > SmartQuotas > Settings.
  2. (Optional) On the Quota settings page, for Scheduled Reporting, click On. The Report Frequency option appears.
  3. Click Change schedule and select the report frequency that you want to set from the list.
  4. Select the reporting schedule options that you want.
  5. Click Save.

Reports are generated according to your criteria and can be viewed in the Generated Reports Archive.

In addition to scheduled quota reports, you can generate a report to capture usage statistics at a point in time. Before you can generate a quota report, quotas must exist and no QuotaScan jobs can be running.

The following procedure will achieve this:

  1. Click File System Management > SmartQuotas > Generated Reports Archive.
  2. In the Generated Quota Reports Archive area, click Generate a quota report.
  3. Click Generate Report.

The new report appears in the Quota Reports list.

You can locate quota reports, which are stored as XML files, and use your own tools and transforms to view them. This task can only be performed from the OneFS command-line interface.

A procedure for this is as follows:

  1. Open a secure shell (SSH) connection to any node in the cluster and log in.
  2. Go to the directory where quota reports are stored. The following path is the default quota report location:
/ifs/.isilon/smartquotas/reports

If quota reports are not in the default directory, you can run the isi quota settings command to find the directory where they are stored.

  1. At the command prompt, run the ls command.

To view a list of all quota reports in the directory, run the following command:

# ls -a *.xml

To view a specific quota report in the directory, run the following command:

# ls <filename>.xml

OneFS SmartQuotas Notifications

A crucial part of the OneFS SmartQuotas system is to provide user notifications regarding quota enforcement violations, both when a violation event occurs and while violation state persists on a scheduled basis.

An enforcement quota may have several notification rules associated with it. Each notification rule specifies a condition and an action to be performed when the condition is met. Notification rules are considered part of enforcements. Clearing an enforcement also clears any notification rules associated with it.

Enforcement quotas support the following notification settings:

Quota Notification Setting Description
Global default Uses the global default notification for the specified type of quota.
Custom – basic Enables creation of basic custom notifications that apply to a specific quota. Can be configured for any or all the threshold types (hard, soft, or advisory) for the specified quota.
Custom – advanced Enables creation of advanced, custom notifications that apply to a specific quota. Can be configured for any or all of the threshold types (hard, soft, or advisory) for the specified quota.
None Disables all notifications for the quota.

A quota notification condition is an event which may trigger an action defined by a notification rule. These notification rules may specify a schedule (for example, “every day at 5:00 AM”) for performing an action or immediate notification of a certain condition. Examples of notification conditions include:

  • Notify when a threshold is exceeded; at most, once every 5 minutes
  • Notify when allocation is denied; at most, once an hour
  • Notify while over threshold, daily at 2 AM
  • Notify while grace period expired weekly, on Sundays at 2 AM

Notifications are triggered for events grouped by the following two categories:

Type Description
Instant notification Includes the write-denied notification triggered when a hard threshold denies a write and the threshold-exceeded notification, triggered at the moment a hard, soft, or advisory threshold is exceeded. These are one-time notifications because they represent a discrete event in time.
Ongoing notification Generated on a scheduled basis to indicate a persisting condition, such as a hard, soft, or advisory threshold being over a limit or a soft threshold’s grace period being expired for a prolonged period.

Each notification rule can perform either one or none of the following notification actions.

Quota Notification Action Description
Alert Sends an alert for one of the quota actions, detailed below.
Email Manual Address Sends email to a specific address, or multiple addresses (OneFS 8.2 and later).
Email Owner Emails an owner mapping based on its identity source.

The email owner mapping is as follows:

Mapping Description
Active directory Lookup is performed against the domain controller (DC). If the user does not have an email setting, a configurable transformation from user name and DC fully qualified domain name is performed in order to generate an email address.
LDAP LDAP user email resolution is similar to AD users. In this case, only the email attribute looked up in the LDAP server is configurable by an administrator based on the LDAP schema for the user account information.
NIS Only the configured email transformation for the NIS fully qualified domain name is used.
Local users Only the configured email transformation is used.

The actual quota notification is handled by a daemon, isi_quota_notify_d, which performs the following functions:

  • Processes kernel notification events that get sent out. They are matched to notification rules to generate instant notifications (or other actions as specified in the notification rule)
  • Processes notification schedules – The daemon will check notification rules on a scheduled basis. These rules specify what violation condition should trigger a notification on a regular scheduled basis.
  • Performs notifications based on rule configuration to generate email messages or alert notifications.
  • Manages persistent notification states so that pending events are processed in the event of a restart.
  • Handles rescan requests when quotas are created or modified

SmartQuotas provides email templates for advisory, grace, and regular notification configuration, which can be found under /etc/ifs. The advisory limit email template (/etc/ifs/quota_email_advisory_template.txt) for example, displays:

Subject: Disk quota exceeded

The <ISI_QUOTA_DOMAIN_TYPE> quota on path <ISI_QUOTA_PATH> owned by <ISI_QUOTA_OWNER> has   exceeded the <ISI_QUOTA_TYPE> limit.

The quota limit is <ISI_QUOTA_THRESHOLD>, and <ISI_QUOTA_USAGE> is currently in use. <ISI_QUOTA_HARD_LIMIT> Contact your system administrator for details.

An email template contains text, and, optionally, variables that represent quota values. The following table lists the SmartQuotas variables that may be included in an email template.

Variable Description Example
ISI_QUOTA_DOMAIN_TYPE Quota type. Valid values are: directory, user, group, default-directory, default-user, default-group default-directory
ISI_QUOTA_EXPIRATION Expiration date of grace period Fri Jan 8 12:34:56 PST 2021
ISI_QUOTA_GRACE Grace period, in days 5 days
ISI_QUOTA_HARD_LIMIT Includes the hard limit information of the quota to make advisory/soft email notifications more informational. You have 30 MB left until you reach the hard quota limit of 50 MB.
ISI_QUOTA_NODE Hostname of the node on which the quota event occurred us-wa-1
ISI_QUOTA_OWNER Name of quota domain owner jsmith
ISI_QUOTA_PATH Path of quota domain /ifs/home/jsmith
ISI_QUOTA_THRESHOLD Threshold value 20 GB
ISI_QUOTA_TYPE Threshold type Advisory
ISI_QUOTA_USAGE Disk space in use 10.5 GB

Note that the default quota templates under /etc/ifs send are configured to send email notifications with a plain text MIME type. However, editing a template to start with an HTML tag (<html>) will allow an email client to interpret and display it as HTML content. For example:

<html><Body>

<h1>Quota Exceeded</h1><p></p>

<hr>

<p> The path <ISI_QUOTA_PATH> has exceeded the threshold <ISI_QUOTA_THRESHOLD> for this <ISI_QUOTA_TYPE> quota. </p>

</body></html>

Various system alerts are sent out to the standard cluster Alerting system when specific events occur. These include:

Alert Type Level Event Description
NotifyFailed Warning An attempt to process a notification rule failed externally, such as an undelivered email.
NotifyConfig Warning A notification rule failed due to a configuration issue, such as a non-existent user or missing email address.
NotifyExceed Warning A child quota’s advisory/soft/hard limit is greater than any of parent quota’s hard limit.
ThresholdViolation Info A quota threshold was exceeded. The conditions under which this alert is triggered are defined by notification rules.
DomainError Error An invariant was violated that resulted in a forced domain rescan.


OneFS SmartQuotas Execution, Operation, and Governance

SmartQuotas employs the OneFS job engine to execute its work. Specifically, the QuotaScan job updates the accounting for quota domains created on an existing directory path. Although it is typically run without any intervention, the administrator has the option of manually control if necessary or desirable.

The OneFS job engine is based on a delegation hierarchy made up of coordinator, director, manager, and worker processes.

Once a SmartQuotas job is initially allocated, the job engine uses a shared work distribution model in order to execute the work, and each job is identified by a unique Job ID. When a job is launched, whether it’s scheduled, started manually, or responding to a cluster event, the Job Engine spawns a child process from the isi_job_d daemon running on each node. This job engine daemon is also known as the parent process.

The entire job engine’s orchestration is handled by the coordinator, which is a process that runs on one of the nodes in a cluster. While the actual work item allocation is managed by the individual nodes, the coordinator node takes control, divides up the job, and evenly distributes the resulting tasks across the nodes in the cluster. It is also responsible for starting and stopping jobs, and also for processing work results as they are returned during the execution of a job.

Each node in the cluster has a job engine director process, which runs continuously and independently in the background. The director process is responsible for monitoring, governing and overseeing all job engine activity on a particular node, constantly waiting for instruction from the coordinator to start a new job. The director process serves as a central point of contact for all the manager processes running on a node, and as a liaison with the coordinator process across nodes.

Manager processes are responsible for arranging the flow of tasks and task results throughout the duration of a job. Each manager controls and assigns work items to multiple worker threads working on items for the designated job. Under direction from the coordinator and director, a manager process maintains the appropriate number of active threads for a configured impact level, and for the node’s current activity level.

Each worker thread is given a task, if available, which it processes item-by-item until the task is complete or the manager un-assigns the task. Towards the end of a job phase, the number of active threads decreases as workers finish up their allotted work and become idle. Nodes which have completed their work items just remain idle, waiting for the last remaining node to finish its work allocation. When all tasks are done, the job phase is considered to be complete, and the worker threads are terminated.

By default, QuotaScan runs with a ‘low’ impact policy and a low-priority value of ‘6’.

If quotas are created on empty directories, governance will instantaneously propagate from parent to child incrementally. If the directory is not empty, the QuotaScan job is used to update the governance.

A domain created on a non-empty directory will not be marked as ready. This triggers a QuotaScan job to be started, and it performs a treewalk to traverse the directory tree under the domain root.

The QuotaScan job is the cluster maintenance process responsible for scanning the cluster to performing accounting activities to bring the determined governance to each inode. In essence, the job is a distributed tree walk that is performed based on the state of the domain.

Under the hood, SmartQuotas is based on the concept of domains – the linchpins of quota accounting. Since OneFS is a single file system, it relies on domains for defining the scope of a quota in place of the typical volume boundaries found in most storage systems. As such, a domain defines which files belong to a quota, accounts for each resource type in that set and defines the top-level directory configuration point.

For SmartQuotas, the three main resource types are:

Resource Type Description
Directory A specific directory and all its subdirectories
User A specific user
Group All members of a specific group

A domain defined as “name@folder” would be the set of files under “folder,” owned by “name,” which could be either a user or a group. The files accounted include all files reachable from the given path, without traversing any soft links. The owner “name” can be ALL, and “/ifs,” the OneFS root directory, is also an effective ALL for “folder.”

With SmartQuotas, it is easy to create traditional domain types quickly by using “ALL.” The following are examples of domain types:

  • All files belonging to user Jane: user:Jane@/ifs
  • All files under /ifs/home, belonging to any user: ALL@/ifs/home.
  • All files under /ifs/home that belong to user Jane: user:Jane@/ifs/home

Domains cannot be created on anything but directories. More specifically, domains are associated with the actual directories themselves, not directory paths. For example, if the domain is ALL@/ifs/home/data, but /ifs/home/data gets renamed to /ifs/home/files, the domain stays with the directory.

Domains can also be nested and may overlap. For example, say a hard quota is set on /ifs/data/marketing for 5 TB. 1 TB soft quotas are then placed on individual users in the marketing department. This ensures that the marketing directory as a whole never exceeds 5 TB, while limiting the users in the marketing department to 1 TB each.

A default quota domain is one that does not account for any specific set of files but instead specifies a policy for new domains that match a specific trigger. In other words, default domains are configuration templates for actual domains. SmartQuotas use the identity notation ‘default-user’, ‘default-group’, and ‘default directory’ to describe domains with default policies. For example, the domain default-user@/ifs/home becomes specific-user@/ifs/home for each specific-user that is not otherwise defined. All enforcements on default-user are copied to specific-user when specific-user allocates within the domain and the new inherited domain quota is termed as a Linked Quota. There may be overlapping defaults (default-user@/ifs and default-user@/ifs/home may both be defined).

Default quota domains help drastically simplify quota management for large environments by providing a mechanism to define top-level template configurations from which many actual quotas can be cloned, or linked. When a default quota domain is configured on a directory, any subdirectories created directly underneath this will automatically inherit the quota limits specified in the parent domain. This streamlines the provisioning and management quotas for large enterprise environments. Furthermore, default directory quotas can co-exist with user and/or group quotas and legacy default quotas.

Default directory quotas have been available since OneFS 8.2, in addition to the default user and group quotas available in earlier releases. For example:

  • Create default-directory quota
# isi quota create --path=/ifs/parent-dir --type=default-directory --hard-threshold=10M
  • Modify Default directory quota
# isi quota modify --path=/ifs/parent-dir --type=default-directory --advisory-threshold=6M --soft-threshold=7M --soft-grace=1D
  • List default-directory quota
# isi quota list                 


  Type              AppliesTo  Path            Snap  Hard   Soft  Adv  Used


  --------------------------------------------------------------------------


  default-directory DEFAULT    /ifs/parent-dir No    10.00M -    6.00M 0.00


  --------------------------------------------------------------------------


  Total: 1
  • Delete Default directory quota
# isi quota delete --path=/ifs/parent-dir --type=default-directory

If the enforcements on a default domain change, SmartQuotas will automatically propagate the changes to the Linked Quota domains. If a default quota domain is deleted, SmartQuotas will delete all children marked as inherited. An administrator may also choose to delete the default without deleting the children, but this will break inheritance on all inherited children.

For example, the creation & deletion of sub-directory under default directory folder causes inherited directory quota creation and removal:

A quota domain may be in one of three accounting states as described in the following table:

Quota Accounting States Description
Ready A domain in the ready state is fully accounted. SmartQuotas displays “ready” domains in all interfaces and all enforcements apply to such domains.
Accounting A domain is placed in the Accounting state when it is waiting on accounting updates.
Deleting After a request to delete a domain, SmartQuotas will place the domain in the deleting state until tear-down is complete. Domain removal may be a lengthy process.

SmartQuotas displays accounting domains in all interfaces including usage data but indicate they are in the process of being “Accounted.” SmartQuotas applies all enforcements to accounting domains, even when it might reject an allocation that would have proceeded if it had completed the QuotaScan.

Domains in the deleting state are hidden from all interfaces, and the top-level directory of a domain may be deleted while the domain is still in the deleting state (assuming there are no domains in “Ready” or “Accounting” state defined on the directory). No enforcements are applied for domains in “Deleting” state.

A quota scan is performed when the domain is in an Accounting State. This can occur during quota creation to account the new domain if a quota has been set for the domain and quota deletion to un-account the domain. A QuotaScan is required when creating a quota on a non-empty directory. If quotas are created up-front on an empty directory, no QuotaScan is necessary.

A QuotaScan job may be started either from the WebUI or CLi with the following syntax:.

# isi job jobs start quotascan

Any path specified on the command line is treated as the root of a tree that should be processed. This is provided primarily as a means to rescan a directory or maintenance reasons.

In addition to the core isi_smartquoatas service, there are three processes, or daemons, associated with SmartQuotas:

Daemon Details
isi_quota_notify_d Listens for ‘limit exceeded’ and ‘link denied’ events and generate notifications for each. Also responds to configuration change events and instructs the QDB to generate ‘expired’ and ‘violated’ over-threshold notifications.
isi_quota_report_d Generates quota reports. Since the QDB only produces real-time resource usage, reports are necessary for providing point-in-time vies of a quota domain’s usage. These historical reports are useful for trend analysis of quota resource usage.
isi_quota_sweeper_d Responsible for quota housekeeping tasks such as propagating default changes, domain and notification rule garbage collection, and kicking off QuotaScan jobs when necessary.


These can be viewed as follows:

# isi services -a | grep -i quota

   isi_smartquotas      SmartQuotas Service                      Enabled

# ps -auxw | grep -i quota

root    4852    0.0  0.0  26708   8404  -  Is   Sat20        0:00.00 /usr/sbin/isi_quota_report_d

root    4860    0.0  0.0  26812   8424  -  Is   Sat20        0:00.00 /usr/sbin/isi_quota_notify_d

root    4872    0.0  0.0  26836   8488  -  Is   Sat20        0:00.00 /usr/sbin/isi_quota_sweeper_d

OneFS 8.2 and later also include the rpc.quotad service to facilitate client-side quota reporting on UNIX and Linux clients using native ‘quota’ tools. The service which runs on tcp/udp port 762 is enabled by default, and control is under NFS global settings.

Also, users can view their available user capacity set by soft or hard user and group quotas rather than the entire cluster capacity or parent directory-quotas. This avoids the ‘illusion’ of seeing available space that may not be associated with their quotas.

SmartQuotas is included as a core component of OneFS but requires a valid product license key in order to activate. This license key can be purchased through your Dell EMC account team. An unlicensed cluster will show a SmartQuotas warning until a valid product license has been purchased and applied to the cluster.

License keys can be easily added through the ‘Activate License’ section of the OneFS WebUI, accessed by going to Cluster Management > Licensing.

OneFS SmartQuotas Architectural Fundamentals

As we saw in the previous article in this series, at a high level, there are three main elements to a OneFS quota:

Element Description
Domain Define which files and directories belong to a quota
Resource The quantity being limited
Enforcement Specify the limits and what actions are taken when those thresholds are exceeded

We’ll look at each of these elements over the course of this series of articles. But first, let’s delve into the architecture.

Under the hood, SmartQuotas hinges on the quota domain and quota database, and the general operational flow is as follows:

Each quota is governed by a OneFS domain, which defines the quota’s scope and includes a set of usage levels, limits, and configuration options. Most of this information is organized and managed by the file system and stored in the quota database (QDB). This database is represented in a B-tree structure, known as the quota tree, and allows both scalability and fast random access. Because of its importance, the quota database is protected at OneFS’ highest metadata level. The quota accounting blocks (QABs) within individual records are protected at the same level as the associated directory.

A quota domain is made up of the following principal parts:

Component Description
Quota domain key Where the unique identifier for the domain is stored.
Quota domain header (QDH) Contains various state and configuration information that affects the domain as a whole.
Quota domain enforcements Manages quota limits, including whether they have been reached or exceeded, notification information, and the quota grace period.
Quota domain account (QDA) Handles tracking of usage levels for the domain. The QDA tracks physical, logical, and file resource types for each domain.

The QDB is a data structure that stores quota domain record (QDR). Resource allocation and governance changes are recorded in the quota operation associated with a transaction, totaled and applied persistently to the QDRs.

Within QDB, a quota domain record stores all configuration and state associated with a domain. The record can be broken down into three components:

Component Description
Configuration Fields within quota config, such as whether the domain is a container. Despite the name, this includes some state fields like the Ready flag.
Enforcements A list of quota enforcements, which include the limit, grace period, and notification state. Although the structure is flexible, only three enforcements are allowed and only for a single resource.
Account The quota account for the domain.

The on-disk format of the QDR is as follows The structure is dynamic, based on the configured enforcements and state of the account, so the on-disk structures look different than the in-memory structures.

Quota domain locks synchronize access to quota domain records in the QDB.

The main challenge for quota domain locks is that the need to exclusively lock a quota domain is not known until the accounting is fully determined. In fact, it may not be until responses from transaction deltas are received before this is reported to the initiator. To address this, Quota Domain Locks use optimistic restarts.

Quota Account Blocks (QABs) enable high-performance accounting using transaction deltas. Since when the quota usage info if viewed it is stale anyway, locking is simplified by using an exclusive domain lock for coherent reads of usage.

Each QAB contains a large number of Quota Accounting records, which need to be updated whenever a particular user adds or removes data from an area of the file system on which quotas are enabled (quota domain). If a large quantity of clients are simultaneously accessing the quota domain, these blocks can become highly contended and a potential bottleneck. Similarly, if a single client (or small number of clients) consistently makes a large number of small writes to files within a single quota, write performance could again be impacted.

To address this, quota accounts have a mechanism to help avoid hot spots on the nodes storing QABs. Quota Account Constituents (QACs) help parallelize the quota accounting by including additional QAB mirrors distributed across other nodes in the cluster.

Configuration is managed through a sysctl, efs.quota.reorganize.qac_ratio , which increases the number of quota accounting constituents. This provides better scalability and reduces latencies on heavy create/delete activities when quotas are used.

Using this parameter, the internally calculated QAC count for each quota is multiplied by the specified value. If a workflow experiences write performance issues, and it has many writes to files or directories governed by a single quota, then increasing the QAC ratio may significantly improve write performance.

The sysctl efs.quota.reorganize.qac_ratio can be reconfigured to its maximum value of 8 from its default value of 1 using the following CLI command:

# isi_sysctl_cluster efs.quota.reorganize.qac_ratio=8

To verify the persistent change, run:

# cat /etc/mcp/override/sysctl.conf | grep qac_ratio

efs.quota.reorganize.qac_ratio=8 #added by script

Although increasing the QAC count through this sysctl can improve performance on write heavy quota domains, some amount of experimentation may be required until the ideal QAC ratio value is found. Adjusting the parameter can adversely affect write performance if you apply a value that is too high, or if you apply the parameter in an environment that does not have diminished write performance due to quota contention.

Additionally, OneFS provides a CLI command, which can restripe the QABs to improve their performance.

# isi_restripe_qabs retune

This utility can be run either on demand or periodically to randomly redistribute QABs for all existing quotas. It does this by ignoring the default ‘rebalance’ layout and running a ‘retune’ layout strategy instead, thereby alleviating the performance impact from an imbalanced QAB layout.

OneFS SmartQuotas

OneFS SmartQuotas help measure, predict, control, and limit the rate of storage capacity consumption, allowing precise cluster provisioning to best meet an organization’s storage needs. SmartQuotas also enables ‘thin provisioning’, or the ability to present more storage capacity to applications and users than is physically present (over-provisioning). This allows storage capacity to be purchased and provisioned organically and in real time, rather than making large, speculative buying decisions ahead of time. As we will see, OneFS also leverages quotas for calculating and reporting on data reduction and storage efficiency across user-defined subsets of the /ifs file system.

SmartQuotas provides two fundamental types of capacity quota:

  • Accounting Quotas
  • Enforcement Quotas

Accounting Quotas simply monitor and report on the amount of storage consumed, but do not take any limiting action or intervention. Instead, they are primarily used for auditing, planning, or billing purposes. For example, SmartQuotas accounting quotas can be used to:

  • Generate reports to analyze and identify storage usage patterns and trends. These can then be used to define storage policies for the business.
  • Track the amount of disk space used by various users, groups, or departments to bill each entity for only the storage capacity they actually consume (charge-back).
  • Intelligently plan for capacity expansions and future storage need.

The ‘isi quota quotas create –enforced=false’ CLI command can be used to create an accounting quota. Alternatively, this can be done from the WebUI by navigating to File System > SmartQuotas > Quotas and usage > Create quota.

The following CLI command creates an accounting quota for the /ifs/data/acct_quota_1 directory, setting an advisory threshold that is informative rather than enforced.

# isi quota quotas create /ifs/data/acct_quota_1 directory \ --advisory-threshold=10M --enforced=false

Before using quota data for analysis or other purposes, verify that no QuotaScan jobs are in progress by running the following CLI command:

# isi job events list --job-type quotascan

In contrast, enforcement quotas include all of the functionality of the accounting option plus the ability to limit disk storage and send notifications. The ‘isi quota quotas create –enforced=true’ CLI syntax can be used to create an enforcement quota. Alternatively, this can be done from the WebUI by navigating to File System > SmartQuotas > Quotas and usage > Create quota.

The following CLI command creates an enforcement quota for the /ifs/data/enforce_quota_1 directory, setting an advisory threshold that is informative rather than enforced.

# isi quota quotas create /ifs/data/enforce_quota_1 directory \ --advisory-threshold=10M --enforced=true

Using enforcement limits, a cluster can be logically partitioned in order to control or restrict how much storage that a user, group, or directory can use. For example, capacity limits can be configured to ensure that adequate space is always available for key projects and critical applications – and to ensure that users of the cluster do not exceed their allotted storage capacity.

Optionally, real-time email quota notifications can be sent to users, group managers, or administrators when they are approaching or have exceeded a quota limit.

A OneFS quota can have one of four enforcement types:

Enforcement Description
Hard A limit that cannot be exceeded. If an operation such as a file write causes a quota target to exceed a hard quota, the operation fails, an alert is logged to the cluster and a notification is sent to any specified recipients. Writes resume when the usage falls below the threshold.
Soft A limit that can be exceeded until a grace period has expired. When a soft quota is exceeded, an alert is logged to the cluster and a notification is issued to any specified recipients. However, data writes are permitted during the grace period. If the soft threshold is still exceeded when the period expires, writes will be blocked, and a hard-limit notification issued to any specified recipients.
Advisory An informal limit that can be exceeded. When an advisory quota threshold is exceeded, an alert is logged to the cluster and a notification is issued to any specified recipients. Reaching an advisory quota threshold does not prevent data writes.
None No enforcement. Quota is accounting only.

All three quota types have both a limit, or threshold, and a grace period. In OneFS 8.2 and later, a soft quota and advisory quota threshold can be specified as a percentage, as well as a specific capacity. For example:

# isi quota quotas create /ifs/quota directory --percent-advisory-threshold=80 --percent-soft-threshold=90 --soft-grace=1d --hard-threshold=100G

A hard quota has a zero-time grace period, an advisory quota has an infinite grace period and a soft quota has a configurable grace period. When a quota limit and grace period have been exceeded, a client write operations to anywhere within that quota domain will fail with EDQUOT. Although enforcements are implemented generically in the quota data bases, only one resource may be limited per domain, either logical or physical space.

Even when a hard quota limit is reached, there are certain instances where operations are not blocked. These include administrative control through root (UID 0), system maintenance activities, and the ability of a blocked user to free up space.

The table below describes the three SmartQuotas enforcement states:

Enforcement State Description
Under (U) If the usage is less than the enforcement threshold, the enforcement is in state U.
Over (O) If the usage is greater than the enforcement threshold, the enforcement is in state O.
Expired (E) If the usage is greater than the soft threshold, and the usage has remained over the enforcement threshold past the grace period expiration, the soft threshold is in state E. If an administrator modifies the soft threshold but not the grace period, and the usage still exceeds the threshold, the enforcement is in state E.

There are a few exceptions to enforcement of Quotas including the following scenarios:

  • If a domain has an accounting only quota, enforcements for the domain are not applied.
  • Any administrator action may push a domain over quota. Examples include changing protection, taking a snapshot, or removing a snapshot. The administrator may write into any domain without obeying enforcements.
  • Any system action may push a domain over quota, including repair. OneFS maintenance processes are as powerful as the administrator.

Governance is the mechanism by which SmartQuotas determines which domains apply to a given file or directory. After a sequence of domain configuration changes, a persistent record is needed in order to know where a file had been accounted. As such, quotas utilize ‘tagging’, and the governing domains are recorded in a dynamic attribute of the inode.

A Quota Domain Account tracks usages and limits of a particular domain. For scalability reasons, the QDA system dynamically breaks up the Quota Domain’s account of the quota into some number of Quota Domain Account Constituents (QAC), each of which tracks a part of the account. Modifications to the account are distributed at random among these constituents. Each Quota Domain Account Constituent is stored in a set of mirrored Quota Accounting Blocks (QABs). QABs track usage of a quota and consist of several level counters for different tracked resource types and level limits for advisory, soft, and hard quotas.

The Quota Domain Record stores all configuration and state associated with a domain. The record can be subdivided into three components:

Component Description
Configuration Quota configuration.
Enforcement This includes the grace period, limit, and notification state.
Account The mechanism for space utilization accounting.

With SmartQuotas, there are three main ways of tracking, enforcing, and reporting resource usage:

Tracking Method Description
Physical size This is simple to track, since it includes all the data and metadata resources used, including the data-protection overhead. The quota system is also able to track the difference before and after the operation.
File system logical size This is slightly more complex to calculate and track but provides the user with a more comprehensible means of understanding their usage.
File accounting This is the most straightforward, since whenever a file is added to a domain, the file count is incremented.
Application logical size Reports total logical data store across different tiers, including CloudPools, to account for the exact file sizes. Allows users to view quotas and free space as an application would view it, in terms of how much capacity is available to store logical data, regardless of data reduction or tiering technology.


Prior to OneFS 8.2, SmartQuota size accounting metrics typically used a count of the number of 8 KB blocks required to store file data on cluster. Accounting based on block count can result in challenges, such as small file over-reporting. For example, a 4KB file would be logically accounted for as 8KB. Similarly, block-based quota accounting only extends to on-premises capacity consumption. This means that a 100MB file stored within a CloudPools tier would only be account for as an 8KB SmartLink stub file, rather than its actual size.

To directly address this issue in OneFS 8.2 and later, application logical quotas provide an additional quota accounting metric. Application logical size accounts for, reports, and enforces on the actual space consumed and available for storage, independent of whether files are cloud-tiered, sparse, deduplicated, or compressed. Application logical quotas can be easily configured from the CLI with the following syntax:

# isi quota quotas create <dir> directory –-thresholds-on=applogicalsize

Any legacy quotas created on OneFS versions prior to 8.2 can easily be converted to use application logical size upon upgrade.

For logical space accounting, some inode attributes such as ACLs and symbolic links are included in the resource count. This uses the same data that is displayed in the ‘logical size’ field by the ‘isi get –DD <file>’ CLI command.

OneFS SmartPools Data Management – Part 2

As we saw in the previous article in this series, SmartPools operation is quarterbacked and executed by the OneFS job engine.

When a one of the SmartPools job runs, all the files’ attributes are examined and checked against the list of file pool policies. As such, file pool policies are built on file attribute(s) the policy can match on, and these include file name, path, file type, size, timestamps, etc.

Once the file attribute is set to select the appropriate files, the action to be taken on those files can be added. For example, if the selected attribute is File Size, additional settings are available to dictate thresholds – for instance, all files bigger than 500MB, but smaller than 2GB. Next, actions are applied, such as move to node pool ‘x’, protect at level ‘y’, and lay out for access setting ‘z’.

File Attribute Description
File Name Specifies file criteria based on the file name
Path Specifies file criteria based on where the file is stored
File Type Specifies file criteria based on the file-system object type
File Size Specifies file criteria based on the file size
Modified Time Specifies file criteria based on when the file was last modified
Create Time Specifies file criteria based on when the file was created
Metadata Change Time Specifies file criteria based on when the file metadata was last modified
Access Time Specifies file criteria based on when the file was last accessed
User Attributes Specifies file criteria based on custom  attributes – see below

Path-based file pool policies can direct data to the correct node pool on write, without a SmartPools job running.  However, policies that use other attributes beside path to dictate placement, move their matching data when the next SmartPools job runs. This ensures that write performance is not sacrificed for initial data placement. Data not covered by a file pool policy is targeted to the default tier, which can be configured as desired. Note that CloudPools, the OneFS off-cluster cloud tiering service, also uses the file pool policy engine.

File pool policies can be configured from the CLI using the ‘isi filepools create’ command, or via the WebUI by navigating to File System > Storage Pools > File Pool Policies > Create a file pool policy:

When a file pool policy is created, SmartPools stores it in a configuration database with any other file policies.  When a SmartPools job runs, it applies all the policies in order.  If a file matches multiple policies, SmartPools will only apply the first rule it matches.  So, for example if there is a rule that moves all small jpeg files to an A-series archive pool, and another that moves all files under 1 MB to an F-series performance tier, if the jpeg rule appears first in the list, then jpg files under 2 MB will go to archive, NOT the performance tier.

Criteria can be combined within a single policy using ‘And’ or ‘Or’ operators, so that data can be classified very granularly.  Continuing with our example, if the desired behavior is to have all jpg files over 2 MB to be moved to the Archive node pool, the file pool policy can be simply constructed with an ‘And’ operator to explicitly cover that condition.

While the example above is a simple one, if needed, SmartPools can currently support up to 128 file pool policies, each of which can contain up to 3 file matching criteria or rules. However, as the list of file pool policies grows large, it becomes less practical to manually traverse them to see how a file will behave when policies are applied.

File pool policy order, and policies themselves, can be easily changed at any time. Specifically, policies can be added deleted, edited, copied and re-ordered. For example:

# isi filepool policies modify Archive_1 --description "Move older files to archive storage" --data-storage-target Archive_1 --data-ssd-strategy metadata --begin-filter --file-type=file --and --birth-time=2022-10-01 --operator=lt --and --accessed-time=2022-11-01 --operator=lt --end-filter

The file pool policy is applied when the next scheduled SmartPools job runs. By default, the SmartPools job runs once a day, but can also started manually:

# isi job jobs start SmartPools

File pool policies are evaluated in descending order, according to their position in the file pool policies list. By default, when a new policy is created, it is inserted immediately above the default file pool policy. The default policy is always the last in priority, and applies to all files that are not matched by any other file pool policy. The priority order of a file pool policy can be altered by moving it up or down in the list. For example:

# isi filepool policies list

Name        Description                               CloudPools State

----------------------------------------------------------------

Archive_1   Move older files to archive storage       No access

Perf_1      Move recent files to perf tier            No access

----------------------------------------------------------------

Total: 2

# isi filepool policies modify Perf_1 --apply-order 1

# isi filepool policies list

Name        Description                               CloudPools State

----------------------------------------------------------------

Perf_1      Move recent files to perf tier            No access

Archive_1   Move older files to archive storage       No access

----------------------------------------------------------------

Total: 2

In this case, the ‘Perf_1’ policy has been promoted to the top of the list, above the ‘Archive_1’ policy.

If no File Pool policy matches a file, the default policy specifies all storage settings for the file. The default policy, in effect, matches all files not matched by any other SmartPools policy. For this reason, the default policy is the last in the file pool policy list, and, as such, always the last policy that SmartPools applies.

Additionally, a file pool policy can be configured to match a user-specified ‘custom attribute’ and/or value.

When data is written to the cluster, SmartPools writes it to a single Node Pool only.  This means that, in almost all cases, a file exists in its entirety within a Node Pool, and not across Node Pools.  SmartPools determines which pool to write to as follows:

  • If a file matches a file pool policy based on directory path, that file will be written into the Node Pool dictated by the File Pool policy immediately.
  • If a file matches a file pool policy which is based on any other criteria besides path name, SmartPools will write that file to the Node Pool with the most available capacity.

The OneFS ‘isi get –D’ CLI command, or WebUI File System Explorer, provides a detailed view of where SmartPools-managed data is at any time by both the actual Node Pool location and the File Pool policy-dictated location (i.e. where that file will move after the next successful completion of the SmartPools job). More specifically, the selection of a disk pool target from a file pool policy typically follows the following logic path:

  1. If SmartPools is licensed and the policy’s pool ID is found that disk pool is targeted.
  2. If SmartPools is unlicensed, the policy ID specified for a file is ignored and the ‘any disk pool’ group ID is used instead.
  3. If the policy ID is not found and global spillover is enabled for the cluster, the spillover target is used as the policy. If global spillover is disabled, the ‘any disk pool’ group is used as the policy.
  4. The pools in the policy which satisfy the SSD preference are presented in a weighted random order. This continues until a suitable pool is found or an error is returned.
  5. If no suitable pool is found, the SSD preference is changed to ‘fallback’ and step #3 is repeated. The ‘fallback’ value allows the use of any pool if the reserved ‘system’ policy is used, or the cluster is all-SSD. Otherwise only all-HDD pools are used.
  6. If no suitable pool is found and global spillover is enabled for the cluster, the spillover target is used as the policy and step #3 is repeated (the SSD preference remains as ‘fallback’).
  7. If spillover is disabled and no suitable pool is found, processing stop and an error is returned.

After a file match with a File Pool policy occurs, the OneFS uses the settings in the matching policy to store and protect the file. However, a matching policy might not specify all settings for the match file. In this case, the default policy is used for those settings not specified in the custom policy. For each file stored on a cluster, the system needs to determine the following:

·         Requested protection level

·         Data storage target for local data cache

·         SSD strategy for metadata and data

·         Protection level for local data cache

·         Configuration for snapshots

·         SmartCache setting

·         L3 cache setting

·         Data access pattern

·         CloudPools actions (if any)

A question that’s frequently asked is what happens to any files that are due to be tiered but are being actively used? SmartPools can move the files transparently, even if they’re open and being modified.

Under the hood, the locks OneFS uses to provide consistency inside the filesystem, are separate from the external file locks for consistency between applications. This allows OneFS to discreetly move metadata and data blocks around, while the file is locked by an application. The restriper also performs its work in small chunks to further minimize disruption.

In addition to actual file placement, SmartPools data access (DAC) settings can be configured at the file pool, or even the single file, level for the type of application or workflow. DAC allows data to be optimized for concurrent, streaming or random access, with each of these three options influencing how files are laid out on disk and cached. Specifically, the ‘random’ data access setting performs little to no read-cache prefetching, to avoid wasted disk seeks. This works best for small files under 128KB, and large files with random, small block accesses. Data is striped across the minimum number of drives needed to achieve the data protection settings.

Streaming access works well for sequentially-read, medium to large files. This access pattern uses aggressive prefetching to improve overall read throughput, and on disk layout spreads the file across a large number of drives to optimize access.

Concurrency, the default, is the middle ground option with moderate prefetching, and data striped across the minimum number of drives required to achieve the configured protection setting. Concurrency is useful for general workloads like file shares and home directories, and file sets with a mix of both random and sequential access.

All the current generation of PowerScale nodes contain some percentage of flash media, and these SSDs can be used to accelerate performance across the entire cluster, by using them for caching or storage. As such, OneFS offers several SSD Strategies, including:

SSD Strategy Description
Metadata read acceleration Creates a preferred mirror of file metadata on SSD, and writes the rest of the metadata, plus all the actual file data, to HDD.
Metadata read & write acceleration All the metadata mirrors are stored on SSD.
Avoid SSDs Writes all associated file data and metadata to HDDs. Only really used when there is insufficient SSD storage capacity, to prioritize its utilization.
Data on SSDs All of a node pool’s data and metadata resides on flash.
L3 cache All of a node pool’s SSDs are used for SmartFlash read caching.

When L3 caching is enabled, it consumes all the SSD capacity in a node pool and therefore cannot coexist with other SSD strategies.

In contrast to L3 cache, with the data on SSD strategy, only the files specifically targeted to SSD benefit from the increased read and write performance. The remainder of the data on the node pool lives exclusively on hard disk and will not benefit from SSD.

The ‘isi_cache_stats -v’ CLI command will return the ratio of L3 cache hits to cache misses. A value of  70% or more cache hits indicates that L3 is working pretty well. Whereas less than 70% suggests that the SSDs may be better used for a metadata strategy.

However, be aware that SmartPools SSD strategies in general typically require more complex configuration than L3 and must be monitored so as not to exceed the available SSD capacity.

In summary, as far as good practices for optimal cluster performance, consider the following when deploying and configuring SmartPools:

  • Define a performance and protection profile, or SLA, for each tier, and configure it accordingly.
  • Avoid creating tiers that combine node pools with differing performance profiles (ie. with and without SSDs).
  • Ensure that cluster capacity utilization, for both hard drives and SSDs, remains below 90%.
  • Keep Virtual Hot Spares enabled, with a minimum of 10% space allocation.
  • Avoid creating hardlinks to files which will cause the file to match different file pool policies
  • If node pools are combined into tiers, craft file pool rules to target the tiers rather than individual node pools within the tiers.
  • Determine if metadata operations for a particular workload are biased towards reads, writes, or an even mix, and select the optimal SmartPools metadata or L3 caching strategy.
  • If attempting to configure ‘up-tiering’, ensure it does what you expect. SmartPools jobs are scheduled, so the promotion of a file from an archive to a performance tier will not be immediate upon its access or modification.
  • When employing a deep archiving strategy, ensure that the performance pool is optimized for all directories and metadata and the archive tier just for cold files as they age. This can be configured by adding a ‘TYPE=FILE’ statement to the aging file pool policy rule(s) to only move files to the archive tier.
  • If SmartPools takes more than a day to run, or the cluster is already running the FSAnalyze job, consider using the FilePolicy, and corresponding IndexUpdate job.
  • When enabling and scheduling the FilePolicy job, continue running the SmartPools job at a reduced frequency. For example:
  • IndexUpdate running every six hours (low impact and priority 5), FilePolicy running daily (low impact and priority 6), and the SmartPools job running on the first Sunday of each month ( low impact and priority 6).
  • Use SmartPools for Painless Tech refresh with intra-cluster migrations of data to other node pools. Allowing data to drain from a node pool before decommissioning makes the SmartFail occur much faster.

And finally, a laudable mantra for SmartPools management could be “simplicity reigns”! Where possible, resist the temptation to create more tiers, policies, or rules (ie. complexity) than you actually need.

OneFS SmartPools Data Management

The previous article examined OneFS storage pools, the substrate upon which SmartPools data tiering is built.

Next up the stack are OneFS file pools – the SmartPools logic layer. User configurable file pool policies govern where data is placed, accessed, and protected, accessed, and how it moves among the node pools and tiers.

File pools allow data to be automatically moved from one type of storage to another within a single cluster, to meet performance, space, cost or other criteria – all while retaining its data protection settings, and without any stubs, indirection layers, or other file system modifications.

Under the hood, the OneFS job engine is responsible for enacting the file movement, as instructed by configured file pool policies.

In all, there are currently five job engine jobs associated with OneFS SmartPools:

Job Description Default Execution
SetProtectPlus Applies the default file policy. This job is disabled if SmartPools is activated on the cluster Daily @ 10pm if SP is unlicensed.

Low impact, priority 6

SmartPools Job that runs and moves data between the tiers of nodes within the same cluster. Also executes the CloudPools functionality if licensed and configured. Daily @ 10pm

Low impact, priority 6

SmartPoolsTree Enforces SmartPools file policies on a subtree. Manual

Medium impact, priority 5

FilePolicy Efficient changelist-based SmartPools file pool policy job. Daily @ 10pm

Low impact, priority 6

IndexUpdate Creates and updates an efficient file system index for FilePolicy job. Manual

Low impact, priority 5

When SmartPools is unlicensed, any disk pool policies are ignored, and instead, the policy is considered to include all disk pools, and file data is directed to, and balanced across, all pools.

When a SmartPools job runs, it examines and compares file attributes against the list of file pool policy rules.  To minimize runtime, the initial scanning phase of the SmartPools’ job uses a LIN-based scan, rather than a more expensive tree-walk – and this is typically even more efficient when an SSD metadata acceleration strategy is used.

A SmartPools LIN tree scan breaks up the metadata into ranges for the cluster nodes to work on in parallel.  Each node can then dedicate multiple threads to execute the scan on their assigned range.  A LIN scan also ensures each file is opened only once, which is much more efficient when compared to a directory walk, where hard links and other constructs can result in single threading, multiple opens, etc.

When a file pool job thread finds a match between a file and a policy, it stops processing additional rules, since that match determines what will happen to the file. Next, SmartPools checks the file’s current settings against those the policy would assign, to identify those which do not match. Once SmartPools has the complete list of settings that it needs to apply to that file, it sets them all simultaneously, and moves to restripe that file to reflect any and all changes to node pool, protection, SmartCache use, layout, etc.

The file pool policy engine falls under the control and management of the SmartPools job. The default schedule for this process is every day at 10pm, and with a low impact policy. However, this schedule, priority and impact can be manually configured and tailored to a particular environment and workload.

SmartPools can also be run on-demand, to apply the appropriate file-pool membership settings to an individual file, or subdirectory, without having to wait for the background scan to do it.

For example, to test what affect a new policy will have, the ‘isi filepool apply’ command line utility can be run against a small subset of the data, which can be either a single file, or group of files or directories.  This CLI command can either be run live, to actually make the policy changes, or in a ‘dry-run’ assessment mode, using the ‘-nv’ flags, to estimate the scope and effect of a policy.

For a detailed view of where a SmartPools-managed file is at any time, the ‘isi get’ CLI command can provide both the actual node pool location, and the file pool policy-dictated location – or where that file will move to, after the next successful SmartPools job run.

When data is written to the cluster, SmartPools writes it to a single node pool only.  This means that, in almost all cases, a file exists in its entirety within a node pool, and not across pools

Unlike the SmartPools job, which scans the entire LIN tree, and the SmartPoolsTree job which visits a subtree of files, the FilePolicy job, introduced in OneFS 8.2, provides a faster, lower impact method for applying file pool policies. In conjunction with the IndexUpdate job, FilePolicy improves job scan performance, by using a snapshot delta based ‘file system index’, or changelist, to find files needing policy changes.

Avoiding a full treewalk dramatically decreases the amount of locking and metadata scanning work the job is required to perform, improving execution time, and reducing impact on CPU and disk – albeit at the expense of not quite doing everything that SmartPools does. However, most of the time SmartPools and FilePolicy perform the same work.  Disabled by default, FilePolicy supports a wide range of file policy features, reports the same information, and provides the same configuration options as the SmartPools job. Since FilePolicy is a changelist-based job, it performs best when run frequently – once or multiple times a day, depending on the configured file pool policies, data size and rate of change.

When enabling and using the FilePolicy and IndexUpdate jobs, the recommendation is to continue running the SmartPools job as well, but at a much-reduced frequency.

FilePolicy requires access to a current index. This means that if the IndexUpdate job has not yet been run, attempting to start the FilePolicy job will fail with an error message, prompting to run the IndexUpdate job first. And once the index has been created, the FilePolicy job will run as expected. The IndexUpdate job can be run several times daily (for example. every six hours) to keep the index current and prevent the snapshots it uses from growing large.

User configurable file pool policies govern where data is placed, accessed, and protected, accessed, and how it moves among the node pools and tiers. As such, these policies can be used to manage three fundamental properties of data storage:

Property Description
Location The physical tier or node pool in which a file lives.
Performance A file’s performance profile, or I/O optimization setting, which includes sequential, concurrent, or random access. Plus SmartCache write caching
Protection The protection level of a file, and whether it’s FEC parity-protected or mirrored.

For example, a file pool policy may dictate that anything written to path /ifs/foo goes to the H-Series nodes in node pool 1, then moves to the A-Series nodes in node pool 3 when older than 30 days. The file system itself is doing the work, so there are no transparency or data access risks to worry about.

Also, to simplify management, there are defaults in place for node pool and file pool settings which handle basic data placement, movement, protection and performance. There are several generic template policies, too, which can be customized, cloned, or used as-is

Data movement is parallelized, with the resources of multiple nodes combining for efficient job completion.  While a SmartPools job is running and tiering is in progress, all data is completely available to users and applications.

The performance of node pools can also be governed with SmartPools SSD ‘Strategies’, which can be configured for read caching or metadata storage. Plus the overall system performance impact can be tuned to suit the peaks and lulls of an environment’s workload, by scheduling the SmartPools job to run during off-peak hours.

OneFS SmartPools – Storage Pools

SmartPools is the OneFS tiering engine, and it enables multiple levels of performance, protection, and storage density to co-exist within a PowerScale cluster. SmartPools allows a cluster admin to define the value of a cluster’s data, and automatically align it with the appropriate price/performance tier over time. Data movement is seamless, and with file-level granularity and control via automated policies, you can easily tune performance and layout, storage tier alignment, and protection settings – with minimal impact to a cluster’s end-users. But first, we’ll run through its taxonomy.

At its core, SmartPools is logically separated into two areas: storage pools and file pools.

Heterogeneous PowerScale clusters can be built with a wide variety of node styles and capacities, in order to meet the needs of a varied data set and wide spectrum of workloads. These node styles fall loosely into three main categories or tiers.

  • F-series, all-flash nodes, typically for high performance, low latency workloads
  • H-series hybrid nodes, containing a mixture of SSD and hard drives, great for concurrency and streaming workloads.
  • A-series active archive nodes, capacity optimized and using large SATA drives.

Storage pools in OneFS provide the ability to define hardware tiers within a single cluster, allowing file layout to be aligned with specific sets of nodes by configuring storage pool policies.

The notion of Storage pools is an abstraction that includes disk pools, node pools, and tiers.

Disk pools are the smallest unit within the storage pools hierarchy. OneFS provisioning works on the premise of dividing the hard drives and SSDs in similar node types into sets, with each pool representing a separate failure domain.

These disk pools are typically protected by default at +2d:1n (or the ability to withstand two disk or one entire node failure) and span a neighborhood from three to forty standalone F-series nodes, or a neighborhood of four to twenty chassis-based H and A series nodes – where each chassis contains four compute modules (one per node), and five drive containers, or ‘sleds’, per node.

Each drive belongs to one disk pool and data protection stripes or mirrors typically don’t extend across pools. Disk pools are managed by OneFS and are generally not user configurable.

Node pools are groups of disk pools, spread across similar storage nodes. Multiple node pools of differing types can coexist in a single, heterogeneous cluster, and this is the lowest level of pool that general SmartPools configuration targets. Say, for example: one node pool of all-flash F-Series nodes for HPC, one node pool of H-Series nodes, for home directories and file shares, and one node pool of A-series nodes, for archive data.

This allows OneFS to present a single storage resource pool, comprising multiple flash and spinning drive media types – NVMe, high speed SAS, large capacity SATA – providing a range of different performance, protection, and capacity characteristics. This heterogeneous storage pools in turn can support a diverse range of applications and workloads with a single, unified namespace and point of management.  It also enables the mixing of older and newer hardware, allowing for simple investment protection even across product generations, and seamless hardware refreshes.

Each node pool only contains disk pools from the same type of storage nodes, and a disk pool may belong to exactly one node pool. For example, all-flash F-series nodes would be in one node pool, whereas A-series nodes with high capacity SATA drives would be in another. Today, a minimum of 4 nodes, or one chassis, are required per node pool for Gen6 modular chassis-based hardware, or three PowerScale F-series nodes per node pool.

Nodes are not associated with each other, or provisioned, until at least three nodes from the same compatibility class are assigned in a node pool. If nodes are removed from a pool, that node pool becomes under-provisioned. In this situation, if two like-nodes remain, they are still writable. If only one remains, it is automatically set to read-only.

Once node pools are created, they can be easily modified to adapt to changing requirements.  Individual nodes can be reassigned from one node pool to another, if necessary.  Node pool associations can also be discarded, releasing member nodes so they can be added to new or existing pools. Node pools can also be renamed at any time without changing any other settings in the node pool configuration.

When new nodes are added to a cluster, they’re automatically allocated to a node pool, and then subdivided into disk pools without any additional configuration steps – and they inherit the SmartPools configuration properties of that node pool. This means the configuration of a pool’s data protection, layout ,and cache settings only needs to be done once, at the time the node pool is first created. Automatic allocation is determined by the shared attributes of the new nodes with the closest matching node pool. If the new node is not a close match to the nodes of any existing pool, it remains un-provisioned until the minimum node pool membership for like-nodes is met.

When a new node pool is created, and nodes are added, SmartPools associates those nodes with a pool ID. This ID is also used in file pool policies and file attributes to dictate file placement within a specific disk pool.

By default, a file which is not covered by a specific file pool policy will go to the configured ‘default’ node pool, identified during set up.  If no default is specified, SmartPools will typically write that data to the pool with the most available capacity.

Tiers are groups of node pools combined into a logical superset to optimize data storage, typically according to OneFS platform type.

For example, similar ‘archive’ node pools are often consolidated into a single tier, which could incorporate different styles of archive node pools into a single, logical container. For example, PowerScale A300s with 12TB SATA drives and PowerScale A3000s with 16TB SATA drives logically combined into a single active archive tier. This is a significant benefit to customers who consistently purchase the highest capacity nodes available, to consolidate a variety of node styles within a single tier and manage them as one logical group.

Note, however, that a storage efficiency cost may be incurred if the node pools in a tier are too small. For example, in a six node cluster with two separate three-node pools (different drive sizes), each pool has a 33% protection overhead. This is compared to a six node cluster with single six-node pool (same drive size), protection overhead drops to 16% (at the default +2d:1n protection).

SmartPools users frequently deploy 2 to 4 tiers, with the fastest tier typically containing all-flash nodes for the most performance demanding portions of a workflow, and the lowest, capacity-biased tier comprising high capacity SATA drive nodes.

SmartPools allows nodes of any type supported by the particular OneFS version, to be combined within the same cluster. The like-nodes are provisioned into different node pools according to their physical attributes:

These node compatibility classes are fairly stringent. This is in order to avoid disproportionate amounts of work being directed towards a subset of cluster resources, which could result in bullying of the lower powered nodes.

However, cluster administrators can safely target specific data to broader classes of storage by creating tiers. For example, if a cluster includes two different varieties of H nodes, such as H700s and H7000s, these will automatically be provisioned into two different node pools. These two node pools can be logically combined into a tier, and file placement targeted to it, resulting in automatic balancing across the node pools.

SmartPools separates hardware by node type and creates a separate node pool for each distinct hardware variant. To reside in the same node pool, nodes must have a set of core attributes in common, and node compatibilities can be defined to allow nodes with the same drive types, quantities and capacities and compatible RAM configurations, to be provisioned into the same pools.

That said, due to significant architectural differences, there are no node compatibilities between the chassis-based all-flash F800 or F810s, and the self-contained all-flash nodes like the F600 or F900.

OneFS also contains an SSD compatibility option, which allows nodes with dissimilar flash capacity to be provisioned to a single node pool. When creating this SSD compatibility, OneFS automatically checks that the two pools to be merged have the same number of SSDs, tier, requested protection, and the same SSD strategy or L3 cache setting.

If a node pool fills up, writes to that pool will automatically spill over to the next pool.  This default behavior ensures that work can continue, even if one type of capacity is full.  There are some circumstances in which spillover is undesirable, for example when different business units within an organization purchase separate pools, or data location has security or protection implications.  In these circumstances, spillover can simply be disabled.  Disabling spillover ensures a file exists in one pool and will not move to another.

From a data protection and layout efficiency point of view, SmartPools subdivides large numbers of like nodes into smaller, more efficiently protected disk pools – automatically calculating and grouping the cluster into pools of disks, that are optimized for both Mean Time to Data Loss (MTTDL) and efficient space utilization. This means that protection level decisions are not left to the cluster admin, unless desired.

With Automatic Provisioning, every set of equivalent node hardware is automatically split up into disk pools, node pools and neighborhoods. These pools are protected by default against up to two drive or one node failure per disk pool. By subdividing a node’s disks into multiple, separately protected disk pools, nodes are significantly more resilient to multiple disk failures.

If the automatically provisioned node pools that OneFS creates are not appropriate for an environment, they can be manually reconfigured. This is done by creating a manual node pool and moving nodes from an existing node pool to the newly created one. However, the strong recommendation is to use the default, automatically provisioned node pools. Manually assigned pools may not provide the same level of performance and storage efficiency as automatically assigned pools.

Unlike hardware RAID, OneFS has no requirement for dedicated hot spare drives. Instead, it simply borrows from the available free space in the file system in order to recover from failures; this technique is called virtual hot spare, or VHS.

SmartPools Virtual Hot Spare helps ensure that node pools maintain enough free space to successfully re-protect data in the event of drive failure. Though configured globally, VHS actually operates at the disk pool level so that nodes with different size drives reserve the appropriate VHS space. This helps ensure that, while data may move from one disk pool to another during repair, it remains on the same class of storage.

VHS reservations are cluster wide and configurable as either a percentage of total storage, up to 20%, or from 1 to 4 virtual drives. This reservation works by allocating a fraction of the node pool’s VHS space in each of its constituent disk pools.

Keep in mind that reservations for virtual hot sparing will affect spillover – if, for example, VHS is configured to reserve 10% of a pool’s capacity, spillover will occur at 90% full.

OneFS SMB Drain Support and Safe Disconnects

Introduced in OneFS 9.3, SMB drain support further enhances OneFS non-disruptive upgrades, by allowing for the safe disconnection of SMB clients. In an ideal world, OneFS would be able to seamlessly migrate all SMB clients transparently to non-rebooting nodes. Windows continuous availability (CA) does this natively, but this is not always a viable option given the client SMB3 support requirements, the performance implications of CA, etc.

Because SMB clients may be caching data through the use of oplocks or leases, it is important to ensure that this caching is stopped prior to disconnecting a client. OneFS SMB drain support ensures that, in non-CA cases, an SMB client is able to flush its cache before being disconnected, and, in conjunction with SmartConnect, enables safe migration of SMB clients to non-rebooting nodes in a cluster.

The following diagram illustrates the basic interaction of the SMB server and SmartConnect with the drain service:

Both SmartConnect and SMB detect when the drain service is running on the local node through the OneFS group management protocol (GMP). When the drain service is active, SmartConnect will no longer include the draining node’s IP address in DNS query responses. Then SMB starts the process of disconnecting clients.

GMP indicates whether the drain service is running on a local node, and, if so, SMB will no longer grant new oplocks or leases. So when a new oplock or lease is requested, the server responds indicating a conflict, which prevents the granting of the lock or lease. SMB then starts the process of breaking existing oplocks and leases, by emulating conflicting access. So, in the case of the lease,  OneFS will send a break response to the client, and, depending on the type of lease, will either wait for an acknowledgement of the break or break the lease immediately. The OneFS lwio server continually scans for sessions which have no oplocks or leases, and these sessions can then be drained down and disconnected. Note that an SMB clients with oplocks and leases disabled will automatically be a candidate for disconnection, since no sessions or locks will be detected during the scan. When a session is disconnected, the drain service notes the time of the disconnection and the client’s GUID (in the case of SMB 2 or 3) or its IP address (if SMB1). This information is used to track any reconnecting clients.

Once a Windows client has been disconnected, it typically sends a DNS request and receives  a response with an IP address of a non-draining node to connect to. However, not all SMB clients do this. For example, Linux and MacOS SMB clients will often perform a small number of attempts to reconnect to the previous IP address instead (either due to caching or stubborn client behavior), before declaring a network error. This is obviously undesirable since it results in a user-visible event. So OneFS cannot immediately disconnect reconnecting clients. Instead, the client is allowed to reconnect, but the lwio server starts delaying the responses to ‘session setup’ and ‘tree connect’ requests by 8 seconds by default. So this limits what the client can do after reconnect, and the goal is two persuade it to send a DNS request instead and connect to a non-rebooting node. The responses to negotiate request are not delayed because most clients will automatically consider the lack of a response as a network error and will not retry. If the node happens to reboot before the negotiation response is sent, the client will likely report an error to the user, so OneFS does not delay the response to minimize this possibility. The server still will not allow oplocks and leases to be granted, and will eventually disconnect the client again, after a default 20 seconds since the last time the client was disconnected.

No configuration is required for this SMB drain functionality in OneFS 9.3 and later, and, as such, there are no CLI commands to control it, etc. The drain service is started on the local node and the service is going to go through the process of safely disconnecting the clients. However, there is a OneFS registry parameter which, if necessary, can be used to modify or override the SMB drain behavior via the isi_gconfig CLI command.

For example, to disable SMB draining:

# isi_gconfig registry.Services.lwio.Parameters.Drivers.srv.EnableSessionDraining=0

registry.Services.lwio.Parameters.Drivers.srv.EnableSessionDraining (uint32) = 0

The three configurable values are:

Parameter Default Value Description
EnableSessionDraining Default is ‘enabled’. Global SMB draining on/off switch.
DrainDisconnectTimeout Default is 20 seconds. Controls the minimum time between disconnecting and reconnecting clients.
DrainResponseDelay Default is 8 seconds. Controls the delay period for responses to ‘session setup’ and ‘tree connect’ requests.

Be aware that, unlike DrainDisconnectTimeout which is in seconds, the DrainResponseDelay parameter is expressed in milliseconds (ms):

# isi_gconfig registry.Services.lwio.Parameters.Drivers.srv.DrainResponseDelay

registry.Services.lwio.Parameters.Drivers.srv.DrainResponseDelay (uint32) = 8000

SMB safe disconnect works in concert with OneFS’ drain-based upgrade, which was introduced in OneFS 9.2. Drain-based upgrade provides a mechanism by which nodes are prevented from rebooting or restarting protocol services until all SMB clients have disconnected from the node. A single SMB client that does not disconnect can cause the upgrade to be delayed indefinitely, so the cluster administrator is provided with options to reboot the node despite persisting clients.

As a truly non-disruptive upgrade process, drain-based upgrade can be potentially slower, since it is dependent upon client disconnections. The core OneFS protocols are handled as follows:

Protocol Action
SMB Wait for clients to drain and disconnect before rebooting node
SMB3-CA Witness, drain service → immediate migration → faster upgrade
NFS, HDFS, HTTP, S3 Assumed resilient to rebooting nodes

Drain-based upgrades can be configured and managed via the OneFS WebUI, CLI, and RESTful platform API, and the supported operations include:

  • OneFS upgrades
  • Firmware upgrades
  • Cluster reboots
  • Combined upgrades (OneFS and Firmware)

Drain-based upgrade is predicated upon the parallel upgrade workflow, which offers accelerated upgrades for large clusters by working across OneFS neighborhoods, or fault domains. By concurrently upgrading a node per neighborhood, the more node neighborhoods there are within a cluster the more parallel activity can occur.

Imagine a PowerScale H700 cluster with five chassis split into two neighborhoods, each containing ten nodes:

Once the drain-based upgrade is started, a maximum of one node from each neighborhood will get the reservation, which allows the nodes to upgrade simultaneously. OneFS will not reboot these nodes until the number of SMB clients is “0”. Say nodes 12 and 17 get the reservation for upgrading at the same time. However, there is one SMB connection to node 17 and two SMB connections to node 12. Neither of these nodes will be able to reboot until their SMB connection count gets to “0”. At this point, there are three options available:

Drain Action Description
Wait Wait until the SMB connection count reaches “0” or it hits the drain timeout value. The drain timeout value is a configurable parameter for each upgrade process. It is the maximum waiting period. If drain timeout is set to “0”, it means wait forever.
Delay drain Add the node into the delay list to delay client draining. The upgrade process will continue on another node in this neighborhood. After all the non-delayed nodes are upgraded, OneFS will rewind to the node in the delay list.
Skip drain Stop waiting for clients to migrate away from the draining node and reboot immediately.

The ‘isi upgrade cluster drain’ CLI command syntax can be used to manage client draining per-node. For example, to configure node 1 in the cluster to delay draining:

# isi upgrade cluster drain delay add 1

The node(s) will delay draining active SMB client connections (until all nodes in the same neighborhood have finished draining). Are you sure? (yes/[no]): yes

# isi upgrade cluster drain delay list

LNN

----

1

The following CLI syntax can be used to confirm whether there are any active SMB connections. In this case, node 1 has one connected Windows client:

# isi statistics query current --keys=node.clientstats.connected.smb

Node  node.clientstats.connected.smb

-------------------------------------

    1                               1

-------------------------------------

The ‘isi upgrade’ CLI command syntax can be used to perform the drain-based upgrade, and now includes flags for configuring drain-timeout and alert-timeout. In this example setting each to value 60 minutes and 45 minutes respectively. As such, if there is still an SMB connection after 45 minutes, a CELOG alert will be triggered to notify the cluster administrator. And after an hour, any remaining SMB connections will be dropped, and the node upgrade reboot will continue.

# isi upgrade start --parallel --skip-optional --install-image-path=/ifs /data/<installation-file-name> --drain-timeout=60m --alert-timeout=45m

From the OneFS WebUI, the same can be achieved by navigating to Upgrade under Cluster management.

OneFS Networking and Client Connection Balancing

In the previous articles in this series, we’ve looked at the fundamentals of a cluster’s network infrastructure:

The complete cluster architecture – software, hardware, and network – all cooperate to provide a distributed single file system that can scale dynamically as workloads and capacity and/or throughput needs change in a scale-out environment.

OneFS SmartConnect provides the load balancing services that work at the front-end Ethernet layer to evenly distribute client connections across the cluster. SmartConnect supports dynamic NFS failover and failback for Linux and UNIX clients and SMB3 continuous availability for Windows clients. This ensures that when a node failure occurs, or preventative maintenance is performed, all in-flight reads and writes are handed off to another node in the cluster to finish its operation without any user or application interruption.

During failover, clients are evenly redistributed across all remaining nodes in the cluster, ensuring minimal performance impact. If a node is brought down for any reason, including a failure, the virtual IP addresses on that node is seamlessly migrated to another node in the cluster.

When the offline node is brought back online, SmartConnect automatically rebalances the NFS and SMB3 clients across the entire cluster to ensure maximum storage and performance utilization. For periodic system maintenance and software updates, this functionality allows for per-node rolling upgrades affording full-availability throughout the duration of the maintenance window.

The OneFS SmartConnect module itself can be run in two modes – with or without a license:

SmartConnect Attribute SmartConnect Basic (unlicensed) SmartConnect Advanced (Licensed)
Connection Balancing Round-robin only. Round-robin, CPU utilization, connection counting, and throughput balancing.
Address Allocation Static IP allocation only. Static and dynamic IP address allocation, up to a maximum of six SmartConnect Service IP addresses per subnet.
Address Failover No IP address failover policy. Supports defining a failover policy for the IP address pool.
Address Rebalance No IP address rebalance policy. Supports defining a rebalance policy for the IP address pool.
Per-pool Addresses Up to two IP address pools per external network subnet Supports multiple IP address pools per external subnet to enable multiple DNS zones within a single subnet.

The SmartPools static vs dynamic address allocation method indicates whether the IP addresses in the pool can move back and forth between nodes when a node goes down. As such, a static IP pool displays the following characteristics:

  • Each interface in the pool gets exactly one IP (assuming there are at least as many IPs as interfaces in the pool).
  • If there are more IPs in the pool than interfaces, the additional IPs will not be allocated to any interface.
  • IPs do not move from one interface to another.
  • If an interface goes down, then the IP also goes down.

Conversely, in a dynamic IP pool:

  • Each of the IPs in the pool is allocated to an interface in the pool.
  • When an interface goes down in the pool, the IPs on that interface automatically move to another interface in the pool (preferring interfaces in the pool that are on the same node as the downed interface).
  • When a node is transitions to an ‘unhealthy’ state, the IPs on that node automatically move to another node in the pool.
  • When a node transitions back to a ‘healthy’ state, IPs will automatically move back to that node, assuming the rebalance policy is set to ‘auto’ and there are enough IPs available.

By default, OneFS SmartConnect balances connections among nodes using a round-robin policy and a separate IP pool for each subnet. A SmartConnect license adds advanced balancing policies to evenly distribute CPU usage, client connections, or throughput. It also lets you define IP address pools to support multiple DNS zones in a subnet.

Load-balancing Policy General Few Clients with High Usage Many Persistent NFS & SMB Connections Many Ephemeral Connections (HTTP, FTP) NFS Automount of UNC Paths are Used
Round Robin (Default)
Connection Count
CPU Usage
Network Throughput

Connection policies other than round robin are sampled every 10 seconds. The CPU policy is sampled every 5 seconds. If multiple requests are received during the same sampling interval, SmartConnect will attempt to balance these connections by estimating or measuring the additional load.

A ‘round robin’ load balancing strategy is generally a safe bet for both client connection balancing and IP failover.

Under the hood, SmartConnect acts as DNS delegation server, responding to requests and returning IP addresses for the appropriate SmartConnect zone(s). The general transactional flow is as follows:

During a cluster ‘split’ or ‘merge’ group change the SmartConnect service will not respond to DNS inquiries. This is seldom as group changes typically take around 30 seconds. However, the time taken for a group change to complete can vary due to the load on the cluster at the time of the change. Any time a node is added, removed, or rebooted in a cluster there will be two group changes that cause SmartConnect to be impacted, one from down/split and one from up/merge.

For large clusters, if group changes are adversely impacting SmartConnect’s load-balancing performance, the core site DNS servers can be configured to use a Round Robin configuration instead of redirecting DNS requests to SmartConnect

SmartConnect supports IP failover to provide continuous access to data when hardware or a network path fails. Dynamic failover is recommended for high availability workloads on SmartConnect subnets that handle traffic from NFS clients.

For optimal network performance, avoid mixing interface types (100/40/25/10 GbE) in the same SmartConnect Pool and/or mixing node types with different performance profiles, such as H700 and A300 interfaces, for example. In general, the ‘round-robin’ SmartConnect Client Connection Balancing and IP-failover policies provide the most consistent results.

To evenly distribute connections and optimize performance, the recommendation is to size SmartConnect for the expected number of connections and for the anticipated overall throughput likely to be generated. The sizing factors for a pool include the total number of concurrently active client connections, the anticipated aggregate throughput for the pool, and he minimum performance and throughput requirements in case an interface fails.

Since OneFS is a single volume, fully distributed file system, a client can access all the files and associated metadata that are stored on the cluster, regardless of the type of node a client connects to or the node pool on which the data resides. For example, data stored for performance reasons on a pool of F-Series all-flash nodes can be mounted and accessed by connecting to an A-Series node in the same cluster. The different types of PowerScale nodes, however, deliver different levels of performance.

To avoid unnecessary network latency under most circumstances, the recommendation is to configure SmartConnect subnets such that client connections are to the same physical pool of nodes on which the data resides. In other words, if a workload’s data lives on a pool of F600 nodes for performance reasons, the clients that work with that data should mount the cluster through a pool that includes the same F600 nodes that host the data.

Keep in mind the following networking and name server considerations:

  • Minimize disruption by suspending nodes in preparation for planned maintenance and resuming them after maintenance is complete
  • Leverage the groupnet feature to enhance multi-tenancy and DNS delegation, where desirable.
  • Ensure traffic flows through the right interface by tracing routes. Leverage OneFS Source-Based Routing (SBR) feature to keep traffic on desired paths.

If firewalling or filtering is deployed within the network, ensure that the appropriate ports are open. For example, open both UDP port 53 and TCP port 53 for the DNS service.

The client never sends a DNS request directly to the cluster. Instead, the site nameservers handle DNS requests from clients and route the requests appropriately.

In order to successfully distribute IP addresses, the OneFS SmartConnect DNS delegation server answers DNS queries with a time-to-live (TTL) of 0 so that the answer is not cached. Certain DNS servers (particularly Windows DNS Servers) will fix the value to one second. If you have many clients requesting an address within the same second, this will cause all of them to receive the same address. If you encounter this problem, you may need to use a different DNS server, such as BIND.

Certain clients perform DNS caching and might not connect to the node with the lowest load if they make multiple connections within the lifetime of the cached address. Recommend turning off client DNS caching, where possible. To handle client requests properly, SmartConnect requires that clients use the latest DNS entries.

The site DNS servers must be able to communicate with the node that is currently hosting the SmartConnect service. This is the node with the lowest logical node number (LNN) with an active interface in the subnet that contains the SSIP address.