Using Dell EMC Isilon with Microsoft’s SQL Server Big Data Clusters

By Boni Bruno, Chief Solutions Architect | Dell EMC

Dell EMC Isilon

Dell EMC Isilon solves the hard scaling problems our customers have with consolidating and storing large amounts of unstructured data.  Isilon’s scale-out design and multi-protocol support provides efficient deployment of data lakes as well as support for big data platforms such as Hadoop, Spark, and Kafka to name a few examples.

In fact, the embedded HDFS implementation that comes with Isilon OneFS has been CERTIFIED by Cloudera for both HDP and CDH Hadoop distributions.  Dell EMC has also been recognized by Gartner as a Leader in the Gartner Magic Quadrant for Distributed File Systems and Object Storage four years in a row.  To that end, Dell EMC is delighted to announce that Isilon is a validated HDFS tiering solution for Microsoft’s SQL Server Big Data Clusters.

SQL Server Big Data Clusters & HDFS Tiering with Dell EMC Isilon

SQL Server Big Data Clusters allow you to deploy clusters of SQL Server, Spark, and HDFS containers on Kubernetes. With these components, you can combine and analyze MS SQL relational data with high-volume unstructured data on Dell EMC Isilon. This means that Dell EMC customers who have data on their Isilon clusters can now make their data available to their SQL Server Big Data Clusters for analytics using the embedded HDFS interface that comes with Isilon OneFS.

Note:  The HDFS Tiering feature of SQL Server 2019 Big Data Clusters currently does not support Cloudera Hadoop, Isilon provides immediate access to HDFS data with or without a Hadoop distribution being deployed in the customers’ environment.  This is a unique value proposition of Dell EMC Isilon storage solution for SQL Server Big Data Clusters.  Unstructured data stored on Isilon is directly accessed over HDFS and will transparently appear as local data to the SQL Server Big Data Cluster platform.

The Figure below depicts the overall architecture between SQL Server Big Data Cluster platform and Dell EMC Isilon or ECS storage solutions.

Dell EMC provides two storage solutions that can integrate with SQL Server Big Data Clusters. Dell EMC Isilon provides a high-performance scale-out HDFS solution and Dell EMC ECS provides a high-capacity scale-out S3A solution, both are on-premise storage solutions.

We are currently working with the Microsoft’s Azure team to get these storage solutions available to customers in the cloud as well.  The remainder of this article provides details on how Dell EMC Isilon integrates with SQL Server Big Data Cluster over HDFS.

Setting up HDFS on Dell EMC Isilon

Enabling HDFS on Isilon is as simple as clicking a button in the OneFS GUI.  Customers have the choice of having multiple access zones if needed, access zones provide a logical separation of the data and users with support for independent role-based access controls.  For the purposes of this article, a “msbdc” access zone will be used for reference.  By default, HDFS is disabled on a given access zone as shown below:

To activate HDFS, simply click the Activate HDFS button.  Note:  HDFS licenses are free with the purchase of Isilon, HDFS licenses can be installed under Cluster Management\Licenses.

Once an HDFS license in installed and HDFS is activated on a given access zone, the HDFS settings can be viewed as shown below:

The GUI allows you to easily change the HDFS block size, Authentication Type, Enable the Ranger Security Plugin, etc.  Isilon OneFS also supports various authentication providers and additional protocols as shown below:

Simply pick the authentication provider of your choice and specify the provider details to enable remote authentication services on Isilon.  Note:  Isilon OneFS has a robust security architecture and authentication, identity management, and authorization stack, you can find more details here.

The multi-protocol support included with Isilon allows customers to land data on Isilon over SMB, NFS, FTP, or HTTP and make all or part of the data available to SQL Server Big Data Clusters over HDFS without having a Hadoop cluster installed – Beautiful!

A key performance aspect of Dell EMC Isilon is the scale-out design of both the hardware and the integrated OneFS storage operating system.  Isilon OneFS provides a unique SmartConnect feature that provides HDFS namenode and datanode load balancing and redundancy.

To use SmartConnect, simply delegate a sub-domain of your choice on your internal DNS server to Isilon and OneFS will automatically load balance all the associated HDFS connections from SQL Server Big Data Clusters transparently across all the physical nodes on the Isilon storage cluster.

The SmartConnect zone name is configured under Cluster Management\Network Configuration\ in the OneFS GUI as shown below:


In the example screen shot above, the SmartConnect Zone name is msbdc.dellemc.com, this means the delegated subdomain on the internal DNS server should be msbdc, a nameserver record for this msbdc subdomain needs to point to the defined SmartConnect Service IP.

The Service IP information is in the subnet details in the OneFS GUI as shown below:

In the above example, the service IP address is 10.10.10.10.  So, creating DNS records for 10.10.10.10 (e.g. isilon.dellemc.com) and a NS record for msbdc.dellemc.com that is served by isilon.dellemc.com (10.10.10.10) is all that would be needed on the internal DNS server configuration to take advantage of the built-in load balancing capabilities of Isilon.

Use “ping” to validate the SmartConnect/DNS configuration.  Multiple ping tests to msbdc.dellemc.com should result with different IP address responses returned by Isilon, the range of IP addresses returned is defined by the IP Pool Range in the Isilon GUI.

SQL Server Big Data Cluster would simply have a single mount configuration pointing to the defined SmartConnect Zone name on Isilon.  Details on how to setup the HDFS mount to Isilon from SQL Server Big Data Cluster is presented in the next section.

SmartConnect makes storage administration easy.  If more storage capacity is required, simply add more Isilon nodes to the cluster and storage capacity and I/O performance instantly increases without having to make a single configuration change to the SQL Server Big Data Clusters – BRILLIANT!

With HDFS enabled, the access zone defined, and the network/DNS configuration complete, the Isilon storage system can now be mounted by SQL Server Big Data Clusters.

Mounting Dell EMC Isilon from SQL Server Big Data Cluster

Assuming you have a SQL Server Big Data Cluster running, begin with opening a terminal session to connect to your SQL Server Big Data Cluster.  You can obtain the IP address of the end point controller-svc-external service of your cluster with the following command:

Using the IP of the controller end point obtained from the above command, log into your big data cluster:

Mount Isilon using HDFS on your SQL Server Big Data Cluster with the following command:

Note:  hdfs://msbdc.dellemc.com is shown as an example, the hdfs uri must match the SmartConnect Zone name defined in the Isilon configuration.  The data directory specified is also an example, any directory name that exists within the Isilon Access Zone can be used.  Also, the mount point /mount1 that is shown above is just an example, any name can be used for the mount point.

An example of a successful response of the above mount command is shown below:

Create mount /mount1 submitted successfully.  Check mount status for progress.

Check the mount status with the following command:

sample output:

Run an hdfs shell and list the contents on Isilon:

sample output:

In addition to using hdfs shell commands, you can use tools like Azure Data Studio to access and browse files over the HDFS service on Dell EMC Isilon.  The example below is using Spark to read the data over HDFS:

To learn more about Dell EMC Isilon, please visit us at DellEMC.com.


OneFS and IPMI

First introduced in version 9.0, OneFS provides support for IPMI, the Intelligent Platform Management Interface protocol. IPMI allows out-of-band console access and remote power control across a dedicated ethernet interface via Serial over LAN (SoL). As such, IMPI provides true lights-out management for PowerScale F-series all-flash nodes and Gen6 H-series and A-series chassis without the need for additional rs-232 serial port concentrators or PDU rack power controllers.

For example, IPMI enables individual nodes or the entire cluster to be powered on after maintenance or a power outage. For example:

  • Power off nodes or the cluster, such as after a power outage and when the cluster is operating on backup power.
  • Perform a Hard/Cold Reboot/Power Cycle, for example, if a node is unresponsive to OneFS.

IPMI is disabled by default in OneFS 9.0 and later, but can be easily enabled, configured, and operated from the CLI via the new ‘isi ipmi’ command set.

A cluster’s console can easily be accessed using the IPMItool utility, available as part of most Linux distributions, or accessible through other proprietary tools. For the PowerScale F900, F600 and F200 platforms, the Dell iDRAC remote console option can be accessed via an https web browser session to the default port 443 at a node’s IPMI address.

Note that support for IPMI on Isilon Generation 6 hardware requires node firmware package 10.3.2 and SSP firmware 02.81 or later.

With OneFS 9.0 and later, IPMI is fully supported on both PowerScale Gen6 H-series and A-series chassis-based platforms, and PowerScale all-flash F-series platforms. For Gen6 nodes running 8.2.x releases, IPMI is not officially supported but does generally work.

IPMI can be configured for DHCP, static IP, or a range of IP addresses. With the range option, IP addresses are allocated on a first-available basis and be cannot assign a specific IP address to a specific node. For security purposes, the recommendation is to restrict IPMI traffic to a dedicated, management-only VLAN.

A single username and password is configured for IPMI management across all the nodes in a cluster using isi ipmi user modify — username= –set-password CLI syntax. Usernames can be up to 16 characters in length, and passwords must comprise 17-20 characters. To verify the username configuration, use isi ipmi user view.

Be aware that a node’s physical serial port is disabled when a SoL session is active, but becomes re-enabled when the SoL session is terminated with the ‘deactivate’ command option.

In order to run the OneFS IPMI commands, the administrative account being used must have the RBAC ISI_PRIV_IPMI privilege.

The following CLI syntax can be used to enable IPMI for DHCP:

# isi ipmi settings modify --enabled=True --allocation-type=dhcp 35 426 IPMI

Simiarly, to enable IPMI for a static IP address:

# isi ipmi settings modify --enabled=True --allocation-type=static

To enable IPMI for a range of IP addresses use:

# isi ipmi network modify --gateway=[gateway IP] --prefixlen= --ranges=[IP Range]

The power control and Serial over LAN features can be configured and viewed using the following CLI command syntax. For example:

# isi ipmi features list

ID            Feature Description           Enabled
----------------------------------------------------
Power-Control Remote power control commands Yes

SOL           Serial over Lan functionality Yes
----------------------------------------------------

To enable the power control feature:

# isi ipmi features modify Power-Control --enabled=True

To enable the Serial over LAN (SoL) feature:

# isi ipmi features modify SOL --enabled=True

The following CLI commands can be used to configure a single username and password to perform IPMI tasks across all nodes in a cluster. Note that usernames can be up to 16 characters in length, while the associated passwords must be 17-20 characters in length.

To configure the username and password, run the CLI command:

# isi ipmi user modify --username [Username] --set-password

To confirm the username configuration, use:

# isi ipmi user view

Username: power

In this case, the user ‘power’ has been configured for OneFS IPMI control.

On the client side, the ‘ipmiItool’ command utility is ubiquitous in the Linux and UNIX world, and is included natively as part of most distributions. If not, it can easily be installed using the appropriate package manager, such as ‘yum’.

The ipmitool usage syntax is as follows:

[Linux Host:~]$ ipmitool -I lanplus -H [Node IP] -U [Username] -L OPERATOR -P [password]

For example, to execute power control commands:

ipmitool -I lanplus -H [Node IP] -U [Username] -L OPERATOR -P [password] power [command]

The ‘power’ command options above include status, on, off, cycle, and reset.

And, similarly, for Serial over LAN:

ipmitool -I lanplus -H [Node IP] -U [Username] -L OPERATOR -P [password] sol [command]

The serial over LAN ‘command’ options include info, activate, and deactivate.

Once active, a Serial over LAN session can easily be exited using the ‘tilde dot’ command syntax, as follows:

# ~.

On PowerScale F600 and F200 nodes, the remote console can be accessed via the Dell iDRAC by browsing to https://<node_IPMI_IP_address>:443 and, unless it’s been changed, using the default password of root/calvin.

Double clicking on the ‘Virtual Console’ image on the bottom right of the iDRAC main page above brings up a full-size console window:

From here, authenticate using your preferred cluster username and password for full out-of-band access to the OneFS console.

When it comes to troubleshooting OneFS IPMI, a good place to start is by checking that the daemon is enabled. This can be done using the following CLI command:

# isi services -a | grep -i ipmi_mgmt

isi_ipmi_mgmt_d      Manages remote IPMI configuration        EnabledTroubleshooting & Firmware

The IPMI management daemon, isi_ipmi_mgmt_d, can also be run with a variety of options including the -s flag to list the current IPMI settings across the cluster, the -d flag to enable debugging output, etc, as follows:

# /usr/bin/isi_ipmi_mgmt_d -h

usage: isi_ipmi_mgmt_d [-h] [-d] [-m] [-s] [-c CONFIG]

Daemon that manages the remote IPMI configuration.

optional arguments:

-h, --help            show this help message and exit

-d, --debug           Enable debug logging

-m, --monitor         Launch the remote IPMI monitor daemon

-s, --show            Show the remote IPMI settings

-c CONFIG, --config CONFIG

Configure IPMI management settings

IPMI writes errors, warnings, etc, to its log file, located at /var/log/isi_ipmi_mgmt_d.log, and which includes a host of useful troubleshooting information.

Isilon OneFS and Hadoop Known Issues

The following are known issues that exist with OneFS and Hadoop HDFS integrations:

Oozie sharedlib deployment fails with Isilon

The deployment of the oozie shared libraries fails on Ambari 2.7/HDP 3.x against Isilon.

oozie makes a rpc check for erasure encoding when deploying the shared libararies, OneFS doesn’t support HDFS erasure encoding as OneFS is natively using its own Erasure Encoding for data protection and the call fails with poor handling on the oozie side of the code, this causes a failure in the deployment of the shared lib.

[root@centos-01 ~]# /usr/hdp/current/oozie-server/bin/oozie-setup.sh sharelib create -fs hdfs://hdp-27.foo.com:8020 -locallib /usr/hdp/3.0.1.0-187/oozie/libserver

  setting OOZIE_CONFIG=${OOZIE_CONFIG:-/usr/hdp/current/oozie-server/conf}

  setting CATALINA_BASE=${CATALINA_BASE:-/usr/hdp/current/oozie-server/oozie-server}

  setting CATALINA_TMPDIR=${CATALINA_TMPDIR:-/var/tmp/oozie}

  setting OOZIE_CATALINA_HOME=/usr/lib/bigtop-tomcat

  setting JAVA_HOME=/usr/jdk64/jdk1.8.0_112

  setting JRE_HOME=${JAVA_HOME}

  setting CATALINA_OPTS="$CATALINA_OPTS -Xmx2048m"

  setting OOZIE_LOG=/var/log/oozie

  setting CATALINA_PID=/var/run/oozie/oozie.pid

  setting OOZIE_DATA=/hadoop/oozie/data

  setting OOZIE_HTTP_PORT=11000

  setting OOZIE_ADMIN_PORT=11001

  setting JAVA_LIBRARY_PATH=/usr/hdp/3.0.1.0-187/hadoop/lib/native/Linux-amd64-64

  setting OOZIE_CLIENT_OPTS="${OOZIE_CLIENT_OPTS} -Doozie.connection.retry.count=5 "

SLF4J: Class path contains multiple SLF4J bindings.

SLF4J: Found binding in [jar:file:/usr/hdp/3.0.1.0-187/oozie/lib/slf4j-simple-1.6.6.jar!/org/slf4j/impl/StaticLoggerBinder.class]

SLF4J: Found binding in [jar:file:/usr/hdp/3.0.1.0-187/oozie/libserver/log4j-slf4j-impl-2.10.0.jar!/org/slf4j/impl/StaticLoggerBinder.class]

SLF4J: Found binding in [jar:file:/usr/hdp/3.0.1.0-187/oozie/libserver/slf4j-log4j12-1.6.6.jar!/org/slf4j/impl/StaticLoggerBinder.class]

SLF4J: See http://www.slf4j.org/codes.html#multiple_bindings for an explanation.

SLF4J: Actual binding is of type [org.slf4j.impl.SimpleLoggerFactory]

3138 [main] WARN org.apache.hadoop.util.NativeCodeLoader - Unable to load native-hadoop library for your platform... using builtin-java classes where applicable

4193 [main] INFO org.apache.hadoop.security.UserGroupInformation - Login successful for user oozie/centos-01.foo.com@FOO.COM using keytab file /etc/security/keytabs/oozie.service.keytab

4436 [main] INFO org.apache.hadoop.conf.Configuration.deprecation - mapred.local.dir is deprecated. Instead, use mapreduce.cluster.local.dir

4490 [main] INFO org.apache.hadoop.security.SecurityUtil - Updating Configuration

log4j:WARN No appenders could be found for logger (org.apache.htrace.core.Tracer).

log4j:WARN Please initialize the log4j system properly.

log4j:WARN See http://logging.apache.org/log4j/1.2/faq.html#noconfig for more info.

Found Hadoop that supports Erasure Coding. Trying to disable Erasure Coding for path: /user/root/share/lib

Error invoking method with reflection


Error: java.lang.reflect.InvocationTargetException

Stack trace for the error was (for debug purposes):

java.lang.RuntimeException: java.lang.reflect.InvocationTargetException

        at org.apache.oozie.tools.ECPolicyDisabler.invokeMethod(ECPolicyDisabler.java:111)

        at org.apache.oozie.tools.ECPolicyDisabler.tryDisableECPolicyForPath(ECPolicyDisabler.java:47)

        at org.apache.oozie.tools.OozieSharelibCLI.run(OozieSharelibCLI.java:171)

        at org.apache.oozie.tools.OozieSharelibCLI.main(OozieSharelibCLI.java:67)

Caused by: java.lang.reflect.InvocationTargetException

        at sun.reflect.NativeMethodAccessorImpl.invoke0(Native Method)

        at sun.reflect.NativeMethodAccessorImpl.invoke(NativeMethodAccessorImpl.java:62)

        at sun.reflect.DelegatingMethodAccessorImpl.invoke(DelegatingMethodAccessorImpl.java:43)

        at java.lang.reflect.Method.invoke(Method.java:498)

        at org.apache.oozie.tools.ECPolicyDisabler.invokeMethod(ECPolicyDisabler.java:108)

        ... 3 more

Caused by: org.apache.hadoop.ipc.RemoteException(org.apache.hadoop.ipc.RpcNoSuchMethodException): Unknown RPC: getErasureCodingPolicy

        at org.apache.hadoop.ipc.Client.getRpcResponse(Client.java:1497)

        at org.apache.hadoop.ipc.Client.call(Client.java:1443)

        at org.apache.hadoop.ipc.Client.call(Client.java:1353)

        at org.apache.hadoop.ipc.ProtobufRpcEngine$Invoker.invoke(ProtobufRpcEngine.java:228)

        at org.apache.hadoop.ipc.ProtobufRpcEngine$Invoker.invoke(ProtobufRpcEngine.java:116)

        at com.sun.proxy.$Proxy9.getErasureCodingPolicy(Unknown Source)

        at org.apache.hadoop.hdfs.protocolPB.ClientNamenodeProtocolTranslatorPB.getErasureCodingPolicy(ClientNamenodeProtocolTranslatorPB.java:1892)

        at sun.reflect.NativeMethodAccessorImpl.invoke0(Native Method)

        at sun.reflect.NativeMethodAccessorImpl.invoke(NativeMethodAccessorImpl.java:62)

        at sun.reflect.DelegatingMethodAccessorImpl.invoke(DelegatingMethodAccessorImpl.java:43)

        at java.lang.reflect.Method.invoke(Method.java:498)

        at org.apache.hadoop.io.retry.RetryInvocationHandler.invokeMethod(RetryInvocationHandler.java:422)

        at org.apache.hadoop.io.retry.RetryInvocationHandler$Call.invokeMethod(RetryInvocationHandler.java:165)

        at org.apache.hadoop.io.retry.RetryInvocationHandler$Call.invoke(RetryInvocationHandler.java:157)

        at org.apache.hadoop.io.retry.RetryInvocationHandler$Call.invokeOnce(RetryInvocationHandler.java:95)

        at org.apache.hadoop.io.retry.RetryInvocationHandler.invoke(RetryInvocationHandler.java:359)

        at com.sun.proxy.$Proxy10.getErasureCodingPolicy(Unknown Source)

        at org.apache.hadoop.hdfs.DFSClient.getErasureCodingPolicy(DFSClient.java:3082)

        at org.apache.hadoop.hdfs.DistributedFileSystem$66.doCall(DistributedFileSystem.java:2884)

        at org.apache.hadoop.hdfs.DistributedFileSystem$66.doCall(DistributedFileSystem.java:2881)

        at org.apache.hadoop.fs.FileSystemLinkResolver.resolve(FileSystemLinkResolver.java:81)

        at org.apache.hadoop.hdfs.DistributedFileSystem.getErasureCodingPolicy(DistributedFileSystem.java:2898)

        ... 8 more
A workaround is a manual copy and unpack of the oozie-sharelib.tar.gz to the /user/oozie/share/lib

Cloudera BDR integration with Cloudera Manager Based Isilon Integration

Cloudera CDH with BDR is no longer supported with Isilon, CDH fails to integrate BDR completely with a Cloudera Manager based Isilon cluster.

Upgrading Ambari 2.6.5 to 2.7 – setfacl issue with Hive

Per the following procedure: http://www.unstructureddatatips.com/upgrade-hortonworks-hdp2-6-5-to-hdp3-on-dellemc-isilon-onefs-8-1-2-and-later/

When upgrading from Ambari 2.6.5 to 2.7, if the Hive Service is installed the following must be completed prior to upgrade otherwise the upgrade process will stall with an Unknown RPC issue as seen below.


The Isilon OneFS HDFS service does not support the HDFS ACL’s and the resulting setfacl will cause the upgrade to stall.

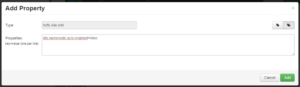
Add the following property: dfs.namenode.acls.enabled=false to the custom hdfs-site prior to upgrading and this will prevent the upgrade attempting to use setfacl.

Restart any services that need restarting

Execute the upgrade per the procedure and the Hive setfacl issue will not be encountered.

Additional Upgrade issue you may see:

– Error mapping uname \’yarn-ats\’ to uid (created yarn-ats user: isi auth users create yarn-ats –zone=<hdfs zone>)

– MySQL Dependency error (execute: ambari-server setup –jdbc-db=mysql –jdbc-driver=/usr/share/java/mysql-connector-java.jar)

– Ambari Metrics restart issue Reference: http://www.ryanchapin.com/fv-b-4-818/-SOLVED–Unable-to-Connect-to-ambari-metrics-collector-Issues.html


OneFS 8.2 Local Service Accounts need to be ENABLED

With the release of OneFS 8.2 a number of changes were made in the identity management stack, one modification that is required on 8.2 is that local accounts need to be in the enabled state to be used for identity, in prior version local account ID’s could be used with the local account disabled.

In 8.2 all local accounts must be ENABLED to be used for ID management by OneFS, this is required:

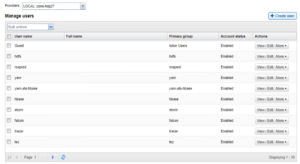
In 8.1.2 and prior, local accounts were functional when disabled
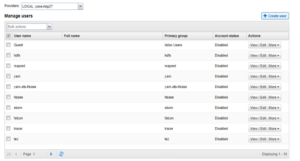
On upgrade to 8.2

  • All accounts should be set the ‘enabled state’
  • Enable all accounts prior to upgrade

The latest version of the create_users script on  the isilon_hadoop_tools github will now create enabled users by default

Enabling account does not make this account interactive logon aware they are still just ID’s used by Isilon for HDFS ID management.


Support for HDP 3.1 with the Isilon Management Pack 1.0.1.0

With the release of the Isilon Management Pack 1.0.1.0 support for HDP 3.1 is included, the procedure to upgrade the mpack is listed here if mpack 1.0.0.1 was installed with HDP 3.0.1.

Before upgrading the mpack the following KB should be consulted to assess the status of the Kerberized Spark2 services and if modifications were made to 3.0.1 installs were made in Ambari: Isilon: Spark2 fails to start after Kerberization with HDP 3 and OneFS due to missing configurations

Upgrade the Isilon Ambari Management Pack

  1. Download the Isilon Ambari Management Pack
  2. Install the management pack by running the following commands on the
    Ambari server:
    
    ambari-server upgrade-mpack –-mpack = <path-to-new-mpack.tar.gz> -verbose
    
    ambari-server restart


How to determine the Isilon Ambari Management Pack version

On the Ambari server host run the following command:

ls /var/lib/ambari-server/resources/mpacks | grep “onefs-ambari-mpack-”

The output will appear similar to this, where x.x.x.x indicates which version of the IAMP is currently installed:

onefs-ambari-mpack-x.x.x.x

How to find the README in Isilon Ambari Management Pack 1.0.1.0

Download the Isilon Ambari Management Pack

  1. Run the following command to extract the contents:
    • tar -zxvf isilon-onefs-mpack-1.0.1.0.tar.gz
  2. The README is located under isilon-onefs-mpack-1.0.1.0/addon-services/ONEFS/1.0.0/support/README
  3. Please review the README for release information.


The release of OneFS 8.2 brings changes to Hadoop Cluster Deployment and Setup

Prior to 8.2, the following two configurations were required to support Hadoop cluster

  1. Modification to the Access Control List Policy setting for OneFS is no longer needed

We used to run ‘isi auth settings acls modify –group-owner-inheritance=parent’  to make the OneFS file system act like an HDFS file system, this was a global setting and affected the whole cluster and other workflows. In 8.2 this is no longer needed, hdfs operation act like this natively so the setting is no longer required. Do not run this command on the setup of hdfs of new 8.2 clusters, if this was previously set on 8.1.2 and prior it is suggested to leave the setting as is because modifying it can affect other workflows.

  1. hdfs to root mappings is not needed – replaced by RBAC

Prior to 8.2 hdfs => root mappings were required to facilitate the behavior of the hdfs account, in 8.2 this root mapping has been replaced with an RBAC privilege, no root mapping is needed and instead the following RBAC role with the specified privileges should be created, add any account needing this access.

isi auth roles create --name=hdfs_access --description="Bypass FS permissions" --zone=System
isi auth roles modify hdfs_access --add-priv=ISI_PRIV_IFS_RESTORE --zone=System
isi auth roles modify hdfs_access --add-priv=ISI_PRIV_IFS_BACKUP --zone=System
isi auth roles modify hdfs_access --add-user=hdfs --zone=System
isi auth roles view hdfs_access --zone=System
isi_for_array "isi auth mapping flush --all"
isi_for_array "isi auth cache flush --all"


The installation guides will reflect these changes shortly.

Summary:

8.1.2 and Earlier:

hdfs=>root mapping

ACL Policy Change Needed

8.2 and Later

RBAC role for hdfs

No ACL Policy Change


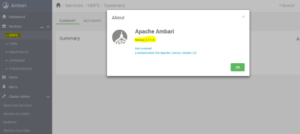
When using Ambari 2.7 and the Isilon Management Pack, the following is seen in the Isilon hdfs.log:

isilon-3: 2019-05-14T14:34:06-04:00 <30.4> isilon-3 hdfs[95183]: [hdfs] Ambari: Agent for zone 12 got a bad exit code from its Ambari server. The agent will attempt to recover.

isilon-3: 2019-05-14T14:34:06-04:00 <30.6> isilon-3 hdfs[95183]: [hdfs] Ambari: The Ambari server for zone 12 is running a version unsupported by OneFS: 2.7.1.0. Agent will reset and retry until a supported Ambari server version is installed or Ambari is no longer enabled for this zone

isilon-3: 2019-05-14T14:35:12-04:00 <30.4> isilon-3 hdfs[95183]: [hdfs] Ambari: Agent for zone 12 got a bad exit code from its Ambari server. The agent will attempt to recover.

isilon-3: 2019-05-14T14:35:12-04:00 <30.6> isilon-3 hdfs[95183]: [hdfs] Ambari: The Ambari server for zone 12 is running a version unsupported by OneFS: 2.7.1.0. Agent will reset and retry until a supported Ambari server version is installed or Ambari is no longer enabled for this zone

isilon-3: 2019-05-14T14:36:17-04:00 <30.4> isilon-3 hdfs[95183]: [hdfs] Ambari: Agent for zone 12 got a bad exit code from its Ambari server. The agent will attempt to recover.

isilon-3: 2019-05-14T14:36:17-04:00 <30.6> isilon-3 hdfs[95183]: [hdfs] Ambari: The Ambari server for zone 12 is running a version unsupported by OneFS: 2.7.1.0. Agent will reset and retry until a supported Ambari server version is installed or Ambari is no longer enabled for this zone

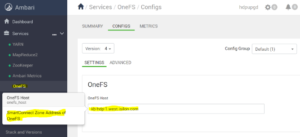
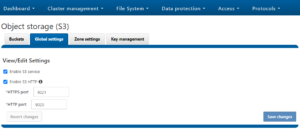
When using Ambari with the Isilon Management Pack, Isilon should not be configured with an Ambari Server or ODP version as they are no longer needed since the Management Pack is in use.

If they have been added, remove them from the Isilon hdfs configuration for the zone in question, this only applied to Ambari 2.7 with the Isilon Management Pack, Ambari 2.6 and earlier still require these settings.

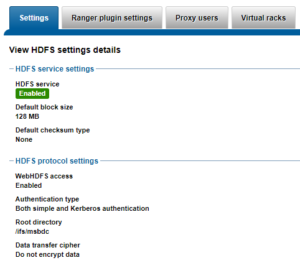
isilon-1# isi hdfs settings view --zone=zone-hdp27

Service: Yes

Default Block Size: 128M

Default Checksum Type: none

Authentication Mode: kerberos_only

Root Directory: /ifs/zone/hdp27/hadoop-root

WebHDFS Enabled: Yes

           Ambari Server: -

Ambari Namenode: hdp-27.foo.com

       Odp Version: -

Data Transfer Cipher: none

Ambari Metrics Collector: centos-01.foo.com


Ambari sees LDAPS issue connecting to AD during Kerberization

05 Apr 2018 20:05:14,081 ERROR [ambari-client-thread-38] KerberosHelperImpl:2379 - Cannot validate credentials: org.apache.ambari.server.serveraction.kerberos.KerberosInvalidConfigurationException: Failed to connect to KDC - Failed to communicate with the Active Directory at ldaps://rduvnode217745.west.isilon.com/DC=AMB3,DC=COM: simple bind failed: rduvnode217745.west.isilon.com:636

Make sure the server’s SSL certificate or CA certificates have been imported into Ambari’s truststore.


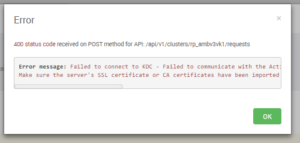
Review the following KB from Hortonworks on resolving this Ambari Issue:

https://community.hortonworks.com/content/supportkb/148572/failed-to-connect-to-kdc-make-sure-the-servers-ssl.html


HDFS rollup patch for 8.1.2 – Patch-240163:

Patch for OneFS 8.1.2.0. This patch addresses issues with the Hadoop Distributed File System (HDFS).

********************************************************************************

This patch can be installed on clusters running the following OneFS version:

8.1.2.0

This patch deprecates the following patch:

Patch-236288


This patch conflicts with the following patches:

Patch-237113

Patch-237483


If any conflicting or deprecated patches are installed on the cluster, you must

remove them before installing this patch.

********************************************************************************

RESOLVED ISSUES


* Bug ID 240177

The Hadoop Distributed File System (HDFS) rename command did not manage file

handles correctly and might have caused data unavailability with

STATUS_TOO_MANY_OPEN_FILES error.


* Bug ID 236286

If a OneFS cluster had the Hadoop Distributed File System (HDFS) configured for Kerberos authentication, WebHDFS requests over curl might have failed to follow a redirect request.


WebHDFS issue with Kerberized 8.1.2 – curl requests fail to follow redirects; Service Checks and Ambari Views will fail


Isilon HDFS error: STATUS_TOO_MANY_OPENED_FILES causes jobs to fail


OneFS 8.0.0.X and Cloudera Impala 5.12.X: Impala queries fail with `WARNINGS: TableLoadingException: Failed to load metadata for table: <tablename> , CAUSED BY: IllegalStateException: null`


Ambari agent fails to send heartbeats to Ambari server if agent is running on a NANON node

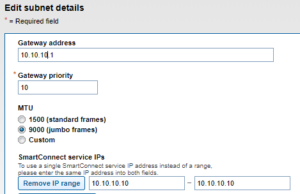
NameNode gives out any IP addresses in an access zone, even across pools and subnets; client connection may fail as a result

Other Known Issues

  1. Host Registrations fails on RHEL 7 hosts with opensslissues

Modify the ambari-agent.ini file:

/etc/ambari-agent/conf/ambari-agent.ini

[security]

force_https_protocol=PROTOCOL_TLSv1_2


Restart the ambari-server and all ambari-agents

https://community.hortonworks.com/questions/145/openssl-error-upon-host-registration.html


OneFS 9.0.0 the services are now disabled by default

Check the service status using isi sevrices -a

hop-ps-a-3# isi services -a
Available Services:    
apache2              Apache2 Web Server                       Enabled 
auth                 Authentication Service                   Enabled  
celog                Cluster Event Log                        Enabled connectemc           ConnectEMC Service                       Disabled 
cron                 System cron Daemon                       Enabled dell_dcism           Dell iDRAC Service Module                Enabled dell_powertools      Dell PowerTools Agent Daemon             Enabled 
dmilog               DMI log monitor                          Enabled  
gmond                Ganglia node monitor                     Disabled  
hdfs                 HDFS Server                              Disabled 

Enable the hdfs service manually to get  going with Hadoop cluster access from hdfs client.

Upgrade Hortonworks HDP2.6.5 to HDP3.* on DellEMC Isilon OneFS 8.1.2 and later

Introduction

This blog post walks you through the process of upgrading  Hortonworks Data Platform (HDP) 2.6.5 to HDP 3.0.1 or HDP3.1.0  on DellEMC Isilon OneFS 8.1.2/OneFS 8.2 This is intended for systems administrators, IT program managers, IT architects, and IT managers who are upgrading Hortonworks Data Platform installed on OneFS 8.1.2.0. or later versions

There are two official ways to upgrade to HDP 3.* as follows:

    1. Deploy a fresh HDP 3.* cluster and migrate existing data using Data Lifecycle Manager or distributed copy (distcp).
    2. Perform an in-place upgrade of an existing HDP 2.6.x cluster.

This post will demonstrate in-place upgrades. Make sure your cluster is ready and meets all the success criteria as mentioned here and in the official Hortonworks Upgrade documentation.

The installation or upgrade process of the new HDP 3.0.1 and later versions on Isilon OneFS 8.1.2 and later versions has changed as follows:

The OneFS is not presented as a host to the HDP cluster anymore, and instead, OneFS is internally managed as a dedicated service in place of HDFS by installing a management pack called the Ambari Management Pack for Isilon OneFS. It is a software component that can be installed on the Ambari Server to define OneFS as a service in a Hadoop cluster. The management pack allows an Ambari administrator to start, stop, and configure OneFS as a HDFS storage service. This provides native NameNode and DataNode capabilities similar to traditional HDFS.

This management pack is OneFS release-independent and can be updated in between releases if needed.

Prerequisites

    1. Hadoop cluster running HDP 2.6.5 and Ambari Server 2.6.2.2.
    2. DellEMC Isilon OneFS updated to 8.1.2 and patch 240163 installed.
    3. Ambari Management Pack for Isilon OneFS download fromhere.
    4. HDFS to OneFS Service converter script download from here.

We will perform the upgrade in two parts: first we will make the changes on the OneFS host and followed by updates on the HDP cluster.

OneFS Host Preparation

The step-by-step process to prepare the OneFS host for the HDP upgrade is as follows:.

    1. First make sure the Isilon OneFS cluster is running 8.1.2 installed with the latest patch available. Check DellEMC support or Current Isilon OneFS Patches

  1. HDP 3.0.1 comes with TLSv2.0 service which relies on the yarn-ats user and a dedicated HBase storage in the back-end for Yarn apps and jobs framework metrics collections. For this, we  create two new users yarn-ats and yarn-ats-hbase on the OneFS host.

Login to the Isilon OneFS terminal node using root credentials, and run the following commands:

isi auth group create yarn-ats
isi auth users create yarn-ats --primary-group yarn-ats --home-directory=/ifs/home/yarn-ats
isi auth group create yarn-ats-hbase
isi auth users create yarn-ats-hbase --primary-group yarn-ats-hbase --home-directory=/ifs/home/yarn-ats-hbase
  1. Once the new users are created, you need to map yarn-ats-hbase to yarn-ats on the OneFS host. This step is required only if you are going to secure the HDP cluster with Kerberization.
isi zone modify --add-user-mapping-rules="yarn-ats-hbase=>yarn-ats" –-zone=ZONE_NAME

This user mapping depends on the mode of Timeline Service 2.0 Installation. Read those instructions carefully and opt for the deployment mode to avoid ats-hbase service failure.

You can skip the yarn-ats-hbase to yarn-ats user mapping in the following two cases:

    • Renaming yarn-ats-hbase principals to yarn-ats during Kerberization if Timeline Service V2.0s are deployed in Embedded or System Service mode.
    • There is no need to set user mapping if TLSv2.0 is configured on external Hbase.

HDP Cluster preparation and upgrade

Follow the steps as documented. The steps  must to meet all of the prerequisites in the Hortonworks upgrade document.

  1. Before starting the process, make sure the HDP 2.6.5 cluster is healthy by doing a service check, and address all of the alerts, if any display.

  1. Now stop the HDFS service and all other components running on the OneFS host.

  1. Delete the Datanode/Namenode/SNamenode using the following curl command:

Note that before DN/NN and SNN are deleted, you’ll see something like the following:

Use the following curl commands to delete the DN, NN and SNN:

export AMBARI_SERVER=<Ambar server IP/FQDN>
export CLUSTER=<HDP2.6.5 cluster name>
export HOST=<OneFS host FQDN>
curl -u admin:admin -H "X-Requested-By: Ambari" -X DELETE http://$AMBARI_SERVER:8080/api/v1/clusters/$CLUSTER/hosts/$HOST/host_components/DATANODE
curl -u admin:admin -H "X-Requested-By: Ambari" -X DELETE http://$AMBARI_SERVER:8080/api/v1/clusters/$CLUSTER/hosts/$HOST/host_components/NAMENODE
curl -u admin:admin -H "X-Requested-By: Ambari" -X DELETE http://$AMBARI_SERVER:8080/api/v1/clusters/$CLUSTER/hosts/$HOST/host_components/SECONDARY_NAMENODE

After the deleting DN/NN and SNN, you’ll see something similar to the following:

  1. Manually delete the OneFS host from the Ambari Server UI.

Following the steps from five to nine are critical and are related to the Hortonworks HDP upgrade process. Refer to the Hortonworks upgrade documentations or consult the Hortonworks support if necessary.

Note: Steps five to nine in the HDP upgrade process below are related to the services running on our POC cluster. You’ll have to do backup, migration, upgrades to the necessary service as described in the Hortonworks documentation before going to  step 10.

———-

  1. Upgrade Ambari Server/agent to 2.7.1, by follow the Hortonworks Ambari Server upgrade document.

  1. Register and install HDP 3.0.1, by following the steps in this Hortonworks HDP register and install target version guide.
  2. Upgrade Ambari metrics, by following the steps in this upgrade ambari metrics guide
  3. Note: This next step is critical: Perform a service check on all the services and make sure to address all  alerts if any.
  4. Click upgrade and complete the upgrade process. Address any issues encountered before proceeding to avoid service failures after finalizing the upgrade.

A screen similar to the following displays:

———–

After the successful upgrade to HDP 3.0.1, continue installing Ambari Management pack for Isilon OneFS on the upgraded Ambari Server.
  1. For the Ambari Server Management Pack installation, login to the Ambari Server terminal, download the management pack, install, and then restart the Ambari server.

a. Download the Ambari Management Pack for Isilon OneFS from here

b. Install the management pack as shown below. Once it is installed, the following displays: Ambari Server ‘install-mpack’ completed successfully.

root@RDUVNODE334518:~ # ambari-server install-mpack --mpack=isilon-onefs-mpack-0.1.0.0.tar.gz --verbose
Using python /usr/bin/python
Installing management pack
INFO: Loading properties from /etc/ambari-server/conf/ambari.properties
INFO: Installing management pack isilon-onefs-mpack-0.1.0.0-SNAPSHOT.tar.gz
INFO: Loading properties from /etc/ambari-server/conf/ambari.properties
INFO: Download management pack to temp location /var/lib/ambari-server/data/tmp/isilon-onefs-mpack-0.1.0.0-SNAPSHOT.tar.gz
INFO: Loading properties from /etc/ambari-server/conf/ambari.properties
INFO: Expand management pack at temp location /var/lib/ambari-server/data/tmp/isilon-onefs-mpack-0.1.0.0-SNAPSHOT/
2018-11-07 06:36:39,137 - Execute[('tar', '-xf', '/var/lib/ambari-server/data/tmp/isilon-onefs-mpack-0.1.0.0-SNAPSHOT.tar.gz', '-C', '/var/lib/ambari-server/data/tmp/')] {'tries': 3, 'sudo': True, 'try_sleep': 1}
INFO: Loading properties from /etc/ambari-server/conf/ambari.properties
INFO: Stage management pack onefs-ambari-mpack-0.1 to staging location /var/lib/ambari-server/resources/mpacks/onefs-ambari-mpack-0.1
INFO: Processing artifact ONEFS-addon-services of type stack-addon-service-definitions in /var/lib/ambari-server/resources/mpacks/onefs-ambari-mpack-0.1/addon-services
INFO: Loading properties from /etc/ambari-server/conf/ambari.properties
INFO: Adjusting file permissions and ownerships
INFO: about to run command: chmod -R 0755 /var/lib/ambari-server/resources/stacks
INFO:
process_pid=28352
INFO: about to run command: chown -R -L root /var/lib/ambari-server/resources/stacks
INFO:
process_pid=28353
INFO: about to run command: chmod -R 0755 /var/lib/ambari-server/resources/extensions
INFO:
process_pid=28354
INFO: about to run command: chown -R -L root /var/lib/ambari-server/resources/extensions
INFO:
process_pid=28355
INFO: about to run command: chmod -R 0755 /var/lib/ambari-server/resources/common-services
INFO:
process_pid=28356
INFO: about to run command: chown -R -L root /var/lib/ambari-server/resources/common-services
INFO:
process_pid=28357
INFO: about to run command: chmod -R 0755 /var/lib/ambari-server/resources/mpacks
INFO:
process_pid=28358
INFO: about to run command: chown -R -L root /var/lib/ambari-server/resources/mpacks
INFO:
process_pid=28359
INFO: about to run command: chmod -R 0755 /var/lib/ambari-server/resources/mpacks/cache
INFO:
process_pid=28360
INFO: about to run command: chown -R -L root /var/lib/ambari-server/resources/mpacks/cache
INFO:
process_pid=28361
INFO: about to run command: chmod -R 0755 /var/lib/ambari-server/resources/dashboards
INFO:
process_pid=28362
INFO: about to run command: chown -R -L root /var/lib/ambari-server/resources/dashboards
INFO:
process_pid=28363
INFO: about to run command: chown -R -L root /var/lib/ambari-server/resources/stacks
INFO:
process_pid=28364
INFO: about to run command: chown -R -L root /var/lib/ambari-server/resources/extensions
INFO:
process_pid=28365
INFO: about to run command: chown -R -L root /var/lib/ambari-server/resources/common-services
INFO:
process_pid=28366
INFO: about to run command: chown -R -L root /var/lib/ambari-server/resources/mpacks
INFO:
process_pid=28367
INFO: about to run command: chown -R -L root /var/lib/ambari-server/resources/mpacks/cache
INFO:
process_pid=28368
INFO: about to run command: chown -R -L root /var/lib/ambari-server/resources/dashboards
INFO:
process_pid=28369
INFO: Management pack onefs-ambari-mpack-0.1 successfully installed! Please restart ambari-server.
INFO: Loading properties from /etc/ambari-server/conf/ambari.properties
Ambari Server 'install-mpack' completed successfully.

c. Restart the Ambari Server.

root@RDUVNODE334518:~ # ambari-server restart
Using python /usr/bin/python
Restarting ambari-server
Waiting for server stop...
Ambari Server stopped
Ambari Server running with administrator privileges.
Organizing resource files at /var/lib/ambari-server/resources...
Ambari database consistency check started...
Server PID at: /var/run/ambari-server/ambari-server.pid
Server out at: /var/log/ambari-server/ambari-server.out
Server log at: /var/log/ambari-server/ambari-server.log
Waiting for server start................
Server started listening on 8080

DB configs consistency check: no errors and warnings were found.


  1. Replace the HDFS service with the OneFS service; the management pack installed contains OneFS Service related settings.

For this step, delete the HDFS service, add the OneFS service installed from the Ambari Management Pack above, and copy the HDFS service configuration into the OneFS service.

a. To delete HDFS, add the OneFS service, and copy the configuration, you have an automation tool “hdfs_to_onefs_convertor.py”.

Login to the Ambari Server terminal and download the script from here.

wget --no-check-certificate https://raw.githubusercontent.com/apache/ambari/trunk/contrib/management-packs/isilon-onefs-mpack/src/main/tools/hdfs_to_onefs_convert.py

b. Now run the script by issuing the Ambari server and cluster name as the parameters. Once it completes, you see all the services up and running.

root@RDUVNODE334518:~ # python hdfs_to_onefs_convertor.py -o 'RDUVNODE334518.west.isilon.com' -c 'hdpupgd'
This script will replace the HDFS service to ONEFS
The following prerequisites are required:
* ONEFS management package must be installed
* Ambari must be upgraded to >=v2.7.0
* Stack must be upgraded to HDP-3.0
* Is highly recommended to backup ambari database before you proceed.
Checking Cluster: hdpupgd (http://RDUVNODE334518.west.isilon.com:8080/api/v1/clusters/hdpupgd)
Found stack HDP-3.0
Please, confirm you have made backup of the Ambari db [y/n] (n)? y
Collecting hosts with HDFS_CLIENT
Found hosts [u'rduvnode334518.west.isilon.com']
Stopping all services..
Downloading core-site..
Downloading hdfs-site..
Downloading hadoop-env..
Deleting HDFS..
Adding ONEFS..
Adding ONEFS config..
Adding core-site
Adding hdfs-site
Adding hadoop-env-site
Adding ONEFS_CLIENT to hosts: [u'rduvnode334518.west.isilon.com']
Starting all services..
root@RDUVNODE334518:~ #


  1. At this point, you have successfully upgraded to HDP 3.0.1 and replaced the HDFS service with the OneFS service. From now on, Isilon OneFS only acts as an HDFS storage layer, so you can remove the Ambari Server and ODP Version settings from the Isilon’s HDFS settings as follows:
kbhusan-y93o5ew-1# isi hdfs settings modify --zone=System --odp-version=
kbhusan-y93o5ew-1# isi hdfs settings modify --zone=System --ambari-server=
kbhusan-y93o5ew-1# isi hdfs settings view
Service: Yes
Default Block Size: 128M
Default Checksum Type: none
Authentication Mode: all
Root Directory: /ifs/hdfs-root
WebHDFS Enabled: Yes
Ambari Server: -
Ambari Namenode: kb-hdp-1.west.isilon.com
Odp Version: -
Data Transfer Cipher: none
Ambari Metrics Collector: kb-hdp-1.west.isilon.com
kbhusan-y93o5ew-1#


13. Login into the Ambari Web UI and check the OneFS service and its configuration. Perform the service check.

A screen similar to the following displays:

Review the results:

Summary

In this blog, we demonstrated how you can successfully upgrade the Apache Ambari Server/agents to 2.7.1 and Hortonworks HDP 2.6.5 to HDP 3.0.1 on DellEMC Isilon OneFS 8.1.2 installed with the latest patch available. The same steps apply to upgrading the later versions of HDP3.0.1.

We installed Ambari server Management Pack for DellEMC Isilon OneFS which replaced the HDFS service to the OneFS service. This enables Ambari administrator to start, stop, and configure OneFS as a HDFS storage service, and this also provides native NameNode and DataNode capabilities like traditional HDFS to DellEMC Isilon OneFS.


OneFS S3 Protocol Support

First introduced in version 9.0,  OneFS supports the AWS S3 API as a protocol, extending the PowerScale data lake to natively include object, and enabling workloads which write data via file protocols such as NFS, HDFS or SMB, and then read that data via S3, or vice versa.

Because objects are files “under the hood”, the same OneFS data services, such as Snapshots, SyncIQ, WORM, etc, are all seamlessly integrated.

Applications now have multiple access options – across both file and object – to the same underlying dataset, semantics, and services, eliminating the need for replication or migration for different access requirements, and vastly simplifying management.

This makes it possible to run hybrid and cloud-native workloads, which use S3-compatible backend storage, for example cloud backup & archive software, modern apps, analytics flows, IoT workloads, etc. – and to run these on-prem, alongside and coexisting with traditional file-based workflows.

In addition to HTTP 1.1, OneFS S3 supports HTTPS 1.2, to meet organizations’ security and compliance needs. And since S3 is integrated as a top-tier protocol, performance is anticipated to be similar to SMB.

By default, the S3 service listens on port 9020 for HTTP and 9021 for HTTPS, although both these ports are easily configurable.

Every S3 object is linked to a file, and each S3 bucket maps to a specific directory called the bucket path.  If the bucket path is not specified, a default is used. When creating a bucket, OneFS adds a dot-s3 directory under the bucket path, which is used to store temporary files for PUT objects.

The AWS S3 data model is a flat structure, without a strict hierarchy of sub-buckets or sub-folders. However, it does provide a logical hierarchy, using object key-name prefixes and delimiters, which OneFS leverages to support a rudimentary concept of folders.

OneFS S3 also incorporates multi-part upload, using HTTP’s ‘100 continue’ header, allowing OneFS to ingest large objects, or copy existing objects, in parts, thereby improving upload performance.

OneFS allows both ‘virtual hosted-style requests’, where you specify a bucket in a request using the HTTP Host header, and also ‘path-style requests’, where a bucket is specified using the first slash-delimited component of the Request-URI path.

Every interaction with S3 is either authenticated or anonymous. While authentication verifies the identity of the requester, authorization controls access to the desired data. OneFS treats unauthenticated requests as anonymous, mapping it to the user ‘nobody’.

OneFS S3 uses either AWS Signature Version 2 or Version 4 to authenticate requests, which must include a signature value that authenticates the request sender. This requires the user to have both an access ID and a secret Key, which can be obtained from the OneFS key management portal.

The secret key is used to generate the signature value, along with several request header values. After receiving the signed request, OneFS uses the access ID to retrieve a copy of the secret key internally, recomputes the signature value of the request, and compares it against the received signature. If they match, the requester is authenticated, and any header value used in the signature is verified to be tamper-free.

Bucket ACLs control whether a user has permission on an S3 bucket. When receiving a request for a bucket operation, OneFS parses the user access ID from the request header and evaluates the request according to the target bucket ACL. To access OneFS objects, the S3 request must be authorized at both the bucket and object level, using permission enforcement based on the native OneFS ACLs.

Here’s the list of the principle S3 operations that OneFS 9.0 currently supports:

Operation S3 API name Description
DELETE object DeleteObject This operation enables you to delete a single object from a bucket. Delete multiple objects from a bucket using a single request is not supported.
GET object GetObject Retrieves an object content.
GET object ACL GetObjectAcl Get the access control list (ACL) of an object.
HEAD object HeadObject The HEAD operation retrieves metadata from an object without returning the object itself. This operation is useful if you’re only interested in an object’s metadata. The operation returns a 200 OK if the object exists and you have permission to access it. Otherwise, the operation might return responses such as 404 Not Found and 403 Forbidden.
PUT object PutObject Adds an object to a bucket.
PUT object – copy CopyObject Creates a copy of an object that is already stored in OneFS.
PUT object ACL PutObjectAcl Sets the access control lists (ACL) permissions for an object that already exists in a bucket.
Initiate multipart upload CreateMultipartUpload Initiate a multipart upload and returns an upload ID. This upload ID is used to associate with all the parts in the specific multipart upload. You specify this upload ID in each of your subsequent upload part requests. You also include this upload ID in the final request to either complete or abort the multipart upload request.
Upload part UploadPart Uploads a part in a multipart upload. Each part must be at least 5MB in size, except the last part. And max size of each part is 5GB.
Upload part – Copy UploadPartCopy Upload a part by copying data from an existing object as data source. Each part must be at least 5MB in size, except the last part. And max size of each part is 5GB.
Complete multipart upload CompleteMultipartUpload Completes a multipart upload by assembling previously uploaded parts.
List multipart uploads ListMultipartUploads Lists in-progress multipart uploads. An in-progress multipart upload is a multipart upload that has been initiated using the Initiate Multipart Upload request but has not yet been completed or aborted.
List parts ListParts List the parts that have been uploaded for a specific multipart upload.
Abort multipart upload AbortMultipartUpload Abort a multipart upload. After a multipart upload is aborted, no additional parts can be uploaded using that upload ID. The storage consumed by any previously uploaded parts will be freed. However, if any part uploads are currently in progress, those part uploads might or might not succeed. As a result, it might be necessary to abort a given multipart upload multiple times in order to completely free all storage consumed by all parts.


Essentially, this includes the basic bucket and object create, read, update, delete, or CRUD, operations, plus multipart upload.

It’s worth noting that OneFS can accommodate individual objects up to 16TB in size, unlike AWS S3, which caps this at a maximum of 5TB per object.

Please be aware that OneFS 9.0 does not natively support versioning or Cross-Origin Resource Sharing (CORS). However, SnapshotIQ and SyncIQ can be used as a substitute for this functionality.

The OneFS S3 implementation includes a new WebUI and CLI for ease of configuration and management.  This enables:

  • The creation of buckets and configuration of OneFS specific options, such as object ACL policy
  • The ability to generate access IDs and secret keys for users through the WebUI key management portal.
  • Global settings, including S3 service control and configuration of the HTTP listening ports.
  • Configuration of Access zones, for multi-tenant support.

All the WebUI functionality and more is also available through the CLI using the new ‘isi s3’ command set:

# isi s3

Description:

    Manage S3 buckets and protocol settings.

Required Privileges:

    ISI_PRIV_S3

Usage:

    isi s3 <subcommand>

        [--timeout <integer>]

        [{--help | -h}]

Subcommands:

    buckets      Manage S3 buckets.

    keys         Manage S3 keys.

    log-level    Manage log level for S3 service.

    mykeys       Manage user's own S3 keys.

    settings     Manage S3 default bucket and global protocol settings.


PowerScale Platforms

In this article, we’ll take a quick peek at the new PowerScale F200 and F600 hardware platforms. For reference, here’s where these new nodes sit in the current hardware hierarchy:

The PowerScale F200 is an entry-level all flash node that utilizes affordable SAS SSDs and a single-CPU 1U PowerEdge platform. It’s performance and capacity profile makes it ideally suited for use cases such as remote office/back office environments, factory floors, IoT, retail, smaller organizations, etc. The key advantages to the F200 are its low entry capacities and price points and the flexibility to add nodes individually, as opposed to a chassis/2 node minimum for the legacy Gen6 platforms.

The F200 contains four 3.5” drive bays populated with a choice of 960GB, 1.92TB, or 3.84TB enterprise SAS SSDs.

Inline data reduction, which incorporates compression, dedupe, and single instancing, is included as standard and requires no additional licensing.

Under the hood, the F200 node is based on the PowerEdge R640 server platform. Each node contains a  single Socket Intel CPU, and 10/25 GbE Front-End and Back-End networking,

Configurable memory options of 48GB or 96GB per node are available.

In contrast, the PowerScale F600 is a mid-level all-flash platform that utilizes NVMe SSDs and a dual-CPU 1U PowerEdge platform.  The ideal use cases for the F600 include performant workflows, such as M&E, EDA, HPC, and others, with some cost sensitivity and less demand for capacity.

The F600 contains eight 2.5” drive bays populated with a choice of 1.92TB, 3.84TB, or 7,68TB enterprise NVMe SSDs. Inline data reduction, which incorporates compression, dedupe, and single instancing, is also included as standard.

The F600 is also based on the 1U R640 PowerEdge server platform, but, unlike the F200, with dual socket Intel CPUs. Front-End networking options include 10/25 GbE or 40/100 GbE and with 100 GbE for the Back-End network.

Configurable memory options include 128GB, 192GB, or 384GB per node.

For Ethernet networking, the 10/40GbE environment uses SFP+ and QSFP+ cables and modules, whereas the 25/100GbE environment uses SFP28 and QSFP28 cables and modules. These cables are mechanically identical and the 25/100GbE NICs and switches will automatically read cable types and adjust accordingly. However, be aware that the 10/40GbE NICS and switches will not recognize SFP28 cables.

The 40GbE and 100GbE connections are actually four lanes of 10GbE and 25GbE respectively, allowing switches to ‘breakout’ a QSFP port into 4 SFP ports. While this is automatic on the Dell back-end switches, some front-end switches may need configuring

The F200 has a single NIC configuration comprising both a 10/25GbE front-end and back-end. By comparison, the F600 nodes are available in two configurations, with a 100GbE back-end and either a 25GbE or 100GbE front-end and.

Here’s what the back-end NIC/Switch Support Matrix looks like for the PowerScale F200 and F600:

Drive subsystem-wise, the PowerEdge R640 platform’s bay numbering scheme starts with 0 instead of 1. On the F200, there are four SAS SSDs, numbered from 0 to 3.

The F600 has ten total bays, of which numbers 0 and 1 on the far left are unused. The eight NVMe SSDs therefore reside in bays 2 to 9.

Support has been added to OneFS 9.0 for NVMe. alongside the legacy SCSI and ATA interfaces. Note that NVMe drives are only currently supported on the F600 nodes, and these drives use the NVMe and NVD drivers. The NVD is a block device driver that exposes an NVMe namespace like a drive and is what most OneFS operations act upon, and each NVMe drive has a /dev/nvmeX, /dev/nvmeXnsX and /dev/nvdX device entry. From a drive management standpoint, the CLI and WebUI are pretty much unchanged. While NVMe has been added as new drive type, the ’isi devices’ CLI syntax stays the same and the locations remain as ‘bays’. Similarly, the CLI drive utilities such as ‘isi_radish’ and ‘isi_drivenum’ also operate the same, where applicable

The F600 and F200 nodes’ front panel has limited functionality compared to older platform generations and will simply allow the user to join a node to a cluster and display the node name after the node has successfully joined the cluster.

Similar to legacy Gen6 platforms, a PowerScale node’s serial number can be found either by viewing /etc/isilon_serial_number or running the ‘isi_hw_status | grep SerNo’ CLI command syntax. The serial number reported by OneFS will match that of the service tag attached to the physical hardware and the /etc/isilon_system_config file will report the appropriate node type. For example:

# cat /etc/isilon_system_config

PowerScale F600

Introducing Dell EMC PowerScale…

Today we’re thrilled to launch Dell EMC PowerScale – a new unstructured data storage family centered  around OneFS 9.0.

This release represents a series of firsts for us:

  • Hardware-wise, we’ve delivered our first NVMe offering, the first nodes delivered in a compact 1RU form factor, the first of our platforms designed and built entirely on Dell Power-series hardware, and the first PowerScale branded products.

  • Software-wise, OneFS 9.0 introduces support for the AWS S3 API as a top-tier protocol – extending our data lake to natively include object, and enabling hybrid and cloud-native workloads that use S3-compatible backend storage, such cloud backup & archive software, modern apps, analytics flows, IoT workloads, etc. And to run these on-prem, alongside and coexisting with traditional file-based workflows.

  • DataIQ’s tight integration with OneFS 9.0 enables seamless data discovery, understanding, and movement, delivering intelligent insights and holistic management.

  • CloudIQ harnesses the power of machine learning and AI to proactively mitigate issues before they become problems.

Over the course of the next few blog articles, we’ll explore the new platforms, features and functionality of the new PowerScale family in more depth…

OneFS Caching Hierarchy

Caching occurs in OneFS at multiple levels, and for a variety of types of data. For this discussion we’ll concentrate on the caching of file system structures in main memory and on SSD.

OneFS’ caching infrastructure design is based on aggregating each individual node’s cache into one cluster wide, globally accessible pool of memory. This is done by using an efficient messaging system, which allows all the nodes’ memory caches to be available to each and every node in the cluster.

For remote memory access, OneFS utilizes the Sockets Direct Protocol (SDP) over an Ethernet or Infiniband (IB) backend interconnect on the cluster. SDP provides an efficient, socket-like interface between nodes which, by using a switched star topology, ensures that remote memory addresses are only ever one hop away. While not as fast as local memory, remote memory access is still very fast due to the low latency of the backend network.

OneFS uses up to three levels of read cache, plus an NVRAM-backed write cache, or write coalescer. The first two types of read cache, level 1 (L1) and level 2 (L2), are memory (RAM) based, and analogous to the cache used in CPUs. These two cache layers are present in all Isilon storage nodes.  An optional third tier of read cache, called SmartFlash, or Level 3 cache (L3), is also configurable on nodes that contain solid state drives (SSDs). L3 cache is an eviction cache that is populated by L2 cache blocks as they are aged out from memory.

The OneFS caching subsystem is coherent across the cluster. This means that if the same content exists in the private caches of multiple nodes, this cached data is consistent across all instances. For example, consider the following scenario:

  1. Node 2 and Node 4 each have a copy of data located at an address in shared cache.
  2. Node 4, in response to a write request, invalidates node 2’s copy.
  3. Node 4 then updates the value.
  4. Node 2 must re-read the data from shared cache to get the updated value.

OneFS utilizes the MESI Protocol to maintain cache coherency, implementing an “invalidate-on-write” policy to ensure that all data is consistent across the entire shared cache. The various states that in-cache data can take are:

M – Modified: The data exists only in local cache, and has been changed from the value in shared cache. Modified data is referred to as ‘dirty’.

E – Exclusive: The data exists only in local cache, but matches what is in shared cache. This data referred to as ‘clean’.

S – Shared: The data in local cache may also be in other local caches in the cluster.

I – Invalid: A lock (exclusive or shared) has been lost on the data.

L1 cache, or front-end cache, is memory that is nearest to the protocol layers (e.g. NFS, SMB, etc) used by clients, or initiators, connected to that node. The main task of L1 is to prefetch data from remote nodes. Data is pre-fetched per file, and this is optimized in order to reduce the latency associated with the nodes’ IB back-end network. Since the IB interconnect latency is relatively small, the size of L1 cache, and the typical amount of data stored per request, is less than L2 cache.

L1 is also known as remote cache because it contains data retrieved from other nodes in the cluster. It is coherent across the cluster, but is used only by the node on which it resides, and is not accessible by other nodes. Data in L1 cache on storage nodes is aggressively discarded after it is used. L1 cache uses file-based addressing, in which data is accessed via an offset into a file object. The L1 cache refers to memory on the same node as the initiator. It is only accessible to the local node, and typically the cache is not the primary copy of the data. This is analogous to the L1 cache on a CPU core, which may be invalidated as other cores write to main memory. L1 cache coherency is managed via a MESI-like protocol using distributed locks, as described above.

L2, or back-end cache, refers to local memory on the node on which a particular block of data is stored. L2 reduces the latency of a read operation by not requiring a seek directly from the disk drives. As such, the amount of data prefetched into L2 cache for use by remote nodes is much greater than that in L1 cache.

L2 is also known as local cache because it contains data retrieved from disk drives located on that node and then made available for requests from remote nodes. Data in L2 cache is evicted according to a Least Recently Used (LRU) algorithm. Data in L2 cache is addressed by the local node using an offset into a disk drive which is local to that node. Since the node knows where the data requested by the remote nodes is located on disk, this is a very fast way of retrieving data destined for remote nodes. A remote node accesses L2 cache by doing a lookup of the block address for a particular file object. As described above, there is no MESI invalidation necessary here and the cache is updated automatically during writes and kept coherent by the transaction system and NVRAM.

L3 cache is a subsystem which caches evicted L2 blocks on a node. Unlike L1 and L2, not all nodes or clusters have an L3 cache, since it requires solid state drives (SSDs) to be present and exclusively reserved and configured for caching use. L3 serves as a large, cost-effective way of extending a node’s read cache from gigabytes to terabytes. This allows clients to retain a larger working set of data in cache, before being forced to retrieve data from higher latency spinning disk. The L3 cache is populated with “interesting” L2 blocks dropped from memory by L2’s least recently used cache eviction algorithm. Unlike RAM based caches, since L3 is based on persistent flash storage, once the cache is populated, or warmed, it’s highly durable and persists across node reboots, etc. L3 uses a custom log-based filesystem with an index of cached blocks. The SSDs provide very good random read access characteristics, such that a hit in L3 cache is not that much slower than a hit in L2.

To utilize multiple SSDs for cache effectively and automatically, L3 uses a consistent hashing approach to associate an L2 block address with one L3 SSD. In the event of an L3 drive failure, a portion of the cache will obviously disappear, but the remaining cache entries on other drives will still be valid. Before a new L3 drive may be added to the hash, some cache entries must be invalidated.

OneFS also uses a dedicated inode cache in which recently requested inodes are kept. The inode cache frequently has a large impact on performance, because clients often cache data, and many network I/O activities are primarily requests for file attributes and metadata, which can be quickly returned from the cached inode.

OneFS provides tools to accurately assess the performance of the various levels of cache at a point in time. These cache statistics can be viewed from the OneFS CLI using the isi_cache_stats command. Statistics for L1, L2 and L3 cache are displayed for both data and metadata. For example:

# isi_cache_stats
Totals 

l1_data: a 224G 100% r 226G 100% p 318M 77%, l1_encoded: a 0.0B 0% r 0.0B 0% p 0.0B 0%, l1_meta: r 4.5T 99% p 152K 48%, 

l2_data: r 1.2G 95% p 115M 79%, l2_meta: r 27G 72% p 28M 3%, 

l3_data: r 0.0B 0% p 0.0B 0%, l3_meta: r 8G 99% p 0.0B 0%

For more detailed and formatted output, a verbose option of the command is available using the ‘isi_cache_stats -v’ option.

It’s worth noting that for L3 cache, the prefetch statistics will always read zero, since it’s a pure eviction cache and does not utilize data or metadata prefetch.

Due to balanced data distribution, automatic rebalancing, and distributed processing, OneFS is able to leverage additional CPUs, network ports, and memory as the system grows. This also allows the caching subsystem (and, by virtue, throughput and IOPS) to scale linearly with the cluster size.

FAQ: Ansible Module for Dell EMC Isilon

To which Ansible module for Dell EMC Isilon version does this FAQ apply?

This FAQ applies to version 1.1 of the module


Where can I get this Ansible module for Dell EMC Isilon?

We have a community in GitHub: https://github.com/dell/ansible-isilon


What is the software prerequisites?

  • Isilon OneFS 8 or higher
  • Ansible 2.7 or higher
  • Python 2.7.12 or higher
  • Red Hat Enterprise Linux 7.6


What are the supported features for this Ansible module for Dell EMC Isilon?

The Ansible Modules for Dell EMC Isilon includes:

  • File System Module
  • Access Zone Module
  • Users Module
  • Groups Module
  • Snapshot Module
  • Snapshot Schedule Module
  • NFS Module
  • SMB Module
  • Gather Facts Module

Each module includes View, Create, Delete and Modify operations. For the details, refer to the table below:

user

group

filesystem

Access zone

NFS export

SMB share

snapshot

Snapshot schedule

Create

y

y

y

n

y

y

y

y

Modify

y

y

y

y

y

y

y

y

Delete

y

y

y

n

y

y

y

y

View

y

y

y

y

y

y

y

y

What is the filesystem as we don’t see this concept in Isilon?

Filesystem in this Ansible module represents a directory in a given access zone with owner, ACL and even quotas specified.


How to install it?

I’ve listed high-level steps below. For the details, refer to the product guide at

https://github.com/dell/ansible-isilon/blob/dellemc_ansible/docs/Ansible%20for%20Dell%20EMC%20Isilon%20v1.1%20Product%20Guide.pdf

The following example is using CenoOS 8 + python 3.6 + Ansible 2.9.5 + Isilon sdk 8.1.1 + OneFS 8.2.2. The overall steps are as the followings:

  1. Install Ansible 2.9.5

# dnf -y install https://dl.fedoraproject.org/pub/epel/epel-release-latest-8.noarch.rpm

# dnf install ansible

  1. Check the python version for ansible by using the following command

# ansible –version

In my case it’s python 3.6.8

[root@c8 ~]# ansible –version

ansible 2.9.5

  config file = /etc/ansible/ansible.cfg

  configured module search path = [‘/root/.ansible/plugins/modules’, ‘/usr/share/ansible/plugins/modules’]

  ansible python module location = /usr/lib/python3.6/site-packages/ansible

  executable location = /usr/bin/ansible

  python version = 3.6.8 (default, Nov 21 2019, 19:31:34) [GCC 8.3.1 20190507 (Red Hat 8.3.1-4)]

  1. Install Isilon sdk 8.1.1

# pip3 install isi_sdk_8_1_1

  1. Install Isilon Ansible module: (make sure the path is aligned with the python version)

Copy utils/dellemc_ansible_utils.py to  /usr/lib/python3.6/site-packages/ansible/module_utils/

Copy all module Python files from ‘isilon/library’ folder to  /usr/lib/python3.6/site-packages/ansible/modules/storage/emc

  1. Install the playbook

Coyp dellemc_ansible/isilon/playbooks to any place you want

  1. Test the installation

Update the playbooks/ flo_test.yml. mine is as below:

– name: Collect set of facts in Isilon

  hosts: localhost

  connection: local

  vars:

    onefs_host: ‘192.168.116.88’

    verify_ssl: False

    api_user: ‘root’

    api_password: ‘a’

    access_zone: ‘System’

  tasks:

  – name: Get nodes of the Isilon cluster

    dellemc_isilon_gatherfacts:

      onefs_host: “{{onefs_host}}”

      verify_ssl: “{{verify_ssl}}”

      api_user: “{{api_user}}”

      api_password: “{{api_password}}”

      gather_subset:

        – nodes

    register: subset_result

  – debug:

      var: subset_result

run the playbook:

ansible-playbook  <path to playbooks/flo_test.yml>

If everything is good, you should see the Info for your Isilon is returned:

…………

                        “release”: “v9.0.0.BETA.0”,

                        “uptime”: 24533,

                        “version”: “Isilon OneFS v8.2.2(RELEASE): 0x900003000000001:Tue Feb 25 09:19:10 PST 2020    root@se********-build11-114:/b/mnt/obj/b/mnt/src/********md64.********md64/sys/IQ.********md64.rele********se   FreeBSD cl********ng version 5.0.0 (t********gs/RELEASE_500/fin********l 312559) (b********sed on LLVM 5.0.0svn)”

                    }

                }

            ],

            “total”: 1

        },

        “Providers”: [],

        “Users”: [],

        “changed”: false,

        “failed”: false

    }

}


PLAY RECAP *********************************************************************

localhost                  : ok=3    changed=0    unreachable=0    failed=0    skipped=0    rescued=0    ignored=0  


Does this module support quota?

The current version only support directory(file system) quotas, but not user or group quotas.


Where can I find the examples?

Check examples from each module’s file in /ansible-isilon/dellemc_ansible/isilon/library/

I’ve also create a short video on how to use this module to create and mount NFS export from Isilon.


What is the limitation of this module?

Gatherfacts

Getting the list of users and groups with very long names may fail.

Users and Groups

Only local users and groups can be created.

Operations on users and groups with very long names may fail.

Access Zone

Creation and deletion of access zones is not supported.

Filesystems

ACLs can only be modified from POSIX to POSIX mode.

Only directory quotas are supported but not user or group quotas.

Modification of include_snap_data flag is not supported.

NFS Export

If there multiple exports present with the same path in an access zone, operations on such exports fail.

Advanced Isilon features

No support for advanced Isilon features like SyncIQ, tiering, WORM and so on.

How to uninstall the module?

  1. pip3 uninstall isi_sdk_8_1_1
  2. Remove dellemc_ansible_utils.py from  /usr/lib/python3.6/site-packages/ansible/module_utils/
  3. Remove the following files from  /usr/lib/python3.6/site-packages/ansible/modules/storage/emc

dellemc_isilon_accesszone.py

dellemc_isilon_filesystem.py

dellemc_isilon_gatherfacts.py

dellemc_isilon_group.py

dellemc_isilon_nfs.py

dellemc_isilon_smb.py

dellemc_isilon_snapshot.py

dellemc_isilon_snapshotschedule.py

dellemc_isilon_user.py

  1. Remove all the play book


Where do submit an issue against the driver?

The Ansible module for Dell EMC Isilon is officially by Dell EMC. Therefore you can open a ticket directly to the support website : https://www.dell.com/support/ or open a discussion in the forum : https://www.dell.com/community/Containers/bd-p/Containers


Can I run this module in a production environment?

Yes, the module is production-grade. Please make sure your environment follows the pre-requisites and Ansible best practices.