In the previous article in this series, we looked at the underlying architecture and management of SmartQoS in OneFS 9.5. Next, we’ll step through an example SmartQoS configuration via the CLI and WebUI.
After an initial set up, configuring a SmartQoS protocol Ops limit comprises four fundamental steps. These are:

| Step | Task | Description | Example |
| 1 | Identify Metrics of interest | Used for tracking, to enforce an Ops limit | Uses ‘path’ and ‘protocol’ for the metrics to identify the workload. |
| 2 | Create a Dataset | For tracking all of the chosen metric categories | Create the dataset ‘ds1’ with the metrics identified. |
| 3 | Pin a Workload | To specify exactly which values to track within the chosen metrics | path: /ifs/data/client_exports
protocol: nfs3 |
| 4 | Set a Limit | To limit Ops based on the dataset, metrics (categories), and metric values defined by the workload | Protocol_ops limit: 100 |
Step 1:

First, select a metric of interest. For this example we’ll use the following:
- Protocol: NFSv3
- Path: /ifs/test/expt_nfs
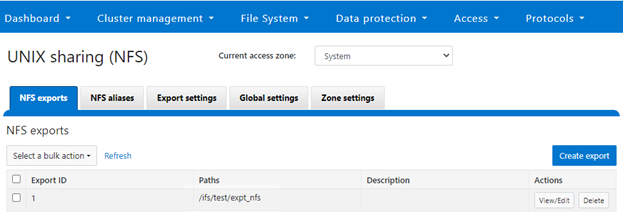
If not already present, create and verify an NFS export – in this case at /ifs/test/expt_nfs:
# isi nfs exports create /ifs/test/expt_nfs

# isi nfs exports list

ID Zone Paths Description

------------------------------------------------

1 System /ifs/test/expt_nfs

------------------------------------------------
Or from the WebUI, under Protocols UNIX sharing (NFS) > NFS exports:
Step 2:

The ‘dataset’ designation is used to categorize workload by various identification metrics including:
| ID Metric | Details |
| Username | UID or SID |
| Primary groupname | Primary GID or GSID |
| Secondary groupname | Secondary GID or GSID |
| Zone name | |
| IP address | Local or remote IP address or IP address range |
| Path | Except for S3 protocol |
| Share | SMB share or NFS export ID |
| Protocol | NFSv3, NFSv4, NFSoRDMA, SMB, or S3 |
SmartQoS in OneFS 9.5 only allows protocol OPs as the transient resources used for configuring a limit ceiling.
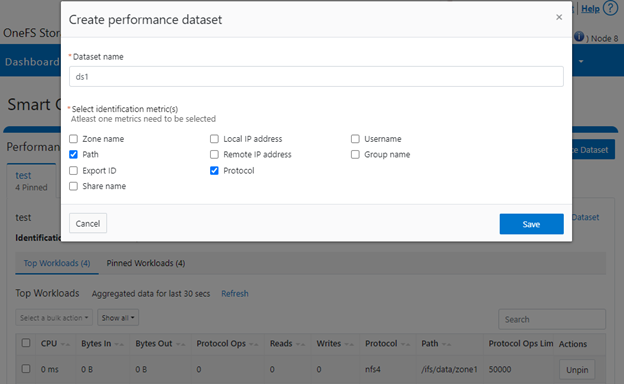
For example, the following CL I command can be used to create a dataset ‘ds1’, specifying protocol and path as the ID metrics:
# isi performance datasets create --name ds1 protocol path

Created new performance dataset 'ds1' with ID number 1.
Note: Resource usage tracking by ‘path’ metric is only supported by SMB and NFS.
The following command will display any configured datasets:
# isi performance datasets list
Or, from the WebUI by navigating to Cluster management > Smart QoS:
Step 3:

After the dataset has been created, a workload can be pinned to it by specifying the metric values. For example:
# isi performance workloads pin ds1 protocol:nfs3 path: /ifs/test/expt_nfs
Pinned performance dataset workload with ID number 100.
Or from the WebUI by browsing to Cluster management > Smart QoS > Pin workload:
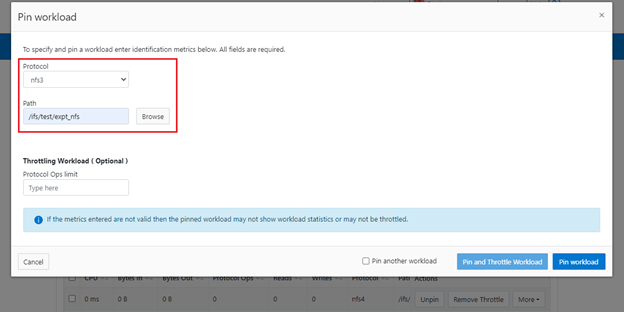
After pinning a workload, the entry will show in the ‘Top Workloads’ section of the WebUI page. However, wait at least 30 seconds to start receiving updates.
To list all the pinned workloads from a specified dataset, use the following command:
# isi performance workloads list ds1
The prior command’s output indicates that there are currently no limits set for this workload.
By default, a protocol ops limit exists for each workload. However it is set to the maximum (the maximum value of a 64-bit unsigned integer). This is represented in the CLI output by a dash (“-“) if a limit has not been explicitly configured:
# isi performance workloads list ds1

ID   Name  Metric Values           Creation Time       Cluster Resource Impact  Client Impact  Limits

--------------------------------------------------------------------------------------

100  -     path:/ifs/test/expt_nfs 2023-02-02T12:06:05  -          -             -

           protocol:nfs3

--------------------------------------------------------------------------------------

Total: 1
Step 4:

For a pinned workload in dataset, a limit for the protocol ops limit can be configured from the CLI using the following syntax:
# isi performance workloads modify <dataset> <workload ID> --limits protocol_ops:<value>
When configuring SmartQoS, always be aware that it is a powerful performance throttling tool which can be applied to significant areas of a cluster’s data and userbase. For example, protocol OPs limits can be configured for metrics such as ‘path:/ifs’, which would affect the entire /ifs filesystem, or ‘zone_name:System’ which would limit the System access zone and all users within it. While such configurations are entirely valid, they would have a significant, system-wide impact. As such, caution should be exercised when configuring SmartQoS to avoid any inadvertent, unintended or unexpected performance constraints.
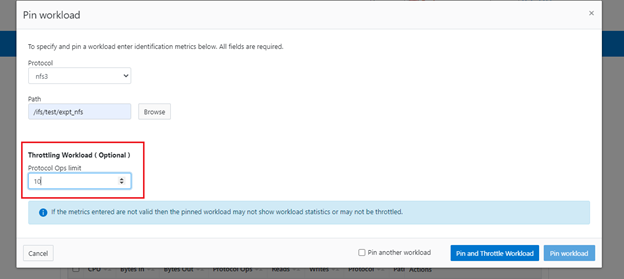
In the following example, the dataset is ‘ds1’, the workload ID is ‘100’, and the protocol OPs limit is set to value ‘10’:
# isi performance workloads modify ds1 100 --limits protocol_ops:10

protocol_ops: 18446744073709551615 -> 10
Or from the WebUI by browsing to Cluster management > Smart QoS > Pin and throttle workload:
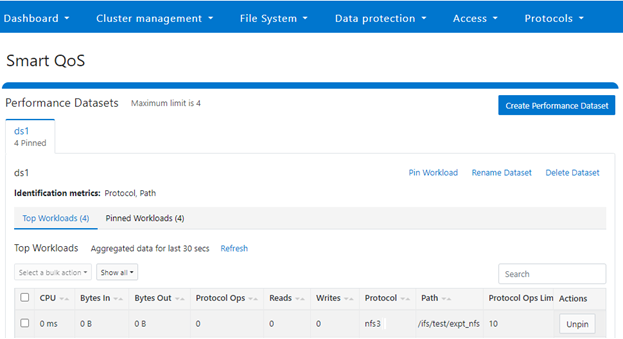
The ‘isi performance workloads’ command can be used in ‘list’ mode to show details of the workload ‘ds1’. In this case, ‘Limits’ is set to protocol_ops = 10.
# isi performance workloads list test

ID   Name  Metric Values           Creation Time       Cluster Resource Impact  Client Impact  Limits

--------------------------------------------------------------------------------------

100  -     path:/ifs/test/expt_nfs 2023-02-02T12:06:05  -  -  protocol_ops:10

           protocol:nfs3

--------------------------------------------------------------------------------------

Total: 1
Or in ‘view’ mode:
# isi performance workloads view ds1 100

                     ID: 100

                   Name: -

          Metric Values: path:/ifs/test/expt_nfs, protocol:nfs3

          Creation Time: 2023-02-02T12:06:05

Cluster Resource Impact: -

          Client Impact: -

                 Limits: protocol_ops:10
Or from the WebUI by browsing to Cluster management > Smart QoS:
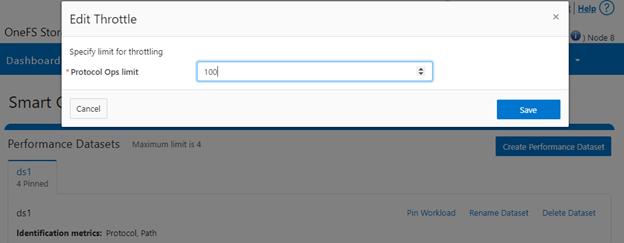
The limit value of a pinned workload can be easily modified with the following CLI syntax. For example, to set the limit to 100 OPs:
# isi performance workloads modify ds1 100 --limits protocol_ops:100
Or from the WebUI by browsing to Cluster management > Smart QoS > Edit throttle:
Similarly, the following CLI command can be used to easily remove a protocol ops limit for a pinned workload:
# isi performance workloads modify ds1 100 --no-protocol-ops-limit
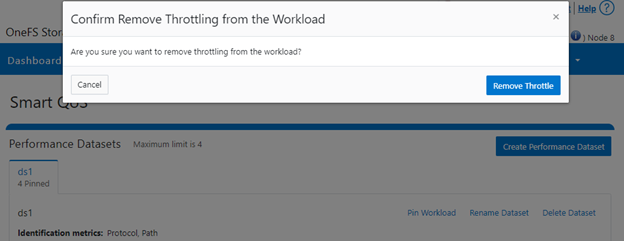
Or from the WebUI by browsing to Cluster management > Smart QoS > Remove throttle:
