In this article we’ll dig into the workings and mechanics of OneFS read caching a bit deeper…
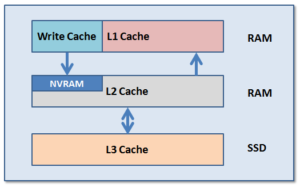
L1 cache interacts with the L2 cache on any node it requires data from, and the L2 cache interacts with both the storage subsystem and L3 cache. L3 cache can be enabled or disabled at a nodepool level. L3 cached blocks are stored on one or more SSDs within the node and each node in the same node nodepool has to have L3 cache enabled
Here are the relative latency of OneFS Cache Hits and Misses:
| Cache | Hit | Miss |
| L1 | 10us | L2 |
| L2 | 100us | L3, (or Hard Disk) |
| L3 | 200us | Hard Disk |
| Hard Disk | 1-10ms | x |
Note: These latency numbers may vary in an active cluster.
L2 is typically more beneficial than L1 because a hit avoids a higher latency operation. An L1 cache hit avoids a back-end round-trip to fetch the data, whereas an L2 cache hit avoids a SATA disk seek in the worst case. This is a dramatic difference in both relative and absolute terms. For SATA drives, an L2 miss is two orders of magnitude above a hit compared to one for L1, and a single back-end round-trip is typically a small portion of a full front-end operation.
L2 is preferable because it is accessible to all nodes. Assuming a workflow with any overlap among nodes, it is preferable to have the cluster’s DRAM holding L2 data rather than L1. In L2, a given data block is only cached once and invalidated much less frequently. This is why storage nodes are configured with a drop-behind policy on file data. Nodes without disks will not drop behind since there is no L2 data to cache.
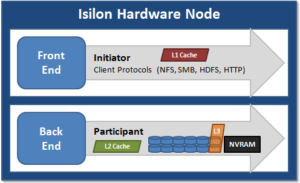
When a read request arrives from a client, OneFS determines whether the requested data is in local cache. Any data resident in local cache is read immediately. If data requested is not in local cache, it is read from disk. For data not on the local node, a request is made from the remote nodes on which it resides. On each of the other nodes, another cache lookup is performed. Any data in the cache is returned immediately, and any data not in the cache is retrieved from disk. When the data has been retrieved from local and remote cache (and possibly disk), it is returned back to the client.
Each level of OneFS’ cache hierarchy utilizes a different strategy for cache eviction, to meet the particular needs of that cache type. For L1 cache in storage nodes, cache aging is based on a drop-behind algorithm. L2 cache utilizes a Least Recently Used algorithm, or LRU, since it is relatively simple to implement, low-overhead, and performs well in general. By contrast, the L3 cache employs a first-in, first-out eviction policy (or FIFO) since it’s writing to what is effectively a specialized linear filesystem on SSD.

For OneFS, a drawback of LRU is that it is not scan resistant. For example, a OneFS Job Engine job or backup process that scans a large amount of data can cause the L2 cache to be flushed. This is mitigated to a large degree by the L3 cache. Other eviction policies have the ability to promote frequently accessed entries such that they are not evicted by scanning entries, which are accessed only once.
OneFS uses two primary sources of information for predicting a file’s access pattern and pre-populate the cache with data and metadata blocks before they’re requested:
- OneFS attributes that can be set on files and directories to provide hints to the filesystem.
- The actual read activity occurring on the file.
This technique is known as ‘prefetching’, whereby the latency of an operation is mitigated by predictively copying data into a cache before it has been requested. Data prefetching is employed frequently and is a significant benefactor of the OneFS flexible file allocation strategy.
Flexible allocation involves determining the best layout for a file based on several factors, including cluster size (number of nodes), file size, and protection level (e.g.+2 or +3). The performance effect of flexible allocation is to place a file on the largest number of drives possible, given the above constraints.
The most straightforward application of prefetch is file data, where linear access is common for unstructured data, such as media files. Reading and writing of such files generally starts at the beginning and continues unimpeded to the end of the file. After a few requests, it becomes highly likely that a file is being streamed to the end.
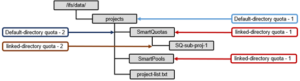
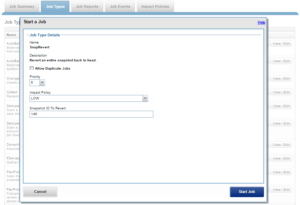
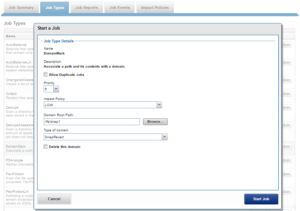
OneFS data prefetch strategies can be configured either from the command line or via SmartPools. File data prefetch behavior can be controlled down to a per-file granularity using the ‘isi set/get’ command’s access pattern setting. The available selectable file access patterns include concurrency (the default), streaming, and random.
# isi get tstfile1

POLICY    LEVEL PERFORMANCE COAL  FILE

default   6+2/2 streaming on    tstfile1

# isi set -l random tstfile1

# isi get tstfile1

POLICY    LEVEL PERFORMANCE COAL  FILE

default   6+2/2 random      on    tstfile1
Metadata prefetch occurs for the same reason as file data. Metadata scanning operations, such as finds and treewalks, can benefit. However, the use of metadata prefetch is less common because most accesses are random and unpredictable.
OneFS also provides a mechanism for prefetching files based on their nomenclature. In film and TV production, “streaming” often takes a different form as opposed to streaming an audio file. Each frame in a movie will often be contained in an individual file. As such, streaming reads a set of image files and prefetching across files is important. The files are often a subset of a directory, so directory entry prefetch does not apply. Ideally, this would be controlled by a client application, however in practice this rarely occurs.
To address this, OneFS has a file name prefetch facility. While file name prefetch is disabled by default, as with file data prefetch, it can be enabled with file access settings. When enabled, file name prefetch guesses the next sequence of files to be read by matching against several generic naming patterns.
Flexible file handle affinity (FHA) is a read-side algorithm designed to better utilize the internal threads used to read files. Using system configuration options and read access profiling, the number of operations per thread can be tuned to improve the efficiency of reads. FHA maps file handles to worker threads according to a combination of system settings, locality of the read requests (in terms of how close the requested addresses are), and the latency of the thread(s) serving requests to a particular client.
Note that prefetch does not apply to the L3 cache, since L3 is populated with ‘interesting’ L2 blocks dropped from memory by L2’s least recently used cache eviction algorithm.
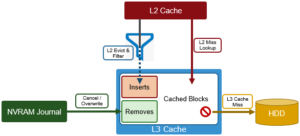
Blocks evicted from L2 are candidates for inclusion in L3, and a filter is employed to reduce the quantity and increase the value of incoming blocks. Because L3 is a first in, first out (FIFO) cache, filtering is performed ahead of time. By selecting blocks that are more likely to be read again, L3 can both limit SSD churn and enhance the quality of the L3 cache contents.
The L3 filter uses several heuristics to evaluate which candidate blocks will likely be most valuable and should go to L3 cache. In general, L3 prefers metadata/inode to data blocks. And the guiding principle for data blocks is that the per-block cost of re-reading a sequential cluster of blocks from disk is much lower than performing random reads from disk. For example, if a block is a “random” read (ie. there are no neighboring blocks on this disk in L2), then it is always included in L3. Conversely, If the block is part of a sequential cluster of 16 or more blocks (128KB), it is not evicted to L3. As such, the L3 cache can be most effective, per capacity, by addressing random reads.
The most frequently accessed data and metadata on a node should just remain in L2 cache and not get evicted to L3. For the next tier of cached data that’s accessed frequently enough to live in L3, but not frequently enough to always live in RAM, there’s a mechanism in place to keep these semi-frequently accessed blocks in L3.
To maintain this L3 cache persistence, when the kernel goes to read a metadata or data block, the following steps are performed:
1) First, L1 cache is checked. Then, if no hit, L2 cache is consulted.
2) If a hit is found in memory, it’s done.
3) If not in memory, L3 is then checked.
4) If there’s an L3 hit, and that item is near the end of the L3 FIFO (last 10%), a flag is set on the block which causes it to be evicted into L3 again when it is evicted out of L2.
Additionally, any un-cached job engine metadata requests will always come from disk and bypass L3 cache, so they do not displace user-cached blocks from L3 cache. As new versions are written, the journal notifies L3, which invalidates and removes the dirty block(s) from its cache.