In the previous article in this series, we looked at an overview of CELOG – OneFS’ cluster event log and alerting infrastructure. For this blog post, we’ll focus in on CELOG’s configuration and management.
CELOG’s CLI is integrated with OneFS’ RESTful platform API and roles-based access control (RBAC) and is based around the ‘isi event’ series of commands. These are divided into three main groups:
| Command Group | Description |
| Alerting | Alerts: Manage rules for reporting on groups of correlated events
Channels: Manage channels for sending alerts |
| Monitoring and Control | Events: List and view events
Groups: Manage groups of correlated event occurrences Test: Create test events |
| Configuration | Settings: Manage maintenance window, data retention and storage limits |
The isi event alerts command set allow for the viewing, creation, deletion, and modification of alert conditions. These are the rules that specify how sets of event groups are reported.
As such, alert conditions combine a set of event groups or event group categories with a condition and a set of channels (isi event channels). When any of the specified event group conditions are met, an alert fires and is dispatched via the specified channel(s).
An alert condition comprises:
- The threshold or condition under which alerts should be sent.
- The event groups and/or categories it applies to (there is a special value ‘all’).
- The channels through which alerts should be sent.
The channels must already exist and cannot be deleted while in use by any alert conditions. Some alert conditions have additional parameters, including: NEW, NEW_EVENTS, ONGOING, SEVERITY_INCREASE, SEVERITY_DECREASE and RESOLVED.
An alert condition may also possess a duration, or ‘transient period’. If this is configured, then no event group which is active (ie. not resolved) for less than this period of time will be reported upon via the alert condition that specifies it.
Note: The same event group may be reported upon under other alert conditions that do not specify a transient period or specify a different one.
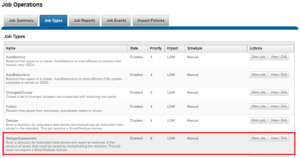
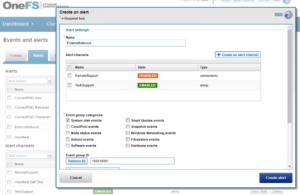
The following command creates an alert named ExternalNetwork, sets the alert condition to NEW, the source event group to ID 100010001 (SYS_DISK_VARFULL), the channel to TechSupport, sets the severity level to critical, and the maximum alert limit to 5:
# isi event alerts create ExternalNetwork NEW –add_eventgroup 100010001 --channel TechSupport --severity critical --limit 5
Or, from the WebUI by browsing to Cluster Management > Events and Alerts > Alerts:
Similarly, the following will add the event group ID 123456 to the ExternalNetwork alert, and only send alerts for event groups with critical severity:
# isi event alerts modify ExternalNetwork -–add-eventgroup 123456 --severity critical
Channels are the routes via which alerts are sent, and include any necessary routing, addressing, node exclusion information, etc. The isi event channels command provides create, modify, delete, list and view options for channels.
The supported communication methods include:
- SMTP
- SNMPA
- ConnectEMC
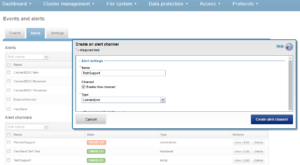
The following command creates the channel ‘TechSupport’ used in the example above, and sets its type to EMCConnect:
# isi event channels create TechSupport connectemc
Note that ESRS connectivity must be enabled prior to configuring a ‘connectemc’ channel.
Conversely, a channel can easily be removed with the following syntax:
# isi event channels delete TechSupport
Or from the WebUI by browsing to Cluster Management > Events and Alerts > Alerts:
For SMTP, a valid email server is required. This can be checked with the ‘isi email view’ command. If the “SMTP relay address” field is empty, this can be configured by running something along the lines of:
# isi email settings modify -–mail-relay=mail.mycompany.com
The following syntax modifies the channel named TechSupport, changing the SMTP username to admin, and resetting the SMTP password:
# isi event channels modify TechSupport --smtp-username admin -–smtp-password p@ssw0rd
SNMP traps are sent by running either ‘snmpinform’ or ‘snmptrap’ with appropriate parameters (agent, community, etc). To configure a cluster to send SNMP traps in order for a network monitoring system (NMS) to receive them, from the WebUI navigate to Dashboard > Events > Notification Rules > Add Rule and create a rule with Recipients = SNMP, and enter the correct values for ‘Community’ and ‘Host’ appropriate for your NMS.
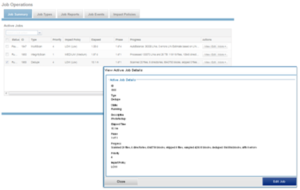
The isi event events list command displays events with their ID, time of occurrence, severity, logical node number, event group and message. The events for a single event group occurrence can be listed using the –eventgroup-id parameter.
To identify the instance ID of the event that you want to view, run the following command:
# isi event events list
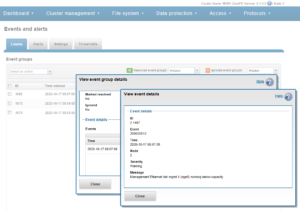
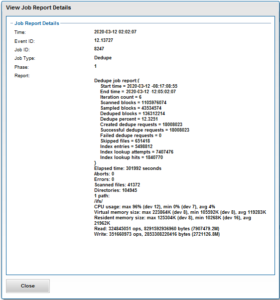
To view the details of a specific event, run the isi event events view command and specify the event instance ID. The following displays the details for an event with the instance ID of 6.201114:
# isi event events view 6.201114

           ID: 6.201114

Eventgroup ID: 4458074

   Event Type: 400040017

      Message: (policy name: cb-policy target: 10.245.109.130) SyncIQ encountered a filesystem error. Failure due to file system error(s): Could not sync stub file 103f40aa8: Input/output error

        Devid: 6

          Lnn: 6

         Time: 2020-10-26T12:23:14

     Severity: warning

        Value: 0.0
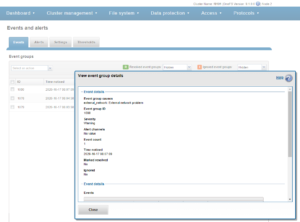
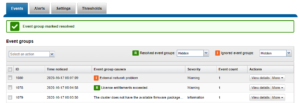
The list of event groups can be filtered by cause, begin (occurred after this time), end (occurred before this time), resolved, ignored or event count (event group occurrences with at least as many events as specified). By default only event group occurrences which are not ignored will be shown.
The configurations options are to set or revert the ignore status and to set the resolved status. Be warned that an event group marked as resolved cannot be reverted.
For example, the following example command modifies event group ID 10 to a status ‘ignored’:
# isi event groups modify 10 --ignored true
Note: If desired, the isi event group bulk command will set all event group occurrences to either ignore or resolved. Use sparingly!
The isi events settings view command displays the current values of all settings, whereas the modify command allows any of them to be reconfigured.
The configurable options include:
| Config Option | Detail |
| retention-days | Retention period for data concerning resolved event groups in days |
| storage-limit | The amount of cluster storage that CELOG is allowed to consume – measured in millionths of the total on the cluster (megabytes per terabyte of total storage). Values of 1-100 are allowed (up to one ten thousandth of the total storage), however there is a 1GB floor for small clusters. |
| maintenance-start
maintenance-duration |
These two should always be used together to specify a maintenance period during which no alerts will be generated. This is intended to suppress alerts during periods of maintenance when they are likely to be false alarms. |
| heartbeat-interval | CELOG runs a periodic (once daily, by default) self test by sending a heartbeat event from each node which is reported via the system ‘Heartbeat Self-Test’ channel. Any failures are logged in /var/log/messages. |
The following syntax alters the number of days that resolved event groups are saved to 90, and increases the storage limit for event data to 5MB for every 1TB of total cluster storage:
# isi event settings modify --retention-days 90 --storage-limit 5
A maintenance window can be configured to discontinue alerts while performing maintenance on your cluster.
For example, the following command schedules a maintenance window that starts at 11pm on October 27, 2020, and lasts for one day:
# isi event settings modify --maintenance-start 2020-10-27T23:00:00 --maintenance-duration 1D
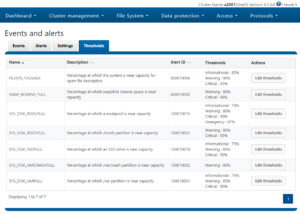
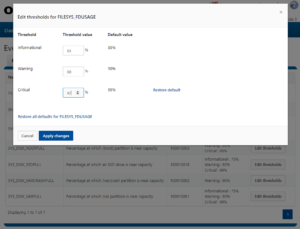
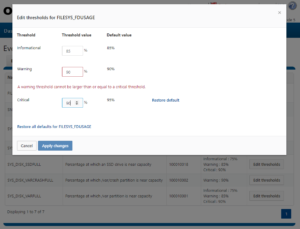
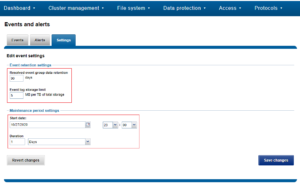
Maintenance periods and retention settings can also be configured from the WebUI by browsing to Cluster Management > Events and Alerts > Settings:
The isi event test command is provided in order to validate the communication path and confirm that events are getting transmitted correctly. The following generates a test alert with the message “Test msg from OneFS”:
# isi event test create "Test msg from OneFS"
Here are the log files that CELOG uses for its various purposes:
| Log File | Description |
| /var/log/isi_celog_monitor.log | System monitoring and event creation |
| /var/log/isi_celog_capture.log | First stop recording of events, attachment generation |
| /var/log/isi_celog_analysis.log | Assignment of events to eventgroups |
| /var/log/isi_celog_reporting.log | Evaluation of alert conditions and sending of alert requests |
| /var/log/isi_celog_alerting.log | Sending of alerts |
| /var/log/messages | Heartbeat failures |
| /ifs/.ifsvar/db/celog_alerting/<channel>/fail.log | Failure messages from alert sending |
| /ifs/.ifsvar/db/celog_alerting/<channel>/sent.log | Alerts sent via <channel> |
These logs can be invaluable for troubleshooting the various components of OneFS events and alerting.
As mentioned previously, CELOG combines multiple events into a single event group. This allows an incident to be communicated and managed as a single, coherent issue. A similar process occurs for multiple instances of the same event. As such, the following deduplication rules apply to these broad categories of events, namely:
| Event Category | Descriptions |
| Repeating Events | Events firing repeatedly before the elapsed time-out value will be condensed into a “… is triggering often” event |
| Sensor | Multiple events by hardware sensors on a node within a given time-frame will be combined as a “hardware problems” event |
| Disk | Multiple events generated by a specific disk will be coalesced into a logical “disk problems” event |
| Network | Various issues may exist, depending on the type of connectivity problem between nodes of a cluster:
§ When a node cannot contact any other nodes in the cluster, each of its connection errors will be condensed into a “node cannot contact cluster” event. § When a node is not reachable by the rest of the cluster nodes, cluster will combine the connection errors as a “cluster cannot reach node X“ event § When clusters split into chunks, each set of nodes will report connection errors coalesced as a “nodes X, Y, Z cannot contact nodes A, B, C“ event. § When cluster re-forms, events will again be combined into a single logical “cluster split into N groups: { A, B, C }, { X, Y, Z }, …” event. § When connectivity between all nodes is restored and cluster is reformed, the events will be condensed into a single “All nodes lost internal connectivity” event. |
| Reboot
|
If a node is unreachable even after a defined time elapses after a reboot, further connection errors will be coalesced as a “node did not rejoin cluster after reboot” event. |
So CELOG is your cluster guardian – continuously monitoring the health and performance of the hardware, software, and services – and generating events when situations occur that might require your attention.