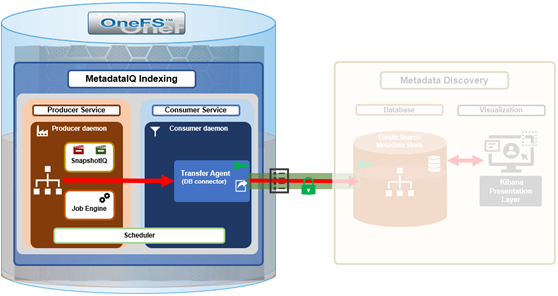
In the prior article in this series, we took an in-depth look at MetadataIQ’s architecture and operation. Now, we turn our focus to its configuration and deployment.

MetadataIQ is introduced in OneFS 9.10 and requires a cluster to be running a fresh install or committed upgrade of 9.10 or later in order to run. The installation package for the OneFS 9.10 release is available at the Dell Support site.
Once the download has completed, the cluster can be upgraded and committed to OneFS 9.10 either from the CLI using the ‘isi upgrade cluster’ command, or via the WebUI by navigating to Cluster management > Upgrade.
Post upgrade to, or installation of, OneFS 9.10, the /ifs/.ifsvar/modules/metadataiq directory is created, which houses various MetadataIQ components and logs.
In addition to a PowerScale cluster running OneFS 9.10, MetadataIQ also requires that the following dependencies are met:
- MetadataIQ requires the OneFS ISI_PRIV_SNAPHSHOT privilege in order to run.
Confirm that SnapshotIQ is licensed across the cluster and that the snapshot service is enabled.
# isi license view snapshotiq | grep Status

Status: Evaluation

# isi services -a | grep -i snapshot

isi_snapshot_d       Snapshot Daemon                          Enabled
- Verify that the ElasticSearch packages are installed on the cluster by running the following CLI command:
# python -m pip list | grep -i elasticsearch

elasticsearch        6.3.1

elasticsearch-midx   8.14.0
MetadataIQ configuration and management in OneFS 9.10 is currently limited to the command line (CLI) or the platform API (pAPI) endpoints.
On the PowerScale cluster, the ‘isi metadataiq’ CLI command execution syntax is as follows:
Usage:

isi metadataiq {<action> | <subcommand>}

[--timeout <integer>]

[{--help | -h}]


Actions:

reset       Reset MetadataIQ to defaults.

resync      Rebuild metadata index from initial state.


Subcommands:

settings    Manage MetadataIQ settings.
As such, the following options are available for the ‘isi metadataiq’ CLI command:

OneFS MetadataIQ requires initialization and configuration before it can be successfully deployed. To this end, the ‘isi metadataiq settings modify’ CLI command can be used to edit the desired configuration fields, and the syntax is as follows:
Usage:

isi metadataiq settings modify

[--max-threads <integer>]

[--excluded-lnns <integer> | --clear-excluded-lnns | --add-excluded-lnns

<integer> | --remove-excluded-lnns <integer>]

[--nshards <integer>]

[--fetch-size <integer>]

[--work-queue-size <integer>]

[--verify-certificate <boolean>]

[--hostname <string>]

[--host-port <integer>]

[--path <string>]

[--schedule <string>]

[--changelist-job-retries <integer>]

[--changelist-job-tolerable-pause-hours <integer>]

[--changelist-job-tolerable-state-request-failures <integer>]

[--ca-certificate-path <string>]

[--api-key <string>]

[{--verbose | -v}]

[{--help | -h}]
When configuring MetadataIQ, the following client system credentials and parameters are required:
- API ID
- API Key
- ElasticSearch database hostname
- ElasticSearch port (typically 9200)
- CA certificate path
For example:
# isi metadataiq settings modify --verify-certificate <boolean> --ca-certificate-path <string> --api-key <string> --hostname <string> --host-port <integer> --path <string> --schedule <string>
The ‘path’ parameter must be a path to a directory under the cluster’s /ifs filesystem. If left unspecified, the metadata path defaults to /ifs.
Note also that the ‘host-port’ value for the ElasticSearch database is typically TCP port 9200.
These configuration parameters are stored within gconfig on each node in the /etc/gconfig/metadataiq_config.gc file.
The OneFS platform API (pAPI) also offers an equivalent set of MetadataIQ configuration endpoints to the CLI, accessible under /platform/21/metadataiq/settings/.
For example:
# curl --insecure --basic --user <uname:passwd> https://<cluster_ip>:8080/platform/21/metadataiq/settings/
{
"settings" :
{
"consumer" :
{
"database_info" :
{
"api_key" : "A key is configured",
"certificate_path" :

"fa0e6e93f47c8d0074832c47bffd630ab1faad065f3d129b32e0aa7ae8de8595",
"database_type" : "ELK database",
"host_port" : 9200,
"hostname" : "https://10.224.101.214:9200",
"verify_certificate" : true
},
"excluded_lnns" : [],
"fetch_size" : 2048,

"max_threads" : 8,

"number_shards" : 8,

"work_queue_size" : 16

},

"producer" :

{

"changelist_job_retries" : 2,

"changelist_job_tolerable_pause_hours" : 24,

"changelist_job_tolerable_state_request_failures" : 720,

"path" : "/ifs/data",

"schedule" : "every day every 2 hours"

}

}

}
The following CLI commands can be used to control the operation of the MetadataIQ services:
| Service | Daemon/Utility | Enable/disable/view Commands |
|---|---|---|
| Producer | isi_metadataiq_producer_d | isi services isi_metadataiq_producer_d enable isi services isi_metadataiq_producer_d disable isi services isi_metadataiq_producer_d |
| Consumer | isi_metadataiq_consumer_d | isi services isi_metadataiq_consumer_d enable isi services isi_metadataiq_consumer_d disable isi services isi_metadataiq_producer_d |
| Transfer | isi_metadataiq_transfer | # isi_metadataiq_transfer # isi_metadataiq_transfer –check # isi_metadataiq_transfer –consumer-checkpoint # isi_metadataiq_transfer –-map-version # isi_metadataiq_transfer –-show-mappings |
For example, the two MetadataIQ services can be enabled from the CLI as follows:
# isi services -a isi_metadataiq_producer_d enable

The service 'isi_metadataiq_producer_d' has been enabled.

# isi services -a isi_metadataiq_consumer_d enable

The service 'isi_metadataiq_consumer_d' has been enabled.
In the next article in this series, we’ll examine the process involved in deploying and configuring an ElasticSearch instance and Kibana visualization portal.