OneFS Web APIs

In addition to the OneFS WebUI and CLI administrative management interfaces, a PowerScale cluster can also be accessed, queried and configured via a representative state transfer (RESTful) API. This API includes a superset of the Web and CLI interfaces and provides the additional benefit of being easily programmable. As such, it allows most of the cluster’s administrative tasks to be scripted and automated.

RESTful APIs are web based (HTTP or HTTPS) interfaces that use the HTTP methods, combined with the URL (uniform resource locator), to undertake a predefined action. The URL can describe either a collection of objects (eg. ‘https://papi.isln.com:8080/<resources>/’) or an individual object from a collection (eg. ‘https://papi.isln.com:8080/<resources>/<object>’).

There are typically six principal HTTP operations, or ‘methods’:

Method Object Collection
Get Retrieve a representation of the addressed member of the collection. List the URIs and (optionally) additional details of a collection’s members.
Put Replace or create the addressed member of a collection. Replace the entire collection with another collection.
Post Infrequently used to promote an element to a collection in its own right, creating a new object within it. Create a new entry in the collection. The new entry’s URI is typically automatically assigned and usually returned by the operation.
Patch Update the addressed member of a collection. Rarely used.
Delete Delete the addressed member of a collection. Delete an entire collection.
Head Returns response header metadata without the response body content. Returns response header metadata without the response body content.

For a given application programming interface (API), its path component typically conveys specific meaning, or ‘representative state’, to the RESTful spec. The ‘human readability’ of a RESTful endpoint can be seen, for example, by looking at a request for a cluster’s SMB shares information:

As shown above, the URL is clearly comprised of distinct parts:

Component Description
Scheme Essentially the HTTP protocol version
Authority IP address (<cluster_ip>) and TCP port (<port>) of the cluster.
Path HTTP path to the endpoint
Query The specific endpoint and data requested.
Fragment Occasionally the query is subdivided, such as ‘query#fragment’.

Additionally, OneFS also uses the following API definitions, which are worth understanding:

Item Description
Access point Root path of the URL to the file system. An access point can be defined for any directory in the file system.
Collection Group of objects of a similar type. For example, all the user-defined quotas on a cluster make up a collection of quotas.
Data object An object that contains content data, such as a file on the system
Endpoint Point of access to a resource, comprising a path, query, and sometimes fragment(s).
Namespace The file system structure on the cluster.
Object Containers or data objects. Also known as system configuration data that a user creates, or a global setting on the system.

·         user-created object: snapshot, quota, share, export, replication policy, etc.

·         global settings:  default share settings, HTTP settings, snapshot settings, etc.

Platform Indicates pAPI and the OneFS configuration hierarchy.
Resource An object, collection, or function that you can access by a URI.
Version The version of the OneFS API. It is an optional component, as OneFS automatically uses the latest API.

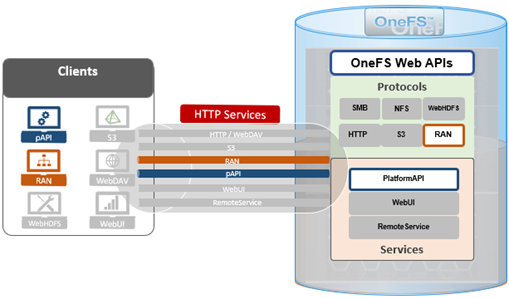
At a high level, the overall OneFS API is divided into two distinct sections:

Section API Description
Namespace RAN Enables operations on files and directories on the cluster.
Platform pAPI Provides endpoints for cluster configuration, management, and monitoring functionality.

As such, the general topology is as follows:

The Platform API (pAPI) provides a variety of endpoints for managing the administrative aspects of a PowerScale cluster. Indeed, the OneFS CLI and WebUI both use these pAPI handlers to facilitate their cluster config and management functionality, so pAPI represents a superset of both user interfaces.

For file system configuration API requests, the resource URI is composed of the following components:

 https://<cluster_ip>:<port>/<api><version>/<path>/<query>

For example, a GET request sent to the following platform URI will return all the SMB shares on a cluster. Where ‘platform’ indicates pAPI, ’17’ is the API version, ‘protocols’ is the configuration area, ‘SMB’ is the collection name, and ‘shares’ is the object ID:

GET https://10.1.10.20:8080/platform/17/protocols/smb/shares

By way of contrast, file system access APIs requests are served by the RESTful Access to Namespace (RAN) API. RAN uses resource URIs, which are composed of the following components:

https://<cluster_ip>:<port>/<access_point>/<resource_path>

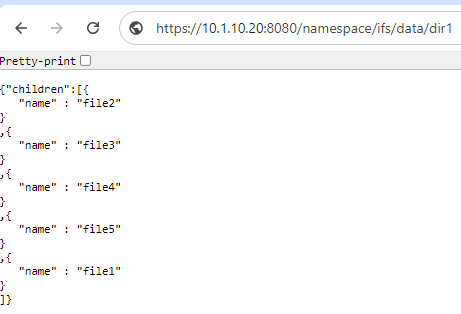
For example, a GET request to the following RAN URI will return the files that are stored within the namespace under /ifs/data/dir1:

GET https://10.1.10.20:8080/namespace/ifs/data/dir1

The response will look something like the following:

In the next couple of articles in this series we’ll dig into the architecture and details of the platform (pAPI) and namespace (RAN) APIs in more depth.

OneFS IceAge and Automated Core File Analysis

The curious and observant may have noticed the appearance of a new service in OneFS 9.8, namely isi_iceage_d.

For example:

# isi services -a | grep -i iceage

isi_iceage_d         Ice Age Monitor Daemon                   Enabled

So what exactly is this new IceAge process and what does it do, you may ask?

Well, OneFS IceAge is a python tool based on lldb, which automatically extracts, optimizes, compresses, and disseminates information from OneFS core files. The goal of this is to streamline the detection and diagnosis of issues and bugs and improve time to resolution.

The IceAge service (IceAge monitor) performs the following core functions:

Function Description
Detection Monitoring the /var/crash directory for fresh core files.
Extraction Extraction (and subsequent removal) of IceAge reports and headers from cores.
Upload Uploading reports to Dell Backend Services .

The IceAge service runs on a cluster, immediately extracting IceAge reports from any core dumps as they are generated, and outputting to a JSON report file, which is suitable for further processing. Reports also include a stack trace to show the potential crash cause. Information can be extracted without the presence of debug symbols  and can also be retroactively annotated with further useful information (such source code line numbers, etc) once symbols are available. Additional information can also be extracted from debug symbols in order to help debug application-specific data structures from a core.

Once a core has been detected, optimized, and processed, IceAge then uses two principal methods of transmission for the report and header:

Uploader Description
isi_gather_info In addition to OneFS logsets, the isi_gather_info utility in OneFS 9,8 and later can collect and transmit JSON IceAge reports and headers as a default option and retain sending cores by request from command line options.
SupportAssist Secure Remote Services (SRS) is used for sending alerts, log_gathers, usage intelligence, managed device status to the backend. OneFS uses SRS to communicate with Dell Support’s backend systems. OneFS 9.8 introduces the ability to collect and send JSON IceAge reports and retain sending cores by request from specific command.

The isi_gather_info command on the cluster gathers various files, including dumps and the output of various commands and uploads them to Dell Support. The /usr/bin/remotesupport directory contains a set of gather and remote support scripts which are designed to collate specific log information about the cluster. Under  this directory is the ‘get_data_iceage’ script which, in conjunction with ‘GetData.sh’, gather and upload data about IceAge reports and headers. These scripts are typically called from the Remote Support Shell, which is a simple, limited shell, solely for running these support scripts.

To aid identification, the header files are generated with the following nomenclature:

YYYYMMDD_HHMMSS_$(SWID)_$(RANDOM_GUID)_IceAgeHeader.tgz

For example:

20240712_173427_ELMISL0121YLVD_4793e5ec-3605-41a6-b72c-d3c404059988_IceAgeHeader.tgz

The header also includes backtrace information and several important sections from the IceAge JSON report.

When IceAge headers have been created and written out to a temporary file, the temporary file is renamed to match the ESRS backend requirements and is uploaded to Dell (ie. CloudIQ). If the upload succeeds the file is removed. However, if the upload fails for any reason, the file is placed into a ‘retry’ state, and a subsequent upload attempted at the beginning of the next interval. Upload retry files are stored in the ‘/ifs/.ifsvar/iceage-reports/headers/retries’ directory.

Architecturally, IceAge looks and operates as follows:
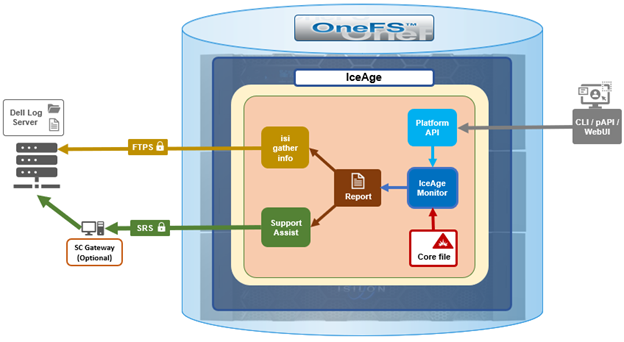
The core isi_iceage_d daemon spawns several additional process, which run on each node in the cluster. These include:

  • IceAge monitor upload
  • Cluster queue watcher
  • Local core watcher
  • Local core timer

For example:

# ps -auxw | grep -i iceage

root    4668    0.0  0.0  99976  50480  -  S    Sat12        1:34.52 /usr/libexec/isilon/isi_iceage_d /usr/local/lib/python3.8/site

root    4688    0.0  0.0 126200  51996  -  I    Sat12        0:06.87 iceage_monitor_upload (isi_iceage_d)

root   63440    0.0  0.0  99976  50480  -  S    18:33        0:00.00 iceage_monitor: cluster queue watcher (isi_iceage_d)

root   63459    0.0  0.0 102384  50656  -  S    18:33        0:00.00 iceage_monitor: local core watcher (isi_iceage_d)

root   63462    0.0  0.0  99976  50480  -  S    18:33        0:00.00 iceage_monitor: local core timer (isi_iceage_d)

When a OneFS component or service fails and a core file is written to /var/crash, IceAge enters it into a queue under /ifs/.ifsvar/iceage-cores/, in which cores awaiting processing are held. To facilitate this, OneFS creates a temporary crash space on the cluster’s existing drives and provisions an ephemeral UFS file system for IceAge to use. IceAge plug-ins are also provided for several OneFS protocols and data services, such as NFS, SMB, etc, in order to generate more detailed reports from the often large and complex cores derived from issues with these processes.

Additionally, the IceAge cluster monitor service watches for cores in the queue and processes them one by one. This generates a report with a summary of information from the core. These reports can then be transmitted to Dell Support by the isi_gather_info process, or via SupportAssist (ESE).

Enabled by default in OneFS 9.8 and later, the IceAge service is managed by MCP, and can be enabled and disabled via the ‘isi services’ CLI command.

# isi services -a isi_iceage_d

isi: Service 'isi_iceage_d' is enabled.

# isi services -a isi_iceage_d disable

The service 'isi_iceage_d' has been disabled.

# isi services -a isi_iceage_d enable

The service 'isi_iceage_d' has been enabled.

Integration with SupportAssist/ESE and isi_gather_info allows IceAge to automatically and securely send the generated report text files back.

Configuration-wise, the IceAge monitor uses a gconfig file in which parameters such as log level can be specified. For example:

# isi_gconfig -t iceage_monitor

[root] {version:1}

iceage_monitor.queue_max_size_gb (int) = 20

iceage_monitor.retention_period_min (int) = 43800

iceage_monitor.log_level (char*) = INFO

iceage_monitor.header_dispatch (bool) = true

iceage_monitor.min_core_create_time_supported (int) = 1715245735

The above configuration is also exposed via the OneFS PlatformAPI, and any modifications are recorded in the /ifs/.ifsvar/ iceage_monitor_config_changes.log file.

The basic flow of the IceAge service and SupportAssist transport is as follows:

  1. First, ensure that SupportAssist is configured and running on the cluster:
# isi supportassist settings view | grep -i enabled

Service enabled:  Yes

If not, SupportAssist can be activated as follows:

# isi supportassist settings modify --connection-mode gateway --gateway-host <host_FQDN> --gateway-port 9443 --backup-gateway-host <backup_FQDN> --backup-gateway-port 9443 --network-pools="subnet0.pool0"

Note that the changes made to SupportAssist settings may take some time to take effect.

  1. Next, generate one or more cores. This can be done with the following CLI syntax:
# isi_noatime isi_kcore <PID> /var/crash/<PID>.<service>.cor.gz

For example, creating two NFS core files for processes with PIDs ‘22120 and ‘22121 in the following output:

# ps -aux | grep nfsroot   22109   0.0  0.5  54840  30356  -  Ss   17:21     0:00.01 /usr/sbin/isi_netgroup_d -P isi_netgroup_d_nfsroot   22120   0.0  0.4  55000  26652  -  Ss   17:21     0:00.04 /usr/libexec/isilon/nfs proxy nfs /var/run/nfs.pidroot   22121   0.0  0.7 111340  42812  -  S<   17:21     0:00.13 lw-container nfs (nfs)root   22175   0.0  0.0  14208   2896  0  S+   17:21     0:00.00 grep nfs# isi_noatime isi_kcore 22120 /var/crash/22120.nfs.core.gz# isi_noatime isi_kcore 22121 /var/crash/22121.nfs.core.gz# ls -ltr /var/crash | grep -i core-rw-------      1 root  daemon     716005 Jul  9 17:22 22120.nfs.core.gz-rw-------      1 root  daemon    1211863 Jul  9 17:22 22121.nfs.core.gz
  1. Next, the monitor log shows the location of the report file for each cores:
# cat /var/log/isi_iceage_monitor.log

For example:

# cat /var/log/isi_iceage_monitor.log

tme2: 2024-07-09T17:23:30.541904+00:00 <3.6> tme-2(id2) isi_iceage_d[4327]: INFO:cluster.py:176 -- Run ClusterProcess with cores: ['/ifs/.ifsvar/iceage-cores/tme-1-1707499378.08631-22121.nfs.core.gz']tme2: INFO:__main__.py:569 -- IceAge startedtme2: INFO:__main__.py:320 -- Detected information for /ifs/.ifsvar/iceage-cores/tme-1-1707499378.08631-22121.nfs.core.gz:tme-2: INFO:__main__.py:360 --              build : b.main.4102rtme-2: INFO:__main__.py:360 --              domain : usertme-2: INFO:__main__.py:360 --              executable : /usr/likewise/sbin/lwsmdtme-2: INFO:__main__.py:360 --              handler : lldbtme-2: INFO:__main__.py:232 -- Calculating space needed...tme-2: INFO:__main__.py:250 -- 379992064 bytes.tme-2: INFO:__main__.py:254 -- Setting up scratch space...tme-2: INFO:__main__.py:259 -- Ready.tme-2: INFO:__main__.py:385 -- Set vmem limit to 2147483648 for pid 15640tme-2: INFO:__main__.py:389 -- Loading core...tme-2: INFO:__main__.py:391 -- Core /ifs/.ifsvar/iceage-cores/tme-1-1707499378.08631-22121.nfs.core.gz loaded.tme-2: INFO:__main__.py:394 -- Extracting...<snip>isi_iceage_d[15637]: INFO:makedigest.py:124 -- Written tgz file: '/ifs/.ifsvar/iceage-reports/headers/20240209_172334_DEFAULTSWID_db3bb260-88ce-4619-9f48-b9828eddccd5_IceAgeHeader.tgz'tme-2: 2024-07-09T17:23:34.318304+00:00 <3.6> tme-2(id2) isi_iceage_d[15637]: INFO:makedigest.py:124 -- Written tgz file: '/ifs/.ifsvar/iceage-reports/20240709_172334_DEFAULTSWID_db3bb260-88ce-4619-9f48-b9828eddccd5_IceAgeHeader.tgz'
  1. The IceAge JSON files are located under /ifs/.ifsvar/iceage-cores, and contain a wealth of information, including OneFS versions and paths, etc. For example:
# cat tme-2-1720811519.5973-59660.nfs.core.json | grep -i core

  "core-file": "/ifs/.ifsvar/iceage-cores/tme-2-1720811519.5973-59660.nfs.core.gz",

        "set_core_hook": 18446744071587293992,

    "corefile_build": "B_9_8_0_0_003(RELEASE)",

    "corefile_version": "Isilon OneFS 9.8.0.0 (Release, Build B_9_8_0_0_003(RELEASE), 2024-03-11 09:27:38, 0x909005000000003)",
  1. Finally, if SupportAssist is configured on the cluster, the ESE logs can be used verify that the reports have been successfully transmitted back to Dell Support with the following CLI command:
# cat /usr/local/ese/var/log/ESE.log | grep -I iceage

For example:

"path": "/ifs/.ifsvar/iceage-reports/headers/20240709_172303_ELMISL0224SM54_0740a853-517c-4fc5-b162-64991d9494b9_IceAgeHeader.tgz",
20067 2024-07-09 17:26:41,235 CP Server Thread-7 INFO     DellESE.ese.threads.web.cherrypydata LN:  61 /ifs/.ifsvar/iceage-reports/headers/20240709_172303_ELMISL0224SM54_0740a853-517c-4fc5-b162-64991d9494b9_IceAgeHeader.tgz is a file

20067 2024-07-09 17:26:43,696 Web Dispatcher DEBUG    urllib3.connectionpool LN: 474 https://eng-sea-v4scg-01.west.isilon.com:9443 "PUT /esrs/v1/devices/ISILON-GW/ELMISL0224SM54/mft/BINARY-ELMISL0224SM54-20240709T172642Z-33MJ9WiT5Swt4mcLdEwSkMA-20240709_172303_ELMISL0224SM54_0740a853-517c-4fc5-b162-64991d9494b9_IceAgeHeader.tgz HTTP/1.1" 200 0
20067 2024-07-09 17:26:43,699 Web Dispatcher DEBUG    DellESE.ese.srs.srswebapi LN:  89 Sending ESE binary file [20240709_172303_ELMISL0224SM54_0740a853-517c-4fc5-b162-64991d9494b9_IceAgeHeader.tgz], Workitem [33MJ9WiT5Swt4mcLdEwSkMA], sent to url https://eng-sea-v4scg-01.west.isilon.com:9443/esrs/v1/devices/ISILON-GW/ELMISL0224SM54/mft/BINARY-ELMISL0224SM54-20240709T172642Z-33MJ9WiT5Swt4mcLdEwSkMA-20240209_172303_ELMISL0224SM54_0740a853-517c-4fc5-b162-64991d9494b9_IceAgeHeader.tgz.  Date: 2024-02-09T17:26:43.282+0000.   Status: 200

  "path": "/ifs/.ifsvar/iceage-reports/headers/20240209_172334_ELMISL0224SM54_db3bb260-88ce-4619-9f48-b9828eddccd5_IceAgeHeader.tgz",
20067 2024-07-09 17:26:47,235 CP Server Thread-8 INFO     DellESE.ese.threads.web.cherrypydata LN:  61 /ifs/.ifsvar/iceage-reports/headers/20240709_*172334_ELMISL0224SM54_db3bb260-88ce-4619-9f48-b9828eddccd5_IceAgeHeader.tgz* is a file

20067 2024-07-09 17:26:58,632 Web Dispatcher DEBUG    urllib3.connectionpool LN: 474 https://eng-sea-v4scg-01.west.isilon.com:9443 "PUT /esrs/v1/devices/ISILON-GW/ELMISL0224SM54/mft/BINARY-ELMISL0224SM54-20240709T172658Z-3hJcHU9hEomZYyWLCkqh5Jj-20240709_172334_ELMISL0224SM54_db3bb260-88ce-4619-9f48-b9828eddccd5_IceAgeHeader.tgz HTTP/1.1" 200 0
20067 2024-07-09 17:26:58,636 Web Dispatcher DEBUG    DellESE.ese.srs.srswebapi LN:  89 Sending ESE binary file [20240709_172334_ELMISL0224SM54_db3bb260-88ce-4619-9f48-b9828eddccd5_IceAgeHeader.tgz], Workitem [3hJcHU9hEomZYyWLCkqh5Jj], sent to url https://eng-sea-v4scg-01.west.isilon.com:9443/esrs/v1/devices/ISILON-GW/ELMISL0224SM54/mft/BINARY-ELMISL0224SM54-20240709T172658Z-3hJcHU9hEomZYyWLCkqh5Jj-20240709_172334_ELMISL0224SM54_db3bb260-88ce-4619-9f48-b9828eddccd5_IceAgeHeader.tgz.  Date: 2024-07-09T17:26:58.362+0000.   Status: 200

There are some caveats to be aware of with IceAge, and it may not be able to process every core in all situations. As such, it is considered ‘best effort’ relative to security and performance constraints.

Specifically, the scenarios under which IceAge monitor will not automatically process cores include:

Component Condition Details
Filesystem During unavailability of ifs
On-disk encryption On SED Nodes, because IceAge uses the band on SEDs that is not encrypted for scratch.
Drive maintenance During drive distmirror rebalancing and drive firmware upgrade
Capacity If OneFS is unable to find sufficient free space on drives.
Memory If it would require too much memory that could cause instability. The vmem limit is determined by the amount of scratch space needed as well as system memory.
Version For any cores generated on OneFS versions older than the running build, IceAge may struggle to interpret them accurately using the debug symbols from the current build.


OneFS NFS over RDMA Client Configuration

The final article in this series focuses on the Linux client-side configuration that’s required when connecting to a PowerScale via the NFS over RDMA protocol.

Note that there are certain client hardware prerequisites which must be met in order use NFSv3 over RDMA service on a PowerScale cluster. These include:

Prerequisite Details
RoCEv2 capable NICs NVIDIA Mellanox ConnectX-3 Pro, ConnectX-4, ConnectX-5, and ConnectX-6
NFS over RDMA Drivers NVIDIA Mellanox OpenFabrics Enterprise Distribution for Linux (MLNX_OFED) or OS Distributed inbox driver. For best performance, the recommendation is to install the OFED driver.

Alternatively, if these hardware requirements cannot be met, basic NFS over RDMA functionality can be verified using a Soft-RoCE configuration on the client. However, Soft-RoCE should not be used in a production environment.

The following procedure can be used to configure a Linux client for NFS over RDMA:

The example below uses a Dell PowerEdge R630 server running CentOS 7.9 with an NVIDIA Mellanox ConnectX-3 Pro NIC as the NFS over RDMA client system.

  1. First, verify the OS version by running the following command:
# cat /etc/redhat-release

CentOS Linux release 7.9.2009 (Core)
  1. Next, check the network adapter model and spec. The following example involves a ConnectX-3 Pro NIC with two interfaces: 40gig1 and 40gig2:
# lspci | egrep -i 'network|ethernet'

01:00.0 Ethernet controller: Intel Corporation 82599ES 10-Gigabit SFI/SFP+ Network Connection (rev 01)

01:00.1 Ethernet controller: Intel Corporation 82599ES 10-Gigabit SFI/SFP+ Network Connection (rev 01)

03:00.0 Ethernet controller: Mellanox Technologies MT27520 Family [ConnectX-3 Pro]

05:00.0 Ethernet controller: Intel Corporation I350 Gigabit Network Connection (rev 01)

05:00.1 Ethernet controller: Intel Corporation I350 Gigabit Network Connection (rev 01)

# lshw -class network -short

H/W path       Device      Class      Description

=================================================

/0/100/15/0    ens160      network    MT27710 Family [ConnectX-4 Lx Virtual Function]

/0/102/2/0     40gig1      network    MT27520 Family [ConnectX-3 Pro]

/0/102/3/0                 network    82599ES 10-Gigabit SFI/SFP+ Network Connection

/0/102/3/0.1               network    82599ES 10-Gigabit SFI/SFP+ Network Connection

/0/102/1c.4/0   1gig1       network    I350 Gigabit Network Connection

/0/102/1c.4/0.1 1gig2       network    I350 Gigabit Network Connection

/3              40gig2      network    Ethernet interface
  1. Add the prerequisite RDMA packages (‘rdma-core’ and ‘libibverbs-utils’) for the Linux version using the appropriate package manager for the distribution:
Linux Distribution Package Manager Package Utility
OpenSUSE RPM Zypper
RHEL RPM Yum
Ubuntu Deb Apt-get / Dpkg

For example, to install both the above packages on a CentOS/RHEL client:

# sudo yum install rdma-core libibverbs-utils
  1. Locate and download the appropriate OFED driver version from the NVIDIA website. Be aware that, as of MLNX_OFED v5.1, ConnectX-3 Pro NICs are no longer supported. For ConnectX-4 and above, the latest OFED version will work.

Note that the NFSoRDMA module was removed from the OFED 4.0-2.0.0.1 version, then re-added in OFED 4.7-3.2.9.0 version. Please refer to Release Notes Change Log History for the details.

  1. Extract the driver package and use the ‘mlnxofedinstall’ script to install the driver. As of MLNX_OFED v4.7, NFSoRDMA driver is no longer installed by default. In order to install it on a Linux client with a supported kernel, include the ‘–with-nfsrdma’ option for the ‘mlnxofedinstall’ script. For example:
# ./mlnxofedinstall --with-nfsrdma --without-fw-update                                                                  

Logs dir: /tmp/MLNX_OFED_LINUX.19761.logs

General log file: /tmp/MLNX_OFED_LINUX.19761.logs/general.log

Verifying KMP rpms compatibility with target kernel...

This program will install the MLNX_OFED_LINUX package on your machine.

Note that all other Mellanox, OEM, OFED, RDMA or Distribution IB packages will be removed.

Those packages are removed due to conflicts with MLNX_OFED_LINUX, do not reinstall them.

Do you want to continue?[y/N]:y

Uninstalling the previous version of MLNX_OFED_LINUX

rpm --nosignature -e --allmatches --nodeps mft

Starting MLNX_OFED_LINUX-4.9-2.2.4.0 installation ...

Installing mlnx-ofa_kernel RPM

Preparing...                          ########################################

Updating / installing...

mlnx-ofa_kernel-4.9-OFED.4.9.2.2.4.1.r########################################

Installing kmod-mlnx-ofa_kernel 4.9 RPM
...
...
...

Preparing...                          ########################################
mpitests_openmpi-3.2.20-e1a0676.49224 ########################################

Device (03:00.0):

        03:00.0 Ethernet controller: Mellanox Technologies MT27520 Family [ConnectX-3 Pro]

        Link Width: x8

        PCI Link Speed: 8GT/s

Installation finished successfully.

Preparing...                          ################################# [100%]

Updating / installing...

   :mlnx-fw-updater-4.9-2.2.4.0      ################################# [100%]

Added 'RUN_FW_UPDATER_ONBOOT=no to /etc/infiniband/openib.conf

Skipping FW update.
  1. Load the new driver by restarting the ‘openibd’ driver.
# /etc/init.d/openibd restart

Unloading HCA driver:

Loading HCA driver and Access
  1. Check the driver version to ensure that the installation was successful.
# ethtool -i 40gig1

driver: mlx4_en

version: 4.9-2.2.4

firmware-version: 2.36.5080

expansion-rom-version:

bus-info: 0000:03:00.0

supports-statistics: yes

supports-test: yes

supports-eeprom-access: no

supports-register-dump: no

supports-priv-flags: yes
  1. Verify that the NFSoRDMA module is also installed.
# yum list installed | grep nfsrdma

kmod-mlnx-nfsrdma.x86_64&nbsp;&nbsp;&nbsp;&nbsp;&nbsp;&nbsp;&nbsp;&nbsp;&nbsp;&nbsp;&nbsp;&nbsp; 5.0-OFED.5.0.2.1.8.1.g5f67178.rhel7u8

Note that if using a vendor-supplied driver for the Linux client system (eg. Dell PowerEdge), the NFSoRDMA module may not be included in the driver package. If this is the case, download and install the NFSoRDMA module directly from the NVIDIA driver package, per the instructions in step 4 above.

  1. Finally, mount the desired NFS export(s) from the cluster with the appropriate version and RDMA options.

For example, for NFSv3 over RDMA:

# mount -t nfs -vo vers=3,proto=rdma,port=20049 myserver:/ifs/data /mnt/myserver

Similarly, to mount with NFSv4.0 over RDMA:

# mount –t nfs –o vers=4,minorvers=0,proto=rdma myserver:/ifs/data /mnt/myserver

And for NFSv4.1 over RDMA:

# mount –t nfs –o vers=4,minorvers=1,proto=rdma myserver:/ifs/data /mnt/myserver

For NFSv4.2 over RDMA:

# mount –t nfs –o vers=4,minorvers=2,proto=rdma myserver:/ifs/data /mnt/myserver

And finally for NFSv4.1 over RDMA across an IPv6 network:

# mount –t nfs –o vers=4,minorvers=1,proto=rdma6 myserver:/ifs/data /mnt/myserver

Note that RDMA is a non-assumable mount option, safeguarding any existing NFSv3 clients. For example:

# mount –t nfs –o vers=3,proto=rdma myserver:/ifs/data /mnt/myserver

The above mount cannot automatically ‘upgrade’ itself to NFSv4, nor can an NFSv4 connection upgrade itself from TCP to RDMA.

Performance-wise, NFS over RDMA can deliver impressive results. That said, RDMA is not for everything. For highly concurrently workloads with high thread and/or connection counts, other cluster resource bottlenecks may be encountered first, so RDMA often won’t provide much benefit over TCP. However, for workloads like high bandwidth streams, NFS over RDMA can often provide significant benefits.

For example, in media content creation and post-production, RDMA can enable workflows that TCP-based NFS is unable to sustain. Specifically, Dell’s M&E solutions architects determined that:

  • With FileStream on PowerScale F600 nodes, RDMA doubled performance compared to TCP. 8K DCI DPX image sequence playback, 24 frames per second 6K PIZ compressed EXR image sequence playback, 24 frames per second 4K DCI DPX image sequence playback, 60 frames per second Conclusions 14 PowerScale OneFS: NFS over RDMA for Media
  • Using Autodesk Flame 2022 with 59.94 frames per second 4K DCI video, the number of dropped frames from the broadcast output was reduced from 6000 with TCP to 11 with RDMA.
  • Using DaVinci Resolve 16 with RDMA enabled workstations to play uncompressed 8K DCI, PIZ compressed 6K, and 60 frames per second 4K DCI content. None of this media would play using NFS over TCP.

In such cases, often the reduction in the NFS client’s CPU load that RDMA offers is equally importantly. Even when the PowerScale cluster can easily support a workload, freeing up the workstation’s compute resources is vital to sustain smooth playback.

OneFS NFS over RDMA Cluster Configuration

In this article in the series, we turn our attention to the specifics of configuring a PowerScale cluster for NFS over RDMA.

On the OneFS side, the PowerScale cluster hardware must meet certain prerequisite criteria in order to use NFS over RDMA. Specifically:

Requirement Details
Node type F210, F200, F600, F710, F900, F910, F800, F810, H700, H7000, A300, A3000
Network card (NIC) NVIDIA Mellanox ConnectX-3 Pro, ConnectX-4, ConnectX-5, ConnectX-6 network adapters which support 25/40/100 GigE connectivity.
OneFS version OneFS 9.2 or later for NFSv3 over RDMA, and OneFS 9.8 for NFSv4.x over RDMA.

The following procedure can be used to configure the cluster for NFS over RDMA:

  1. First, from the OneFS CLI, verify which of the cluster’s front-end network interfaces support the ROCEv2 capability. This can be determined by running the following CLI command to find the interfaces that report ‘SUPPORTS_RDMA_RRoCE’. For example:
# isi network interfaces list -v

        IP Addresses: 10.219.64.16, 10.219.64.22

                 LNN: 1

                Name: 100gige-1

            NIC Name: mce3

              Owners: groupnet0.subnet0.pool0, groupnet0.subnet0.testpool1

              Status: Up

             VLAN ID: -

Default IPv4 Gateway: 10.219.64.1

Default IPv6 Gateway: -

                 MTU: 9000

         Access Zone: zone1, System

               Flags: SUPPORTS_RDMA_RRoCE

    Negotiated Speed: 40Gbps

--------------------------------------------------------------------------------

<snip>

Note that there is currently no WebUI equivalent for this CLI command.

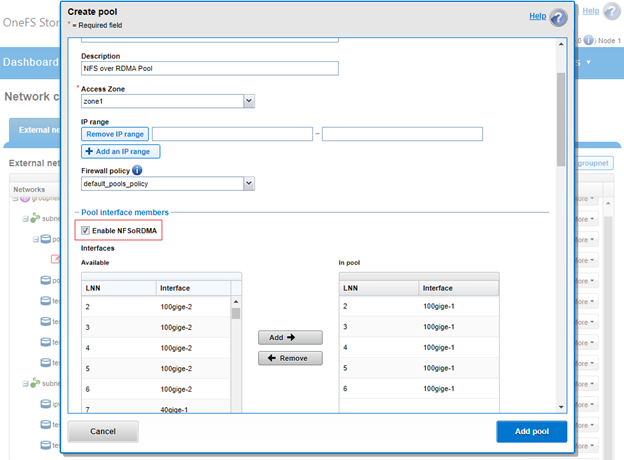
  1. Next, create an IP pool that contains the ROCEv2 capable network interface(s) from the OneFS CLI. For example:
# isi network pools create --id=groupnet0.40g.40gpool1 --ifaces=1:40gige- 1,1:40gige-2,2:40gige-1,2:40gige-2,3:40gige-1,3:40gige-2,4:40gige-1,4:40gige-2 --ranges=172.16.200.129-172.16.200.136 --access-zone=System --nfs-rroce-only=true

Or via the OneFS WebUI by navigating to Cluster management > Network configuration:

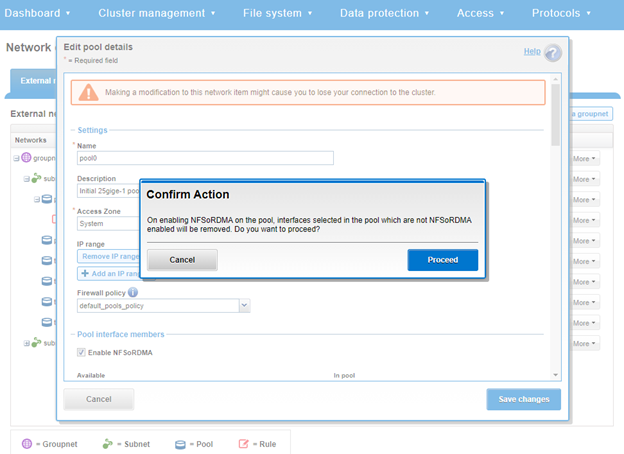
Note that, when configuring the ‘Enable NFSoRDMA’ setting, the following action confirmation warning will be displayed informing that any non-RDMA-capable NICs will be automatically removed from the pool:

  1. Enable the cluster NFS service, the NFSoRDMA functionality (transport), and the desired protocol versions, by running the following CLI commands.
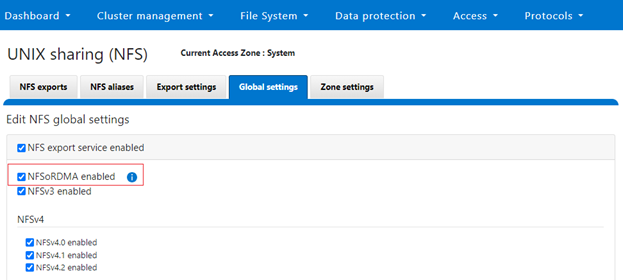
# isi nfs settings global modify –-nfsv3-enabled=true -–nfsv4-enabled=true -–nfsv4.1-enabled=true -–nfsv4-enabled=true --nfs-rdma-enabled=true
# isi services nfs enable

In the example above, all the supported NFS protocol versions (v3, v4.0, v4.1, and v4.2) have been enabled in addition to RDMA transport.

Similarly, from the WebUI under Protocols > UNIX sharing (NFS) > Global settings.

Note that OneFS checks to ensure that the cluster’s NICs are RDMA-capable before allowing the NFSoRDMA setting to be enabled.

  1. Finally, create the NFS export via the following CLI syntax:
# isi nfs exports create --paths=/ifs/export_rdma

Or from the WebUI under Protocols > UNIX sharing (NFS) > NFS exports.

Note that NFSv4.x over RDMA will only work after an upgrade to OneFS 9.8 has been committed. Also, if the NFSv3 over RDMA ‘nfsv3-rdma-enabled’ configuration option was already enabled before upgrading to OneFS 9.8 , this will be automatically converted with no client disruption to the new ‘nfs-rdma-enabled=true’ setting, which applies to both NFSv3 and NFSv4.