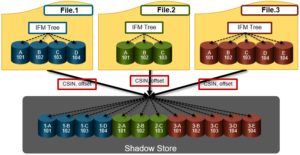
OneFS SmartDedupe – Monitoring & Management

As we saw in the previous article in this series, SmartDedupe operates at the directory level, targeting all files and directories underneath one or more root directories.

SmartDedupe not only deduplicates identical blocks in different files, it also matches and shares identical blocks within a single file. For two or more files to be deduplicated, the two following attributes must be the same:

  • Disk pool policy ID
  • Protection policy

If either of these attributes differs between two or more matching files, their common blocks will not be shared. SmartDedupe also does not deduplicate files that are less than 32 KB or smaller, because the resource consumption overhead outweighs the small storage efficiency benefit.

There are two principal elements to managing deduplication in OneFS. The first is the configuration of the SmartDedupe process itself. The second involves the scheduling and execution of the Dedupe job. These are both described below.

SmartDedupe works on data sets which are configured at the directory level, targeting all files and directories under each specified root directory. Multiple directory paths can be specified as part of the overall deduplication job configuration and scheduling.
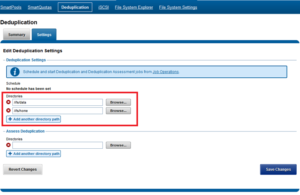
Similarly, the dedupe directory paths can also be configured from the CLI via the isi dedupe settings modify command. For example, the following command targets /ifs/data and /ifs/home for deduplication:

# isi dedupe settings modify --paths /ifs/data, /ifs/home

Bear in mind that the permissions required to configure and modify deduplication settings are separate from those needed to run a deduplication job. For example, a user’s role must have job engine privileges to run a deduplication job. However, in order to configure and modify dedupe configuration settings, they must have the deduplication role privileges.

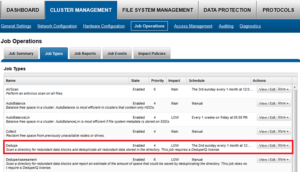
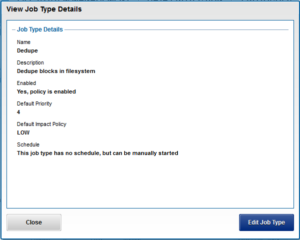
SmartDedupe can be run either on-demand (started manually) or via a predefined schedule. This is configured via the cluster management ‘Job Operations’ section of the WebUI.
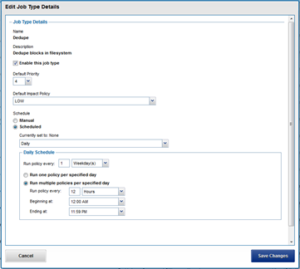
The recommendation is to schedule and run deduplication during off-hours, when the rate of data change on the cluster is low. If clients are continually writing to files, the amount of space saved by deduplication will be minimal because the deduplicated blocks are constantly being removed from the shadow store.

To modify the parameters of the dedupe job itself, run the isi job types modify command. For example, the following command configures the deduplication job to be run every Saturday at 12:00 AM:

# isi job types modify Dedupe --schedule "Every Saturday at 12:00 AM"

For most clusters, after the initial deduplication job has completed, the recommendation is to run an incremental deduplication job once every two weeks.

The amount of disk space currently saved by SmartDedupe can be determined by viewing the cluster capacity usage chart and deduplication reports summary table in the WebUI. The cluster capacity chart and deduplication reports can be found by navigating to File System Management > Deduplication > Summary.
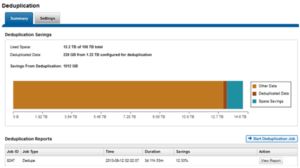
In addition to the bar chart and accompanying statistics (above), which graphically represents the data set and space efficiency in actual capacity terms, the dedupe job report overview field also displays the SmartDedupe savings as a percentage.

SmartDedupe space efficiency metrics are also provided via the ‘isi dedupe stats’ CLI command:

# isi dedupe stats

      Cluster Physical Size: 676.8841T

          Cluster Used Size: 236.3181T

  Logical Size Deduplicated: 29.2562T

             Logical Saving: 25.5125T

Estimated Size Deduplicated: 42.5774T

  Estimated Physical Saving: 37.1290T

In OneFS 8.2.1 and later, SmartQuotas has been enhanced to report the capacity saving from deduplication, and data reduction in general, as a storage efficiency ratio. SmartQuotas reports efficiency as a ratio across the desired data set as specified in the quota path field. The efficiency ratio is for the full quota directory and its contents, including any overhead, and reflects the net efficiency of compression and deduplication. On a cluster with licensed and configured SmartQuotas, this efficiency ratio can be easily viewed from the WebUI by navigating to ‘File System > SmartQuotas > Quotas and Usage’.
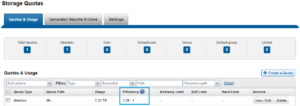
Similarly, the same data can be accessed from the OneFS command line via is ‘isi quota quotas list’ CLI command. For example:

# isi quota quotas list

Type      AppliesTo  Path           Snap  Hard  Soft  Adv  Used    Efficiency

-----------------------------------------------------------------------------

directory DEFAULT    /ifs           No    -     -     -    2.3247T 1.29 : 1

-----------------------------------------------------------------------------

Total: 1

More detail, including both the physical (raw) and logical (effective) data capacities, is also available via the ‘isi quota quotas view <path> <type>’ CLI command. For example:

# isi quota quotas view /ifs directory

                        Path: /ifs

                        Type: directory

                   Snapshots: No

 Thresholds Include Overhead: No

                       Usage

                           Files: 4245818

         Physical(With Overhead): 1.80T

           Logical(W/O Overhead): 2.33T

Efficiency(Logical/Physical): 1.29 : 1

…

To configure SmartQuotas for data efficiency reporting, create a directory quota at the top-level file system directory of interest, for example /ifs. Creating and configuring a directory quota is a simple procedure and can be performed from the WebUI, as follows:

Navigate to ‘File System > SmartQuotas > Quotas and Usage’ and select ‘Create a Quota’. In the create pane, field, set the Quota type to ‘Directory quota’, add the preferred top-level path to report on, select ‘File system logical size’ for Quota Accounting, and set the Quota Limits to ‘Track storage without specifying a storage limit’. Finally, select the ‘Create Quota’ button to confirm the configuration and activate the new directory quota.
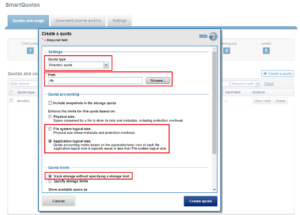
The efficiency ratio is a single, current-in time efficiency metric that is calculated per quota directory and includes the sum of SmartDedupe plus in-line data reduction. This is in contrast to a history of stats over time, as reported in the ‘isi statistics data-reduction’ CLI command output, described above. As such, the efficiency ratio for the entire quota directory will reflect what is actually there. via the platform API as of OneFS 8.2.2.

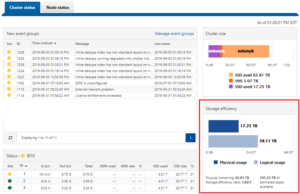
The OneFS WebUI cluster dashboard also now displays a storage efficiency tile, which shows physical and logical space utilization histograms and reports the capacity saving from in-line data reduction as a storage efficiency ratio. This dashboard view is displayed by default when opening the OneFS WebUI in a browser and can be easily accessed by navigating to ‘File System > Dashboard > Cluster Overview’.
The Job Engine parallel execution framework provides comprehensive run time and completion reporting for the deduplication job.

Once the dedupe job has started working on a directory tree, the resulting space savings it achieves can be monitored in real time. While SmartDedupe is underway, job status is available at a glance via the progress column in the active jobs table. This information includes the number of files, directories and blocks that have been scanned, skipped and sampled, and any errors that may have been encountered.

Additional progress information is provided in an Active Job Details status update, which includes an estimated completion percentage based on the number of logical inodes (LINs) that have been counted and processed.
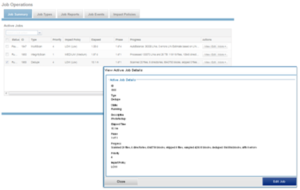
Once the SmartDedupe job has run to completion, or has been terminated, a full dedupe job report is available. This can be accessed from the WebUI by navigating to Cluster Management > Job Operations > Job Reports, and selecting ‘View Details’ action button on the desired Dedupe job line item.
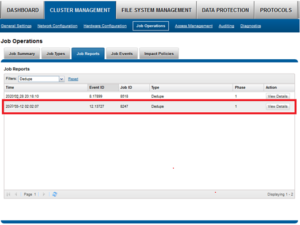
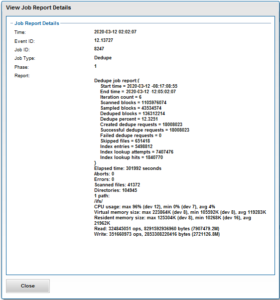
The job report contains the following relevant dedupe metrics.

Report Field Description of Metric
Start time When the dedupe job started.
End time When the dedupe job finished.
Scanned blocks Total number of blocks scanned under configured path(s).
Sampled blocks Number of blocks that OneFS created index entries for.
Created dedupe requests Total number of dedupe requests created. A dedupe request gets created for each matching pair of data blocks. For example, three data blocks all match, two requests are created: One request to pair file1 and file2 together, the other request to pair file2 and file3 together.
Successful dedupe requests Number of dedupe requests that completed successfully.
Failed dedupe requests Number of dedupe requests that failed. If a dedupe request fails, it does not mean that the also job failed. A deduplication request can fail for any number of reasons. For example, the file might have been modified since it was sampled.


Skipped files Number of files that were not scanned by the deduplication job. The primary reason is that the file has already been scanned and hasn’t been modified since. Another reason for a file to be skipped is if it’s less than 32KB in size. Such files are considered too small and don’t provide enough space saving benefit to offset the fragmentation they will cause.
Index entries Number of entries that currently exist in the index.
Index lookup attempts Cumulative total number of lookups that have been done by prior and current deduplication jobs. A lookup is when the deduplication job attempts to match a block that has been indexed with a block that hasn’t been indexed.
Index lookup hits Total number of lookup hits that have been done by earlier deduplication jobs plus the number of lookup hits done by this deduplication job. A hit is a match of a sampled block with a block in index.

Dedupe job reports are also available from the CLI via the ‘ isi job reports view <job_id> ’ command.

From an execution and reporting stance, the Job Engine considers the ‘dedupe’ job to comprise of a single process or phase. The Job Engine events list will report that Dedupe Phase1 has ended and succeeded. This indicates that an entire SmartDedupe job, including all four internal dedupe phases (sampling, duplicate detection, block sharing, & index update), has successfully completed. For example:

# isi job events list --job-type dedupe

Time                Message

------------------------------------------------------

2020-09-01T13:39:32 Dedupe[1955] Running

2020-09-01T13:39:32 Dedupe[1955] Phase 1: begin dedupe

2020-09-01T14:20:32 Dedupe[1955] Phase 1: end dedupe

2020-09-01T14:20:32 Dedupe[1955] Phase 1: end dedupe

2020-09-01T14:20:32 Dedupe[1955] Succeeded

For deduplication reporting across multiple OneFS clusters, SmartConnect is also integrated with Isilon’s InsightIQ cluster reporting and analysis product. A report detailing the space savings delivered by deduplication is available via InsightIQ’s File Systems Analytics module.
Enable RFC2307 for OneFS and Active Directory

Windows Active Directory(AD) supports authenticate the Unix/Linux clients with the RFC2307 attributes ((e.g. GID/UID etc.). The Isilon OneFS is also RFC2307 compatible. So it is recommended to use Active Directory as the OneFS authentication provider to enable the centric identity management and authentication. This post will talk about the configurations to integrate AD and OneFS with RFC2307 compatible. In this post, Windows 2012R2 AD and OneFS 8.1.0 is used to show the process.

Prepare Windows 2012R2 AD for Unix/Linux

Unlike Windows 2008, Windows 2012 comes equipped with the UNIX attributes already loaded within the schema. And as of this release the Identity Services for UNIX feature has been deprecated, although still available until Windows 2016 the NIS and Psync services are not required.

The UI elements to configure RFC2307 attributes are not as nice as they were in 2008 since the IDMU MMC snap-in has also been depreciated. So we will install the IDMU component first to make it easier to configure the UID/GID attributes. With the following command, you can install the IDMU component in Windows 2012R2.

  • To install the administration tools for Identity Management for UNIX.
dism.exe /online /enable-feature /featurename:adminui /all
  • To install Server for NIS.
dism.exe /online /enable-feature /featurename:nis /all
  • To install Password Synchronization.
dism.exe /online /enable-feature /featurename:psync /all

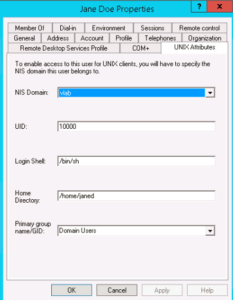
After restarting the AD, you can see the UI element(UNIX Attributes) tab same as Windows 2008R2, shown as below. Now you can configure your AD users/groups to compatible with Unix/Linux environment. Recommended to configure the UID/GID to 10000 and above, meanwhile, do not overlap with the OneFS default auto-assign UID/GID range (1000000 – 2000000).

Configure the OneFS  Active Directory authentication provider to enable RFC2307

For mixed mode(Unix/Linux/Windows) authentication operations, there are several advanced options Active Directory authentication provider will need to be enabled.

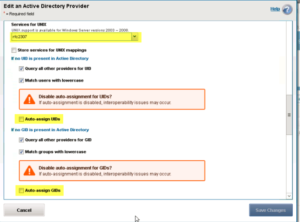
  • Services for UNIX: rfc2307 – This leverages the Identity Management for UNIX services in the Active Directory schema
  • Auto-Assign UIDs: No – OneFS by default will generate pseudo UIDs for users it cannot match to SIDs this can cause potential user mapping issues.
  • Auto-Assign GIDs: No – OneFS by default will generate pseudo GIDs for groups it cannot match to SIDs as with the user mapping equally a group-mapping mismatch could occur.

You can do this configuration using both WebUI and CLI, with command isi auth ads modify EXAMPLE.LOCAL –sfu-support=rfc2307 –allocate-uids=false –allocate-gids=false. Or change the settings from the WebUI, shown below:

After the configurations above, the OneFS can use Active Directory as identity source for Unix/Linux client, and in this method, you can also simplify the identity management, as you have a centric identity source (AD) to be used for both Unix/Linux clients and Windows clients.

Configure SSH Multi-Factor Authentication on OneFS 8.2 Using Duo

SSH Multi-Factor Authentication (MFA) with Duo is a new feature introduced in OneFS 8.2. Currently, OneFS supports SSH MFA with Duo service through SMS (short message service), phone callback, and Push notification via the Duo app. This blog will cover the configuration to integrate OneFS SSH MFA with Duo service.

Duo provides service to many kinds of applications, like Microsoft Azure Active Directory, Cisco Webex, Amazon Web Services and etc. For an OneFS cluster, it is represented as a “Unix Application” entry.  To integrate OneFS with Duo service, configuration is required on Duo service and OneFS cluster. Before configuring OneFS with Duo, you need to have Duo account. In this blog, we used a trial version account for demonstration purposes.

Failback mode

By default, the SSH failback mode for Duo in OneFS is “safe”, which will allow common authentication if Duo service is not available. The “secure” mode will deny SSH access if Duo service is not available, including the bypass users, because the bypass users are defined and validated in the Duo service. To configure the failback mode in OneFS, specify –failmode  option using command isi auth duo modify .

Exclusion group

By default, all groups are required to use Duo unless the Duo group is configured to bypass Duo auth. The groups option allows you to exclude or specify dedicated user groups from using Duo service authentication. This method provides a way to configure users that can still SSH into the cluster even when the Duo service is not available and failback mode is set to “secure”. Otherwise, all users may be locked out of cluster in this situation.

To configure the exclusion group option, add an exclamation character “!” before the group name and preceded by an asterisk to ensure that all other groups use Duo service. An example is shown as below:

# isi auth duo modify --groups=”*,!groupname”

Note: zsh shell requires the “!” to be escaped. In this case, the example above should be changed to isi auth duo modify –groups=”*,\!groupname”

Prepare Duo service for OneFS

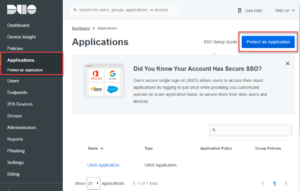
  1. Use your new Duo account to log into the Duo Admin Panel. Select the “Application” item from the left menu. And then click “Protect an Application”, Shown in Figure 1.
Figure 1 Protect an Application
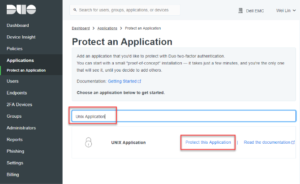
  1. Type “Unix Application” in the search bar. Click “Protect this Application” to create a new Unix Application entry. See Figure 2.
Figure 2 Search for Unix Application
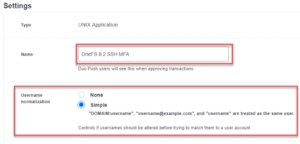
  1. Scroll down the creation page and find the “Settings” section. Type a name for the new Unix Application. It is recommended to use a name which can recognize your OneFS cluster, shown as Figure 3. In this section, you can also find the Duo’s name normalization setting. By default, Duo username normalization is not AD aware, it will alter incoming usernames before trying to match them to a user account. For example, “DOMAIN\username”, “username@domain.com“, and “username” are treated as the same user. For other options, refer to here.
Figure 3 Unix Application Name
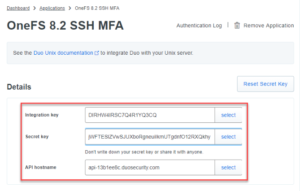
  1. Check the required information for OneFS under “Details” section, including API hostnameintegration key, and secret key. Shown as Figure 4
Figure 4 Required Information for OneFS
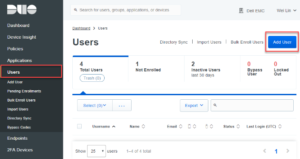
  1. Manually enroll a user. In this example, we will create a user named “admin” which is the default OneFS administrator user. Switch the menu item to “Users” and click “Add User” button, shown as Figure 5. For details about user enrollment on Duo service, refer to Duo documentation Enrolling Users.
Figure 5 User Enrollment
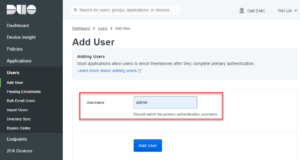
  1. Type the user name, shown as Figure 6.
Figure 6 Manually User Enrollment
  1. Find the “Phones” settings in the user page and click “Add Phone” button to add a device for the user. Shown in Figure 7.
Figure 7 Add Phone for User
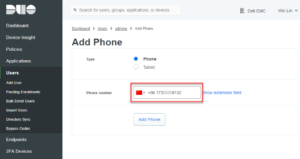
  1. Type your phone number.
Figure 8 Add New Phone
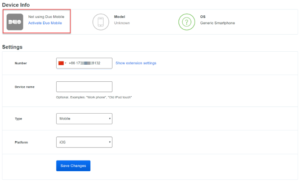
  1. (optional) If you want to use Duo push authentication methods, you need to install Duo Mobile app in the phone and activate the Duo Mobile. As highlighted in Figure 9, click the link to activate the Duo Mobile.
Figure 9 Activate Duo Mobile

OneFS Configuration and Verification

  1. By default, the authentication setting template is set for “any”. To use OneFS with Duo service, the authentication setting template must not be set to “any” or “custom”. It should be set to “password”, “publickey”, or “both”. In this example, we configure the setting to “password”, which will use user password and Duo for SSH MFA. Shown as the following command:
# isi ssh modify --auth-settings-template=password
  1. Confirm the authentication method using the following command:
# isi ssh settings view| grep "Auth Settings Template"
      Auth Settings Template: password
  1. Configure required Duo service information and enable it for SSH MFA, shown as below, use the information when we set up Unix Application in Duo, including API hostname, integration key, and secret key.
# isi auth duo modify --enabled=true --failmode=safe --host=api-13b1ee8c.duosecurity.com --ikey=DIRHW4IRSC7Q4R1YQ3CQ --set-skey

Enter skey:

Confirm:
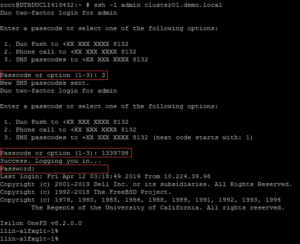
  1. Verify SSH MFA using the user “admin”. An SMS passcode and user’s password are used for authentication in this example, shown as Figure 10.
Figure 10 SSH MFA Verification

OneFS SmartDedupe

Received several questions from the field recently around OneFS SmartDedupe, so this seemed like a useful topic to delve into. For the first article, we’ll dig into SmartDedupe’s underlying architecture.

In essence, SmartDedupe helps to maximize the storage efficiency of a cluster by decreasing the amount of physical storage required to house any given dataset. Efficiency is achieved by scanning the on-disk data for identical blocks and then eliminating the duplicates. This approach is commonly referred to as post-process, or asynchronous, deduplication. This is in contrast to the real time, in-line dedupe that’s performed on certain nodes as part of OneFS in-line data reduction. In-line DR will be explored in a future series of blog article. That said…

On discovering duplicate blocks, SmartDedupe moves a single copy of those blocks to a special set of files known as shadow stores. During this process, duplicate blocks are removed from the actual files and replaced with pointers to the shadow stores.

With post-process deduplication, new data is first stored on the storage device and then a subsequent process analyzes the data looking for commonality. This means that initial file write or modify performance is not impacted, since no additional computation is required in the write path.

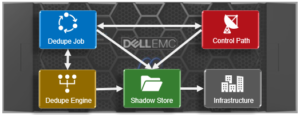
Under the covers, SmartDedupe is comprised of five principle components:

  • Deduplication Control Path
  • Deduplication Job
  • Deduplication Engine
  • Shadow Store
  • Deduplication Infrastructure

The SmartDedupe job  is a highly distributed background process that orchestrates deduplication across all the nodes in the cluster. Job control encompasses file system scanning, detection and sharing of matching data blocks, in concert with the Deduplication Engine.

The SmartDedupe control path is the user interface portion, comprising the OneFS WebUI, command line interface and platform API, and is responsible for managing the configuration, scheduling and control of the deduplication job.

SmartDedupe works on data sets which are configured at the directory level, targeting all files and directories under each specified root directory. Multiple directory paths can be specified as part of the overall deduplication job configuration and scheduling. By design, the deduplication job will automatically ignore (not deduplicate) the reserved cluster configuration information located under the /ifs/.ifsvar/ directory, and also any file system snapshots.

It’s worth noting that the RBAC permissions required to configure and modify the deduplication settings are separate from those needed to actually run a deduplication job. For example, a user’s role must have job engine privileges to run a deduplication job. However, in order to configure and modify dedupe configuration settings, they must have the deduplication role privileges.

‘Fingerprinting’ is the part of the dedupe process where unique digital signatures, or fingerprints, are calculated using the SHA-1 hashing algorithm, one for each 8KB data block in the sampled set.

When SmartDedupe runs for the first time, it scans the data set and selectively samples blocks from it, creating the fingerprint index. This index contains a sorted list of the digital fingerprints, or hashes, and their associated blocks. After the index is created, the fingerprints are checked for duplicates. When a match is found, during the sharing phase, a byte-by-byte comparison of the blocks is performed to verify that they are absolutely identical and to ensure there are no hash collisions. Then, if they are determined to be identical, the block’s pointer is updated to the already existing data block and the new, duplicate data block is released.

Hash computation and comparison is only utilized during the sampling phase. For the actual block sharing phase, full data comparison is employed. SmartDedupe also operates on the premise of variable length deduplication, where the block matching window is increased to encompass larger runs of contiguous matching blocks.

As we saw in the previous  article, OneFS shadow stores are file system containers that allow data to be stored in a sharable manner. This allows files to contain both physical data and pointers, or references, to shared blocks in shadow stores.

For example, consider the shadow store information for a regular, undeduped file:

# isi get -DDD file.orig | grep –i shadow

*  Shadow refs:        0

         zero=36 shadow=0 ditto=0 prealloc=0 block=28

A second copy of this file is then created and then deduped:

# isi get -DDD file.* | grep -i shadow

*  Shadow refs:        28

         zero=36 shadow=28 ditto=0 prealloc=0 block=0

*  Shadow refs:        28

         zero=36 shadow=28 ditto=0 prealloc=0 block=0

As we can see, the block count of the original file has now become zero and the shadow block count for both the original file and it’s and copy has become ‘28′. Additionally, if another file copy is added and deduplicated, the same shadow store info and count is reported for all three files.

It’s worth noting that, even if duplicate file(s) are removed, the original file still retains the shadow store layout.

Dedupe is performed in parallel across the cluster by the OneFS Job Engine via a dedicated deduplication job, which distributes worker threads across all nodes. This distributed work allocation model allows SmartDedupe to scale linearly as an Isilon cluster grows and additional nodes are added.

The control, impact management, monitoring and reporting of the deduplication job is performed by the Job Engine in a similar manner to other storage management and maintenance jobs on the cluster.

While deduplication can run concurrently with other cluster jobs, only a single instance of the deduplication job, albeit with multiple workers, can run at any one time. Although the overall performance impact on a cluster is relatively small, the deduplication job does consume CPU and memory resources.

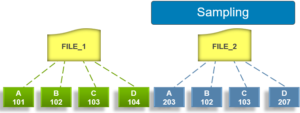
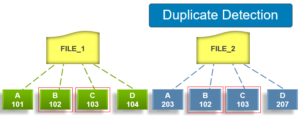
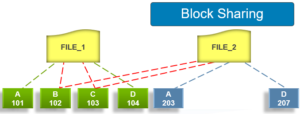
Architecturally, the duplication job, and supporting dedupe infrastructure, are made up of the following four phases:

Because the SmartDedupe job is typically long running, each of the phases are executed for a set time period, performing as much work as possible before yielding to the next phase. When all four phases have been run, the job returns to the first phase and continues from where it left off. Incremental dedupe job progress tracking is available via the OneFS Job Engine reporting infrastructure.

Phase 1 – Sampling

In the sampling phase, SmartDedupe performs a tree-walk of the configured data set in order to collect deduplication candidates for each file. The rational is that a large percentage of shared blocks can be detected with only a smaller sample of data blocks represented in the index table.

By default, the sampling phase selects one block from every sixteen blocks of a file as a deduplication candidate. For each candidate, a key/value pair consisting of the block’s fingerprint (SHA-1 hash) and file system location (logical inode number and byte offset) is inserted into the index. Once a file has been sampled, the file is flagged and won’t be re-scanned until it has been modified. This drastically improves the performance of subsequent deduplication jobs.

Phase 2 – Duplicate Detection

During the duplicate detection phase, the dedupe job scans the index table for fingerprints (or hashes) that match those of the candidate blocks.

If the index entries of two files match, a request entry is generated.  In order to improve deduplication efficiency, a request entry also contains pre and post limit information. This information contains the number of blocks in front of and behind the matching block which the block sharing phase should search for a larger matching data chunk, and typically aligns to a OneFS protection group’s boundaries.

Phase 3 – Block Sharing

For the block sharing phase the deduplication job calls into the shadow store library and dedupe infrastructure to perform the sharing of the blocks.

Multiple request entries are consolidated into a single sharing request, which is processed by the block sharing phase, and ultimately results in the deduplication of the common blocks. The file system searches for contiguous matching regions before and after the matching blocks in the sharing request; if any such regions are found, they will also be shared. Blocks are shared by writing the matching data to a common shadow store and creating references from the original files to this shadow store.

Phase 4 – Index Update

The index table is populated with the sampled and matching block information gathered during the previous three phases. After a file has been scanned by the dedupe job, OneFS may not find any matching blocks in other files on the cluster. Once a number of other files have been scanned, if a file continues to not share any blocks with other files on the cluster, OneFS will remove the index entries for that file. This helps prevent OneFS from wasting cluster resources searching for unlikely matches. SmartDedupe scans each file in the specified data set once, after which the file is marked, preventing subsequent dedupe jobs from rescanning the file until it has been modified.

HDFS Service not enabled by default in 9.0 OneFS – java.net.ConnectException: Connection refused

In OneFS 9.0 by default Services are not enabled by default, this also includes NFS, SMB, S3 and HDFS.

When attempting to use HDFS against an 9.0 cluster, the Hadoop client may see the following error on all HDFS access.

[cdh6-1-user1@centos-10 ~]$ hadoop fs -ls /

ls: Call From centos-10.foo.com/10.246.156.21 to cdh6.foo.com:8020 failed on connection exception: java.net.ConnectException: Connection refused; For more details see:  http://wiki.apache.org/hadoop/ConnectionRefused


This is because the HDFS service is not enabled on HDFS and therefore connections are refused.

When looking at the cluster we see the Service is Disabled as by design.

# isi services -al | grep hdfs

Available Services:

  hdfs                 HDFS Server                              Disabled


But when looking at the WebUI or the CLI, this misleading as the Service appears enabled

cascade-1# isi hdfs settings view

                 Service: Yes

      Default Block Size: 128M

   Default Checksum Type: none

     Authentication Mode: simple_only

          Root Directory: /ifs/data

         WebHDFS Enabled: Yes

           Ambari Server:

         Ambari Namenode:

             ODP Version:

    Data Transfer Cipher: none

Ambari Metrics Collector:

To enable the Service and allow HDFS connectivity, enable the hdfs service directly from the CLI.

isi services hdfs enable

# isi services -al | grep hdfs

Available Services:

  hdfs                 HDFS Server                              Enabled


Now the service is Enabled, HDFS operation can occur.

[cdh6-1-user1@centos-10 ~]$ hadoop fs -ls /

Found 11 items

-rwxrwxrwx   3 root         wheel               1 2020-02-20 11:38 /1.txt

-rwxrwxrwx   3 hbase        yarn               17 2020-02-20 11:31 /THIS_IS_ISILON_zone1-hadoop.txt

drwxr-xr-x   - hbase        hbase               0 2020-05-26 14:19 /_hbase

-rw-r--r--   3 root         wheel               0 2020-09-14 17:46 /cdh6_zone.txt

drwxr-xr-x   - hbase        hbase               0 2020-08-11 11:47 /hbase

-rw-r--r--   3 root         wheel               0 2020-09-14 17:46 /isilon_9.txt

drwxrwxrwx   - cdh6-1-user1 supergroup          0 2020-03-10 15:20 /nfs

drwxrwxr-x   - solr         solr                0 2019-12-12 13:29 /solr

drwxrwxrwt   - hdfs         supergroup          0 2019-12-12 13:29 /tmp

drwxr-xr-x   - hdfs         supergroup          0 2020-01-15 12:32 /user

-rw-r--r--   3 root         wheel               0 2020-09-14 17:47 /zone-3.txt


As an FYI: NFS, SMB & S3 are also Disabled by default in 9.0, but the Service checkbox/status can be managed via the WebUI Service enabled box on these services.

# isi services -al | grep smb

   smb                  SMB Service                              Disabled

Enable the Service via the WebUI:

# isi services -al | grep smb

   smb                  SMB Service                              Enabled

OneFS Shadow Stores – Part 2

In the previous article, we looked at an overview of the shadow store and its three primary use cases within OneFS. Now, let’s look at shadow store mechanics, reporting, and job engine integration.

Under the hood, OneFS provides a SIN cache, which helps facilitate shadow store allocations. This provides a mechanism to create a shadow store on demand when required, and then cache that shadow store in memory on the local node so that it can be shared with subsequent allocators. The SIN cache separates stores by disk pool, protection policy and whether or not the store is a container.

When referencing data in a shadow store, blocks are identified with a SIN (shadow identification number) and LBN pair. A file with shadow store blocks will have protection group (PG) information that points to SINs. For example:

# isi get -DD /ifs/data/file.dup | head -100

POLICY  W  LEVEL PERFORMANCE COAL  ENCODING      FILE              IADDRS

default  4+2/2 concurrency on    UTF-8         file.dup     <1,6,35008000:512>, <2,3,236753920:512>, <3,5,302813184:512> 

...

PROTECTION GROUPS

       lbn 0: 4+2/2

               4000:0001:0067:0009@0#64

               0,0,0:8192#32

The ‘isi get’ CLI command will display information about a particular shadow store when using the –L flag and the SIN:

# isi get –DDL <SIN>
# isi get -DDL 4000:0001:003c:0005 | head -20

isi: Could not find a path to LIN:0x40000001003c0005/SNAP:18446744073709551615: Invalid argument

No valid path for LIN 0x40000001003c0005

POLICY  W  LEVEL PERFORMANCE COAL  ENCODING      FILE              IADDRS

+2:1  18   4+2/2 concurrency off   N/A           <unlinked>        <1,9,168098816:512>, <2,6,269270016:512>, <3,6,33850368:512> ct:  1337648672 rt: 0

*************************************************

* IFS inode: [ 1,9,168098816:512, 2,6,269270016:512, 3,6,33850368:512 ]

*************************************************

*

*  Inode Version:      6

*  Dir Version:        2

*  Inode Revision:     1

*  Inode Mirror Count: 3

*  Recovered Flag:     0

*  Recovered Groups:   0

*  Link Count:         2

*  Size:               133660672

*  Mode:               0100000

*  Flags:              0

*  Physical Blocks:    19251

*  LIN:                4000:0001:003c:0005

The protection group information for a SIN will also contain ‘reference count’ (refcount) information.

lbn 384: 4+2/2

               1,4,5054464:8192#16

               1,7,450527232:8192#16

               2,9,411435008:8192#16

               2,11,556056576:8192#16

               3,5,678928384:8192#16

               3,8,579436544:8192#16

               REF(    384): { 3, 3, 3, 3, 3, 3, 3, 3 }

               REF(    392): { 3, 3, 3, 3, 3, 3, 3, 3 }

               REF(    400): { 3, 3, 3, 3, 3, 3, 3, 3 }

               REF(    408): { 3, 3, 3, 3, 3, 3, 3, 3 }

               REF(    416): { 3, 3, 3, 3, 3, 3, 3, 3 }

               REF(    424): { 3, 3, 3, 3, 3, 3, 3, 3 }

               REF(    432): { 3, 3, 3, 3, 3, 3, 3, 3 }

               REF(    440): { 3, 3, 3, 3, 3, 3, 3, 3 }

The isi_sstore stats command can be used to display aggregate container statistics, alongside those of regular, or block, shadow stores. The output also includes storage efficiency stats. For example:

# isi_sstore stats

Block SIN stats:

33 GB user data takes 6 MB in shadow stores, using 11 MB physical space.

10792K physical average per shadow store.


5708.92 refs per block.

Reference efficiency 99.9825%.

Storage efficiency 57.0892%


Container SIN stats:

0 B user data takes 0 B in shadow stores, using 0 B physical space.


Raw counts={ type 0 num_ss=1 lsize=6209536 pblk=1349 refs=4328123 }{ type 1 num_ss=0 lsize=0 pblk=0 refs=0 }

Running the ‘isi_sstore list’ command in its verbose (-v) form also displays the type of SIN, the ‘fragmentation score’ (frag score) metric and whether a container is ‘underfull’, amongst other things:

# isi_sstore list –v | head –n 2

SIN                 lsize   psize    refs    filesize date         sin type underfull frag score

4000:0001:0002:0000 6209536 11003392 4328123 2121080K Jan 29 21:09 block    no 0.01

When it comes to the job engine, there are several jobs that interact with and cater to shadow stores – in addition to the dedupe job and SmartPools for small file packing. These include:

The Flexprotect job has two phases which are of particular relevance to shadow stores.

  1. The ‘LIN reverify’ phase: Metatree transfers are allowed, even if a file is under repair. Since metatree transfer goes in opposite direction from linscan, the LIN table needs to be re-verified to ensure a file is not missed during the first LIN verify. Note that both LIN verify and reverify will scan only the LIN potion of the LIN table.
  2. The ‘SIN verify’ phase: Once it’s determined that all the LINs are good, the SINs are inspected to ensure they are all correct. This is necessary since a cloning operation during Flexprotect, for example, might have moved an un-repaired block to a shadow store. This phase scans only the SIN portion of the table.

In general, the collect job isn’t required for (logical) blocks stored in shadow stores isn’t, since the freeing system is resilient to failure. The one exception is that references from files intentionally leaked by removing a LIN table entry to a file will not be freed, so collect will deal with these.

The ShadowStoreDelete job examines each shadow store for allocated blocks that have no external references (other than the shadow store’s reference) and frees the blocks. If all blocks in a shadow store have been freed then the shadow store is removed. A good practice is to run the ShadowStoreDelete job prior to running IntegrityScan on clusters with file clones and/or running SmartDedupe or small file storage efficiency jobs.

The ShadowStoreProtect job updates the protection level of shadow stores which are referenced by a LIN with a higher requested protection. Shadow stores that require a protection level change are added to a persistent queue (PQ) and consumed by this job.

There is also a SinReport job engine job which can be run to find LINs with SINs within the file system.

All the jobs which can change the protection contain an additional phase for SINs. For every LIN pointing to a particular SIN, if the LINs new protection policy is higher than that of the shadow store, it will update the SIN’s protection policy. In the SIN phase, the highest recorded policy will be used to protect the shadow store. In the case of disk pools, shadow stores may inherit the effective protection from the disk pool but not the disk pool itself.

As we have seen, to a large degree shadow stores store data like regular files. However, blocks from regular files are moved or copied to shadow stores and the original blocks in the source file are replaced with references to the blocks in the shadow store. If any of the logical blocks in the source file are written to, a copy on write (COW) event is triggered, which causes a local allocation of a block for the source file to replace the shadow reference. There may be multiple files with references to the same logical block in a shadow store. When all external references to a block in a shadow store have been released the block in the shadow store is now unused and will never be referenced again. The background garbage collection job, ShadowStoreDelete, periodically scans all the shadow stores and frees these unreferenced blocks. Once all the blocks in a shadow store are released, the shadow store itself can then be removed.

Be aware that files which reference shadow stores may also behave differently from regular files in that reading shadow-store references can be slower than reading data directly. Specifically, reading non-cached shadow-store references is slower than reading non-cached data. Reading cached shadow-store references takes no more time than reading cached data.

When files that reference shadow stores are replicated to another Isilon cluster or backed up via NDMP, the shadow stores are not transferred to the target Isilon cluster or backup device. The files are transferred as if they contained the data that they reference from shadow stores. On the target Isilon cluster or backup device, the files consume the same amount of space as if they had not referenced shadow stores.

When OneFS creates a shadow store, OneFS assigns the shadow store to a storage pool of a file that references the shadow store. If you delete the storage pool that a shadow store resides on, the shadow store is moved to a pool occupied by another file that references the shadow store.

OneFS does not delete a shadow-store block immediately after the last reference to the block is deleted. Instead, OneFS waits until the ShadowStoreDelete job is run to delete the unreferenced block. If a large number of unreferenced blocks exist on the cluster, OneFS might report a negative deduplication savings until the ShadowStoreDelete job is run.

Shadow stores are protected at least as much as the most protected file that references it. For example, if one file that references a shadow store resides in a storage pool with +2 protection and another file that references the shadow store resides in a storage pool with +3 protection, the shadow store is protected at +3.

Quotas account for files that reference shadow stores as if the files contained the data referenced from shadow stores; from the perspective of a quota, shadow-store references do not exist. However, if a quota includes data protection overhead, the quota does not account for the data protection overhead of shadow stores.

OneFS Shadow Stores

Within OneFS, the shadow store is a class of system file that contains blocks which can be referenced by different file – thereby providing a mechanism that allows multiple files to share common data. Shadow stores were first introduced in OneFS 7.0, initially supporting Isilon file clones, and indeed there are many overlaps between cloning and deduplicating files. As we will see, a variant of shadow store is also used as a container for file packing in OneFS SFSE (Small File Storage Efficiency), often used in archive workflows such as healthcare’s PACS.

Architecturally, each shadow store can contain up to 256 blocks, with each block able to be referenced by 32,000 files. If this 32KB reference limit is exceeded, a new shadow store is created. Additionally, shadow stores do not reference other shadow stores. All blocks within a shadow store must be either sparse or point at an actual data block. And snapshots of shadow stores are not allowed, since shadow stores have no hard links.

Shadow stores contain the physical addresses and protection for data blocks, just like normal file data. However, a fundamental difference between a shadow stores and a regular file is that the former doesn’t contain all the metadata typically associated with traditional file inodes. In particular, time-based attributes (creation time, modification time, etc) are explicitly not maintained.

Consider the shadow store information for a regular, undeduped file (file.orig):

# isi get -DDD file.orig | grep –i shadow

*  Shadow refs:        0

         zero=36 shadow=0 ditto=0 prealloc=0 block=28

A second copy of this file (file.dup) is then created and then deduplicated:

# isi get -DDD file.* | grep -i shadow

*  Shadow refs:        28

         zero=36 shadow=28 ditto=0 prealloc=0 block=0

*  Shadow refs:        28

         zero=36 shadow=28 ditto=0 prealloc=0 block=0

As we can see, the block count of the original file has now become zero and the shadow count for both the original file and its copy is incremented to ‘28′. Additionally, if another file copy is added and deduplicated, the same shadow store info and count is reported for all three files. It’s worth noting that even if the duplicate file(s) are removed, the original file will still retain the shadow store layout.

Each shadow store has a unique identifier called a shadow inode number (SIN). But, before we get into more detail, here’s a table of useful terms and their descriptions:

Element Description
Inode Data structure that keeps track of all data and metadata (attributes, metatree blocks, etc.) for files and directories in OneFS
LIN Logical Inode Number uniquely identifies each regular file in the filesystem.
LBN Logical Block Number  identifies the block offset for each block in a file
IFM Tree or Metatree Encapsulates the on-disk and in-memory format of the inode. File data blocks are indexed by LBN in the IFM B-tree, or file metatree. This B-tree stores protection group (PG) records keyed by the first LBN. To retrieve the record for a particular LBN, the first key before the requested LBN is read. The retried record may or may not contain actual data block pointers.
IDI Isi Data Integrity checksum. IDI checkcodes help avoid data integrity issues which can occur when hardware provides the wrong data, for example. Hence IDI is focused on the path to and from the drive and checkcodes are implemented per OneFS block.
Protection Group (PG) A protection group encompasses the data and redundancy associated with a particular region of file data. The file data space is broken up into sections of 16 x 8KB blocks called stripe units. These correspond to the N in N+M notation; there are N+M stripe units in a protection group.
Protection Group Record Record containing block addresses for a data stripe .There are five types of PG records: sparse, ditto, classic, shadow, and mixed. The IFM B-tree uses the B-tree flag bits, the record size, and an inline field to identify the five types of records.
BSIN Base Shadow Store, containing cloned or deduped data
CSIN Container Shadow Store, containing packed data (container or files).
SIN Shadow Inode Number is a LIN for a Shadow Store, containing blocks that are referenced by different files; refers to a Shadow Store
Shadow Extent Shadow extents contain a Shadow Inode Number (SIN), an offset, and a count.

Shadow extents are not included in the FEC calculation since protection is provided by the shadow store.

Blocks in a shadow store are identified with a SIN and LBN (logical block number).

# isi get -DD /ifs/data/file.dup | fgrep –A 4 –i “protection group”

PROTECTION GROUPS

       lbn 0: 4+2/2

               4000:0001:0067:0009@0#64

               0,0,0:8192#32

A SIN is essentially a LIN that is dedicated to a shadow store file, and SINs are allocated from a subset of the LIN range. Just as every standard file is uniquely identified by a LIN, every shadow store is uniquely identified by a SIN. It is easy to tell if you are dealing with a shadow store because the SIN will begin with 4000. For example, in the output above:

4000:0001:0067:0009

Correspondingly, in the protection group (PG) they are represented as:

  • SIN
  • Block size
  • LBN
  • Run

The referencing protection group will not contain valid IDI data (this is with the file itself). FEC parity, if required, will be computed assuming a zero block.

When a file references data in a shadow store, it contains meta-tree records that point to the shadow store. This meta-tree record contains a shadow reference, which comprises a SIN and LBN pair that uniquely identifies a block in a shadow store.

A set of extension blocks within the shadow store holds the reference count for each shadow store data block. The reference count for a block is adjusted each time a reference is created or deleted from any other file to that block. If a shadow store block’s reference count drop to zero, it is marked as deleted, and the ShadowStoreDelete job, which runs periodically, deallocates the block.

Be aware that shadow stores are not directly exposed in the filesystem namespace. However, shadow stores and relevant statistics can be viewed using the ‘isi dedupe stats’, ‘isi_sstore list’ and ‘isi_sstore stats’ command line utilities.

Cloning

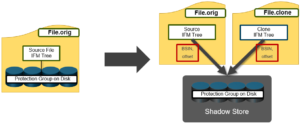
In OneFS, files can easily be cloned using the ‘cp –c’ command line utility. Shadow store(s) are created during the file cloning process, where the ownership of the data blocks is transferred from the source to the shadow store.

In some instances, data may be copied directly from the source to the newly created shadow stores. Cloning uses logical references to shadow stores, and the source and the destination data blocks refer to an offset in a shadow store. The source file’s protection group(s) are moved to a shadow store, and the PG is now referenced by both the source file and destination clone file. After cloning a file, both the source and the destination data blocks refer to an offset in a shadow store.

Dedupe

Shadow Stores are also used for both OneFS in-line deduplication and post-process SmartDedupe. The principle difference with dedupe, as compared to cloning, is the process by which duplicate blocks are detected.

Since in-line dedupe and SmartDedupe use different hashing algorithms, the indexes for each are not shared directly. However, the work performed by each dedupe solution can be leveraged by each other.  For instance, if SmartDedupe writes data to a shadow store, when those blocks are read, the read hashing component of inline dedupe will see those blocks and index them.

SmartDedupe post process dedupe is compatible with in-line data reduction and vice versa. In-line compression is able to compress OneFS shadow stores. However, for SmartDedupe to process compressed data, the SmartDedupe job will have to decompress it first in order to perform deduplication, which is an addition resource overhead.

Currently neither SmartDedupe nor in-line dedupe are immediately aware of the duplicate matches that each other finds.  Both in-line dedupe and SmartDedupe could dedupe blocks containing the same data to different shadow store locations, but OneFS is unable to consolidate the shadow blocks together.  When blocks are read from a shadow store into L1 cache, they are hashed and added into the in-memory index where they can be used by in-line dedupe.

Unlike SmartDedupe, in-line dedupe can deduplicate a run of consecutive blocks to a single block in a shadow store. In contrast, the SmartDedupe job also has to spend more effort to ensure that contiguous file blocks are generally stored in adjacent blocks in the shadow store. If not, both read and degraded read performance may be impacted.

Small File Storage Efficiency

A class of specialized shadow stores are also used as containers for storage efficiency, allowing packing of small file into larger structures that can be FEC protected.

These shadow stores differ from regular shadow stores in that they are deployed as single-reference stores. Additionally, container shadow stores are also optimized to isolate fragmentation, support tiering, and live in a separate subset of ID space from regular shadow stores. (4080:xxxx:xxxx:xxxx).